One frequently requested feature in Work Manager is for the ability to allow the user to sort the list of Work Orders displayed on their device. In Work Manager the list of work orders is displayed using a Tile List control. In this post, I will show you the steps necessary to add user sorting to the main list of Work Orders. This procedure is based on the Work Manager 6.3.1 product but can also be applied to other versions.
For this scenario, I want to add sorting on the following Work Order properties.
- WO Num
- Priority
- Type
- Due Date
The end result will be the new sort toolbar button that the user can select to choose which of these properties the work order list will be sorted by. The screen shot below shows the final result in the WPF client but it also works in iOS and Android.

Adding user sorting to the work orders tile list
To make this work we will need a new property in the underlying collection object. For Work Manager, this is the WorkOrder object. We will add a new String property to the WorkOrder object.

Next we need to add a transaction to the WorkOrder object to update the new CurrentSort property. Repeat the following steps for each of the properties that the user can select (WO Num, Priority, Type, Due Date).
Create Transaction to Update CurrentSort
- Select the WorkOrder Object, Transactions Properties List and Add a new Edit Transaction

- By default all object properties are Selected. Click the Remove All button to remove all the selected properties
- Add the WONum (Key Property) to the Selected Properties
- Add the CurrentSort property to the Selected Properties
- Click Finish to be taken to the New Transaction properties
- Set the Name and Display Name properties and Save your changes.
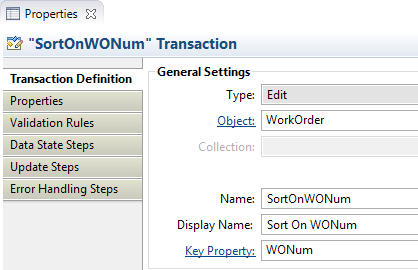
- Select the Transaction properties tab and double click on Current Sort to view the properties
- Set the Initial Value for the CurrentSort property to From a different object property
- Set the Other Property to the field you want to sort on (:> “WONum” Property)

Now that we have the transactions defined, we need to create actions to run those transactions. Again, repeat the following steps for each of the transactions that were just created (SortOnWONum, SortOnPriority, SortOnType, SortOnDueDate).
Create Action to run the Transaction
- Create a new action and set the Name, Group and For Obejct

- Select the Action Steps properties tab
- Add a Transaction Action Step and point to the Transaction previously created

- Add an Apply Action Step
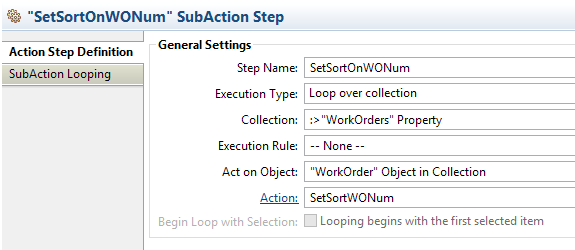
Next we need to create a looping action to execute the transaction against all the objects in the Work Order collection. Here again you will need to repeat the following steps for each of the actions that were just created (SetSortWONum, SetSortPriority, SetSortType, SetSortDueDate).
Create Action to loop over the Work Orders and set the CurrentSort property
- Create a new action and set the Name, Group and For Object

- Select the Action Steps properties tab
- Add a SubAction Action Step to loop over the work orders and call the action/transaction to update the CurrentSort property.
Once all the actions are in place we can tie it all together in the UI.
We will start with setting the sort on the List Tile control to use our new CurrentSort property. Out of the box the sort is set to WONum. Select the WorkOrderTileListView Screen Set, the WorkOrderTileListView_Detail_iPad Screen and the TileList Field. Change the Fixed Sort Property to CurrentSort.

The last step is to create the buttons for the user to choose which sort they want to apply. The buttons need to be added to the same screen containing the Tile List. We will add a new toolbar button as well as buttons for each of the looping actions.
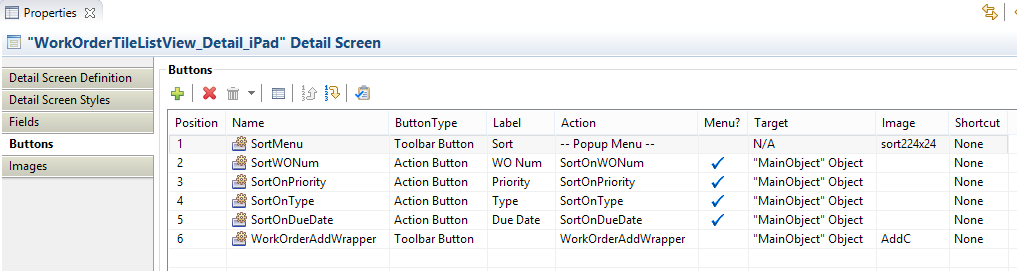
You will need to add an appropriate image to use for the toolbar button. I created a simple sort icon but you can use anything you feel is appropriate. The screen shot below shows the properties of the Toolbar button.

In addition to the popup menu, for each sort property we also need an action button to invoke the looping action (SortOnWONum, SortOnPriority, SortOnType, SortOnDueDate). Add a button for each of the actions setting the properties similar to the screen shot below.

Once all the buttons have been created you are ready to publish and test. After transmitting from your client the Work Order list should look similar to the example screen included at the beginning of this post.
