
- SAP Community
- Products and Technology
- Technology
- Technology Blogs by SAP
- Building healthcare applications with SAP Build Ap...
Technology Blogs by SAP
Learn how to extend and personalize SAP applications. Follow the SAP technology blog for insights into SAP BTP, ABAP, SAP Analytics Cloud, SAP HANA, and more.
Turn on suggestions
Auto-suggest helps you quickly narrow down your search results by suggesting possible matches as you type.
Showing results for
Product and Topic Expert
Options
- Subscribe to RSS Feed
- Mark as New
- Mark as Read
- Bookmark
- Subscribe
- Printer Friendly Page
- Report Inappropriate Content
06-22-2023
10:30 PM
Introduction
At the end of April 2023, SAP published the SAP Health Data Services for FHIR as Beta service on BTP Cloud Foundry Environment (see also Health Application Development using HL7 FHIR on the SAP Business Technology Platform).
In parallel, a learning mission was published on SAP Discovery Center (see Get on your healthcare mission – Hands-on experience with SAP Health Data Services for FHIR (Beta)).
bettina.lieske asked me to implement a sample user interface for these services. Since I was just looking at SAP Build Apps, we came to the idea to implement a patient list from the FHIR REST API with SAP Build Apps.
Due to the REST character of FHIR, the following description is also a general example for using a REST service (based on a BTP destination) in SAP Build Apps.
Prerequisites
FHIR server on BTP
As mentioned in the blogs above SAP Health Data Services for FHIR provides you with a FHIR server. In order to set it up, just follow the first 3 phases of the Discovery Center Mission Build a healthcare app with SAP Health Data Services for FHIR
SAP Build Apps Account
In order to create an app in SAP Build Apps, you need an account in an SAP Build Apps instance on BTP. This might be the same account, where the FHIR server instance is running, but it might be also an additional, free account like described in SAP Build Apps Free Tier Individual Access.
Execution
FHIR service as BTP destination
In order to reference a REST destination with authentication in SAP Build Apps, it is necessary to reference this service as a Cloud Foundry destination - in opposite to a public REST service, where you can reference the URL directly.
Navigate to the subaccount where the FHIR service instance is running.
Click on "Services", “Instances and Subscriptions" in the navigation bar.
Click on "Credentials" of the FHIR service instance.
Copy the values from "coreservice", "clientid", "clientsecret", "url".

Navigate to the subaccount, where SAP Build Apps is running.
Click on "Connectivity", “Destinations" in the navigation bar.
Click on "New Destination".
Name the new destination, e.g. "FHIRBTPCC" (for FHIR service on BTP client credentials).
Paste the previously copied values ("coreservice", "clientid", "clientsecret", "url") as "URL", "Client ID", "Client Secret", "Token Service URL".
Add /oauth/token to the Token Service URL.
Fill all other values according to the screenshot:

Don’t forget to set the additional properties:
AppgyverEnabled: true

HTML5.DynamicDestination: true

WebIDEEnabled: true
These are necessary so that the destination is handled correctly as an SAP Build Apps destination.
Click on "Check Connection".
"Connection to "FHIRBTPCC" established. Response returned: "401: Unauthorized"" appears. (Unfortunately the logic behind “Check Connection” does not use the credentials; so it could not be authorized. This will not be the case when running the app later on)
Build the app
Create the app
Go to the lobby of SAP Build Apps (e.g. as described in SAP Build Apps Free Tier Individual Access)
Create a new application: Click on “Create”, click on “Build an application”, click on “Web & Mobile Application”, name it e.g. “Patient List 230606”, description “UI for FHIR Server”.

Open the newly created app.
Enable Authentication
Enable authentication by: Click on “Auth”, click on “Enable Authentication”, click on SAP BTP authentication:

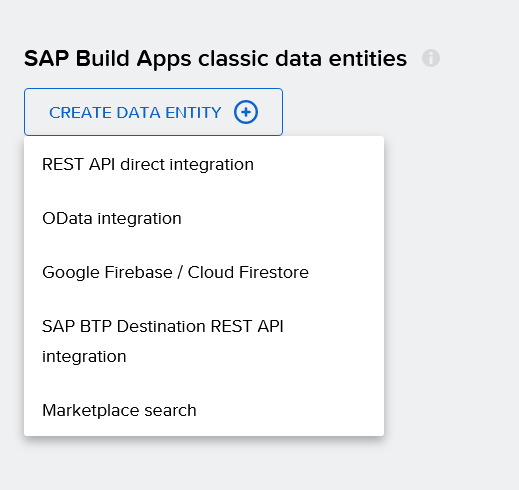
Create the Data Model
Click on Data, Click on “SAP Build Apps classic data entities“ and choose “SAP BTP Destination REST API integration”:
Give it a name, a description, choose the destination as created before:

Click on “list”, fill the relative path with “Patient”:

Click on Test, click on "Run Test":

You can see the typical FHIR response to a search which is a bundle instance. In this list, the patient instances can be found in the “entry” element:

So we have to set a path in the Response Mapper to the “entry” element.
Go back to tab Config, click on the x under Response Mapper:

Select Formula, Click on Create Formula, you will see:

Click on API response and click on response.data.entry. Now you see the list itself as result:

Click on Enter in order to set the value, click on Save, click on Save:

Go to test, Run test:

You see that the result is an empty json object, unexpected.
There is a bug in the response mapper, so go back to the config tab, click on the value under response mapper:
Substitute the value
response.data.entryby
{driverCode: response.status , records: response.data.entry}(The Response Mapper does not only expect the path itself, but a more complex object.)
Thanks to marchuber03 for the hack.
Click twice on Save:

Go to Test, run Test:
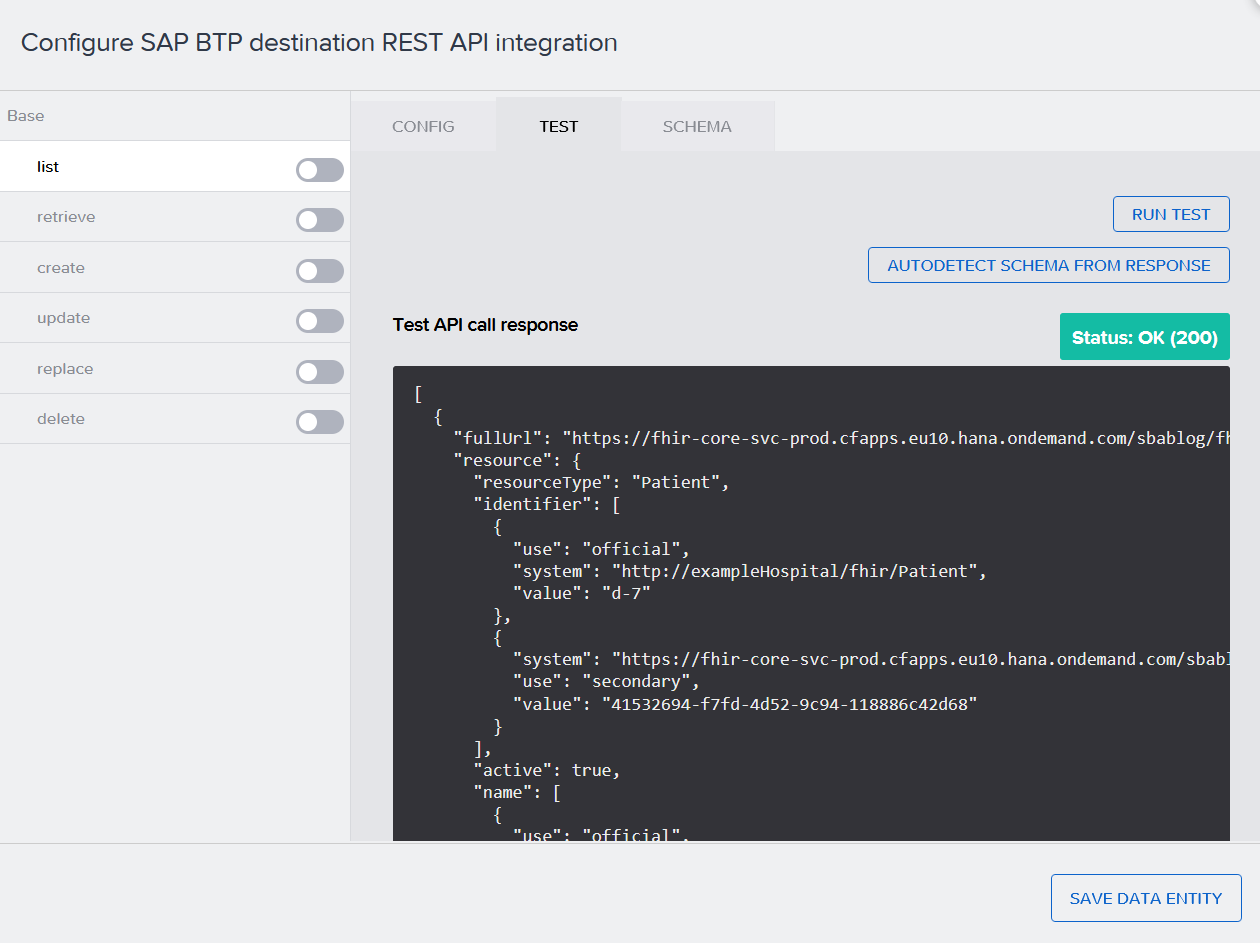
Now the response is OK.
To create the data model structure, click on “autodetect schema from response”, click on schema:

Now you can see the correct data structure.
Click on the switch beside list to activate the list operation:

Click on Save Data Entity:
Create the Data variable
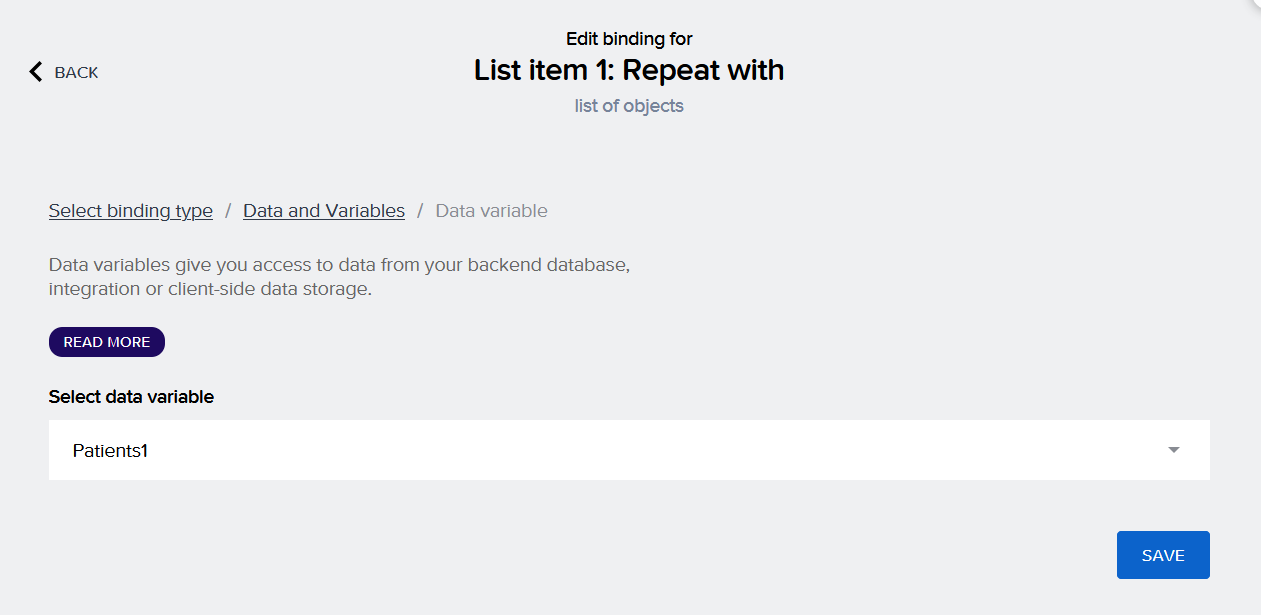
Click on UI Canvas, click on Variables, click on Data Variables, click on Add Data Variable, click on Patients.
A new variable Patients1 is created:

Click on Save.
Create the UI
Click on UI Canvas and go from the “variables” mode to the “view” mode.
Drag the “List item” from the left hand side to the canvas:

Set Repeat with by clicking on the arrows under “Repeat with”, select Data and Variables, select Data variable, select Patients1:
Click on Save.
Now we would like to show <Last Name>, <First name> in the table on the left hand side and the birth date on the right hand side.
Let’s start with the birth date, because it is easier:
Click on ABC under Secondary Label:

Click Data item in repeat, click current, click birth date:

Click save.
Try to repeat this step with the primary label. We see, that the name is incompatible in this context as it is a complex data type:

So, we have to use the formula editor again. Go back to the “Select binding type” screen and select “Formula”.
Then, click on the line field below the “Formula” label.
In the menu field on the left, click on “Currently repeated data items”:

Select “repeated.current.resource.name[0].family” in the middle, press enter:

Type + ', ' + in the editor line to concatenate the 2 strings family and given.
Select “repeated.current.resource.name[0].given[0]”
So the complete editor line should be:
repeated.current.resource.name[0].family + ', ' + repeated.current.resource.name[0].given[0]
Click twice Save.
The canvas should show:

Click on Save.
Change the content above the table; change the content of the headline to patient list, remove the text field below:

Now it’s time to preview the results!
Preview the app
Click on Launch:

Click on “Open preview portal”:

Click on "Open web preview", click on your app:

Voilà, the patients from the FHIR server will be shown!
Conclusion
SAP Build Apps is suited to show data from „SAP Health Data Services for FHIR“ on SAP BTP:
Both SAP Build apps and SAP Health Data Services for FHIR are compatible with the REST standard so that they can work together without any problems. With SAP Build Apps, there is an easy way to visualize the data from FHIR, the industry standard in Healthcare (see also https://blogs.sap.com/2023/05/30/benefits-of-the-hl7-fhir-industry-standard).
- SAP Managed Tags:
- SAP BTP, Cloud Foundry runtime and environment,
- SAP Build Apps
Labels:
2 Comments
You must be a registered user to add a comment. If you've already registered, sign in. Otherwise, register and sign in.
Labels in this area
-
ABAP CDS Views - CDC (Change Data Capture)
2 -
AI
1 -
Analyze Workload Data
1 -
BTP
1 -
Business and IT Integration
2 -
Business application stu
1 -
Business Technology Platform
1 -
Business Trends
1,658 -
Business Trends
106 -
CAP
1 -
cf
1 -
Cloud Foundry
1 -
Confluent
1 -
Customer COE Basics and Fundamentals
1 -
Customer COE Latest and Greatest
3 -
Customer Data Browser app
1 -
Data Analysis Tool
1 -
data migration
1 -
data transfer
1 -
Datasphere
2 -
Event Information
1,400 -
Event Information
70 -
Expert
1 -
Expert Insights
177 -
Expert Insights
339 -
General
1 -
Google cloud
1 -
Google Next'24
1 -
GraphQL
1 -
Kafka
1 -
Life at SAP
780 -
Life at SAP
14 -
Migrate your Data App
1 -
MTA
1 -
Network Performance Analysis
1 -
NodeJS
1 -
PDF
1 -
POC
1 -
Product Updates
4,575 -
Product Updates
381 -
Replication Flow
1 -
REST API
1 -
RisewithSAP
1 -
SAP BTP
1 -
SAP BTP Cloud Foundry
1 -
SAP Cloud ALM
1 -
SAP Cloud Application Programming Model
1 -
SAP Datasphere
2 -
SAP S4HANA Cloud
1 -
SAP S4HANA Migration Cockpit
1 -
Technology Updates
6,872 -
Technology Updates
470 -
Workload Fluctuations
1
Related Content
- Automated check for SAP HANA Cloud availability with SAP Automation Pilot in Technology Blogs by SAP
- Essential SAP Fiori Transaction Codes for Fiori Developers in Technology Q&A
- Enabling SAML Single Sign-On for SAP S/4 HANA and SAP BTP Apps using the same SAP IDP in Technology Blogs by SAP
- SAP Cloud ALM and SAP Cloud Connector in Technology Blogs by SAP
- Streamlining User Provisioning from IBM Verify to SAP Cloud Identity Services in Technology Blogs by Members
Top kudoed authors
| User | Count |
|---|---|
| 17 | |
| 11 | |
| 7 | |
| 7 | |
| 7 | |
| 7 | |
| 6 | |
| 6 | |
| 6 | |
| 6 |