
- SAP Community
- Products and Technology
- Technology
- Technology Blogs by SAP
- How to integrate Twitter & SAP Analytics Cloud: St...
Technology Blogs by SAP
Learn how to extend and personalize SAP applications. Follow the SAP technology blog for insights into SAP BTP, ABAP, SAP Analytics Cloud, SAP HANA, and more.
Turn on suggestions
Auto-suggest helps you quickly narrow down your search results by suggesting possible matches as you type.
Showing results for
Advisor
Options
- Subscribe to RSS Feed
- Mark as New
- Mark as Read
- Bookmark
- Subscribe
- Printer Friendly Page
- Report Inappropriate Content
01-28-2022
5:47 AM
Overview
This blog post is part of a series where we will be looking at integrating data from Twitter with SAP Analytics Cloud. In this installment, we have a full walkthrough of
What is the goal?
The target is for you to be able to set this up in your own environment by simply following the steps outlined in this blog. There is no coding involved and we have tried to keep this as simple as possible. All the additional tools we are using are free to use at the time of writing.
Agenda
In today's blog post, we have broken it down into 4 Parts:
These are simple steps that need to be done in sequence for SAP Analytics Cloud to ingest and use data from Twitter. Let's get to it.
Part (1/4) - Tools & Accounts required
We will be using the 3rd Party Tools listed below that will require accounts to be created if you do not already have them.
Note: As mentioned earlier, these tools are all free to use at the time of writing.
Part (2/4) - Creating the Twitter search
In Part 2, we are going to get set up the Twitter search criteria we would like to track. We will do this in IFTTT.
Part (3/4) - Setting up Google Drive
In Part 3, we are going to get set up the Google Sheets. We will do this in Google Drive.
Part (4/4) - Connecting SAP Analytics Cloud to the Data
In Part 4, we will be looking at how to connect SAP Analytics Cloud to Google Drive.
Success! You now have a Twitter feed linked to SAP Analytics Cloud. You can select the refresh times based on your own preference.
[Coming Soon] Demo
We will have a demo walkthrough of the steps above as well so check back soon.
Thank you for making it this far. We do hope this guide was helpful to you and serves as a starting point for your future development using SAP Analytics Cloud and integrating with Google Drive.
As we mentioned in the overview, this blog is part of a series. Check back soon for future posts.
Part 1: How to integrate Twitter & SAP Analytics Cloud: Step-by-step Walkthrough
[Coming Soon] Part 2
Thank you!
This blog post is part of a series where we will be looking at integrating data from Twitter with SAP Analytics Cloud. In this installment, we have a full walkthrough of
- How we are able to set up specific search criteria from Twitter,
- How we are able to save this data,
- How to use this data for stories built using SAP Analytics Cloud.
This blog post is also used as a guide for setting up SAP Analytics Cloud content being released for Q1 2022. Please follow the steps carefully to ensure the content works as expected.
What is the goal?
The target is for you to be able to set this up in your own environment by simply following the steps outlined in this blog. There is no coding involved and we have tried to keep this as simple as possible. All the additional tools we are using are free to use at the time of writing.
Agenda
In today's blog post, we have broken it down into 4 Parts:
Part 1 - Tools & Accounts required
Part 2 - Creating the Twitter search
Part 3 - Setting up Google Drive
Part 4 - Connecting SAP Analytics Cloud to your data
These are simple steps that need to be done in sequence for SAP Analytics Cloud to ingest and use data from Twitter. Let's get to it.
Part (1/4) - Tools & Accounts required
We will be using the 3rd Party Tools listed below that will require accounts to be created if you do not already have them.
- Google
- You will need a Google account for integration with IFTTT with access to Google Drive This account will also be used as the target of our Data Import from SAP Analytics Cloud via the Google Drive standard connection.
- If you already have a valid Google Account, please proceed to the next step. If not, please find the link to create a Google Account below. Steps to create a Google account can be found here
- Twitter
- You will need a Twitter account for integration with IFTTT.
- If you already have a valid Twitter Account, please proceed to the next step. If not, please find the link to create a Twitter account below. Steps to create a Twitter account can be found here
- IFTTT
- You will need an IFTTT(If This Then That) account to search for Twitter data and save data to Google Drive.
- If you already have a valid IFTTT Account, please proceed to the next step. If not, please find the link to create a new IFTTT account here
Note: As mentioned earlier, these tools are all free to use at the time of writing.
Part (2/4) - Creating the Twitter search
In Part 2, we are going to get set up the Twitter search criteria we would like to track. We will do this in IFTTT.
- Step 1: Creating an Applet in IFTTT
- Go ahead and click "Create" on the IFTTT home page

Step 1 - IFTTT
- Step 2: Adding a service
- Select "Add" a new service

Step 2 - IFTTT
- Step 3: Find the Twitter service
- Search for the "Twitter" service and select it

Step 3 - IFTTT
- Step 4: Select the Trigger
- Search for "New tweet from search" and select it
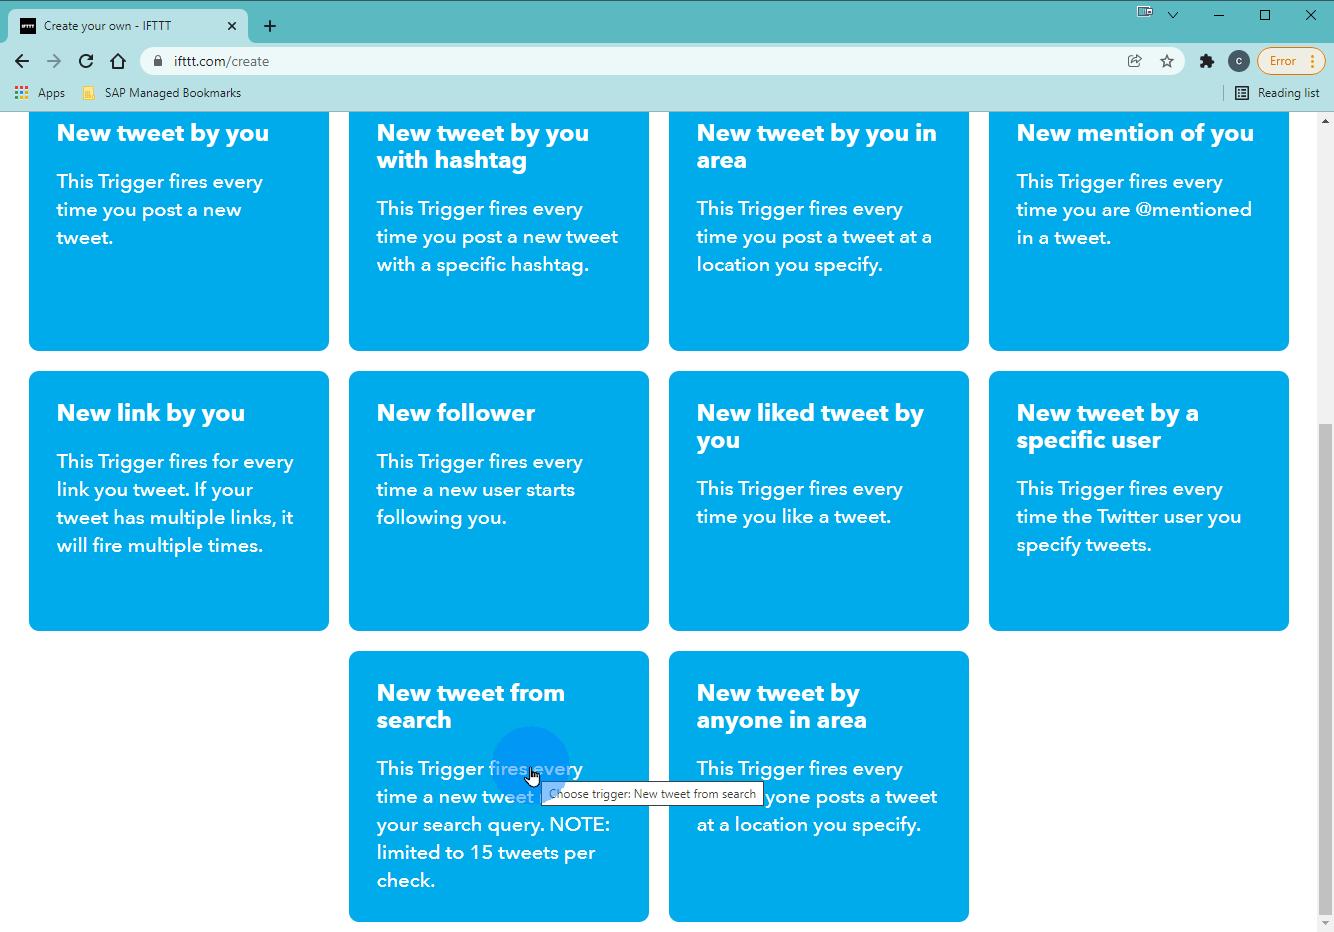
Step 4 - IFTTT
- Step 5: Connect your Twitter Account
- You will be prompted to connect to your Twitter account. Please login to the Twitter account from Part 1
- This is a one-time setup. Future triggers or applets will not require this step

Step 5 - IFTTT
- Step 6: Search Criteria
- Enter a search term or criteria of interest. This will be the Twitter search that continues to run and populate our Google Sheet.
- In this example, we are looking for "@Sap4Good". Go ahead and select "Create Trigger" once you are done.

Step 6 - IFTTT
- Step 7: Connecting Google Drive
- Next, we look to save the Twitter data to Google Drive with the "Add"

Step 7 - IFTTT
- Step 8: Find the Google Sheets service
- Search for the "Google Sheets" service and select it

Step 8 - IFTTT
- Step 9: Select the Action
- Search for "Add row to spreadsheet" and select it

Step 9 - IFTTT
- Step 10: Connect your Google Account
- You will be prompted to connect to your Google account. Please login to the Google account from Part 1
- This is a one-time setup. Future actions or applets will not require this step

Step 10 - IFTTT
- Step 11: Spreadsheet format
This step will align with the format in our SAP Analytics Cloud standard content. Please ensure you follow this exactly if you are using this blog to set up your standard content story.
If you are following along in general, you can skip this step if you would like. Just keep in mind that the end result will slightly differ.
Update the "Spreadsheet Name"
Old = New tweet from search
New = Tweets [Mentioning] [@SAP4Good]
"@SAP4Good" was the search criteria we used in our example. If your topic or handle is different, you can use that here. This is not critical as it doesn’t affect the search. It is to keep your documents easily sorted in Google Drive.
Update "Formatted Row"
Old = {{CreatedAt}} ||| @{{UserName}} ||| {{Text}} ||| {{LinkToTweet}} ||| {{FirstLinkUrl}}
New = @{{UserName}} ||| {{Text}} ||| {{LinkToTweet}} ||| {{CreatedAt}}

Step 11 - IFTTT
- Step 12: Confirm Trigger and Action
- Confirm the steps in your applet by selecting "Continue"
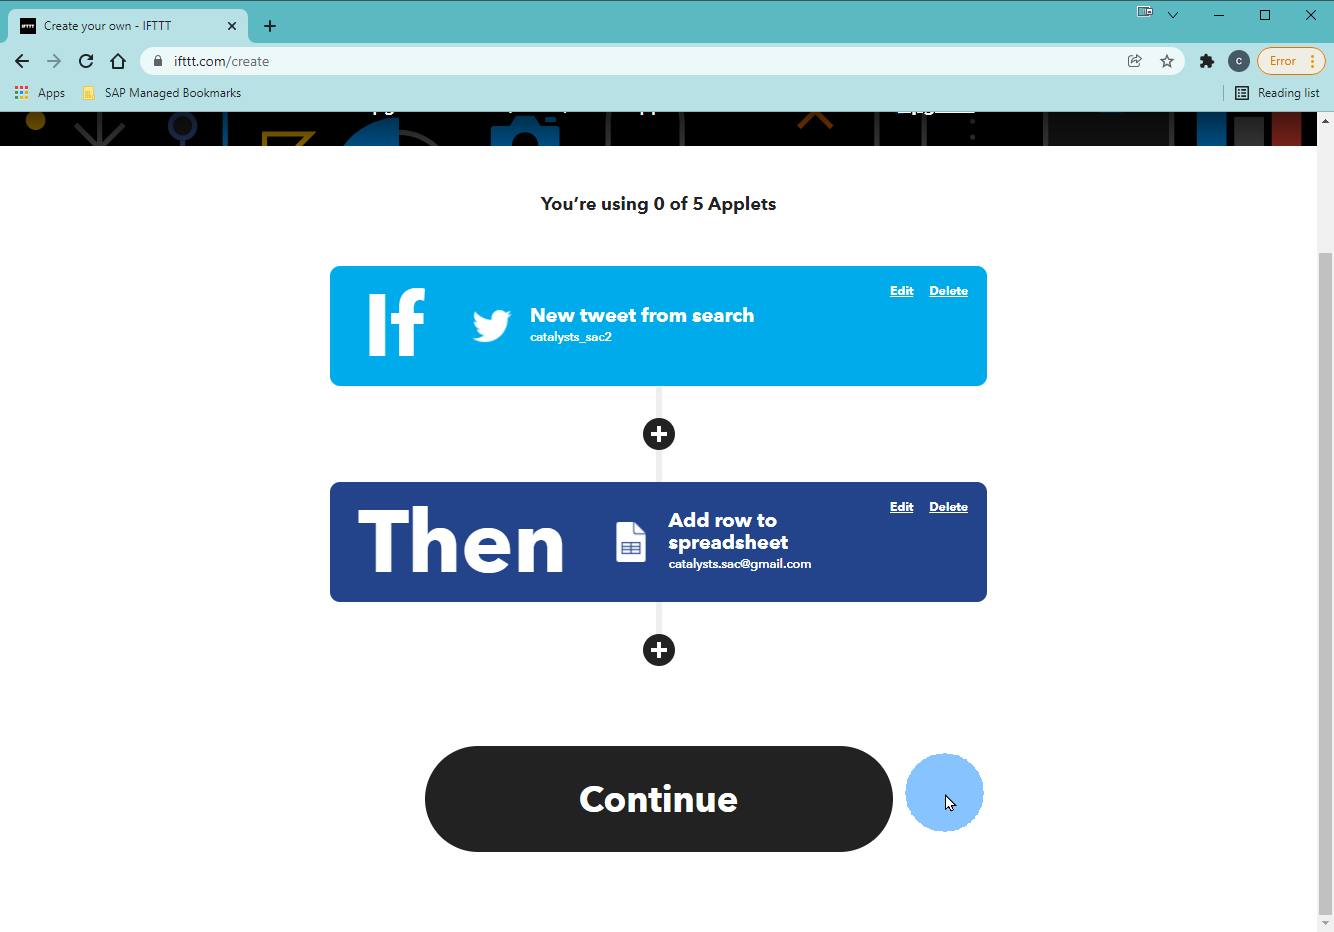
Step 12 - IFTTT
- Step 13: Name your Applet
- Review your title and select "Finish". You can edit the title from the system generated title to something more descriptive like shown below
- Tweets [Mentioning] [@SAP4Good]
- Review your title and select "Finish". You can edit the title from the system generated title to something more descriptive like shown below

Step 13 - IFTTT
- Step 14: Review Applet
- Your applet in IFTTT is now created and should be creating data in your Google Drive in no time
- Depending on your search criteria and how often results are generated, the time taken for the first data entry may differ. This usually starts within the hour however if there is no data from your search criteria nothing will be created.

Step 14 - IFTTT
Part (3/4) - Setting up Google Drive
In Part 3, we are going to get set up the Google Sheets. We will do this in Google Drive.
- Step 1: Setting Up Google Sheets
- First, you will need to import a Google Sheet which we have already prepared for you.
a) Head to the shared Google Sheet link here:
b) You should be seeing a "View only" version of this document

Step 1 - Google Sheets
- Step 2: Copying to your Google Drive
- You will then need to make a copy of this document in your own Google Drive by going to "File" and "Make a copy"

Step 2 - Google Sheets
- Step 3: Saving to your Google Drive
- Go ahead and name your Google Sheet and save this
- The name is not critical since you can rename this at a later stage as well

Step 3 - Google Sheets
- Step 4: Personal version of Google Sheet
- You should now have a personal version of this Google Sheet to work with and edit
- Previously greyed out options like "Insert" and "Format" should now be usable

Step 4 - Google Sheets
- Step 5: Check for IFTTT Sheet
- You should also have a new document in your Google Drive that IFTTT has created
- This can be found in Google Drive under the "IFTTT" folder
If you still do not see this file, this might be related to your search criteria as mentioned earlier. You can either give it a little more time and confirm that tweets have been occuring since you created the applet or change the search criteria to something that occurs more often.

Step 5 - Google Sheets
- Step 6: Sharing the Google Sheet
- Next, we need to share the Google Sheet generated by IFTTT to link with our main document
- Remember this step is done in the Google Sheet that was generated. The name should resemble "Tweets [Mentioning] [@SAP4Good]" if you followed our example

Step 6 - Google Sheets
- Step 7: Sharing the Google Sheet
- Select the "Change to anyone with the link"

Step 7 - Google Sheets
- Step 8: Copy the link
- Copy this link to use in our main document
- You can always come back and find this link at a later time as well following the same step as this link will not change

Step 8 - Google Sheets
- Step 9: Linking with Google Sheet
- Head back to your local copy of the shared Google Sheet. The name should resemble "Sac - Tweets [Mentioning][]" if you were following the example
- Paste the link you just copied into Cell J3
- You can also edit Cell C5 to match your search criteria. In our example, we will use @SAP4Good
- This will help us in later steps to manage data in SAP Analytics Cloud if this is expanded and used multiple times

Step 9 - Google Sheets
- Step 10: Confirm data linking
- Confirm that your data is linked by going to the "SAC-Source" tab
- You should be seeing data automatically being populated like we see below
If you are following along from the SAP Analytics Cloud content, do not edit anything on these sheets. These have already been formatted specifically for use with the Stories made available in content

Step 10 - Google Sheets
- Step 11: Sharing for SAP Analytics Cloud
- Finally, we share this Google Sheet as a data source for SAP Analytics Cloud
- As with our previous sharing step, we go to "Share"

Step 11 - Google Sheets
- Step 12: Sharing for SAP Analytics Cloud
- Select the "Change to anyone with the link"

Step 12 - Google Sheets
- Step 13: Copy link for SAP Analytics Cloud
- And for your final step in Google Sheets, copy the link to be used later in SAP Analytics Cloud.

Step 13 - Google Sheets
Part (4/4) - Connecting SAP Analytics Cloud to the Data
In Part 4, we will be looking at how to connect SAP Analytics Cloud to Google Drive.
The following steps are catering to the SAP Analytics Cloud content use case. If you are following along without the content, you can jump to Step 4 by creating a new model and still set up your model.
- Step 1: Find the Content Model
- First, we need to find our Model which we installed from the SAP Analytics Cloud Content
- This should be under Files / My Files / Public / SAP_Content / SAP_SM_Social_Media_Analysis

Step 1 - SAC
- Step 2: Data Management
- Once you have found this model, go to "Data Management"

Step 2 - SAC
- Step 3: Importing Data
- Select Import data from a "Data Source"

Step 3 - SAC
- Step 4: Selecting Google Drive as a data source
- Select "Data Source Type" as "Google" to make it easier to find Connection "Google Drive"

Step 4 - SAC
- Step 5: Linking to Google Sheet
- Ensure the Google Drive File From is selecting "Google Sheet Url"
- Paste the URL copied from Step 27 in the previous section

Step 5 - SAC
- Step 6: Selecting the Sheet
- Ensure you have selected the sheet named "SAC-Source"
- Keep the "Use first row as column headers" selected

Step 6 - SAC
- Step 7: Query run
- Once the query has been run, you will see it available under the Draft Sources which you can select

Step 7 - SAC
- Step 8: Confirm Columns
- Columns should automatically map with the content without errors or issues
- Select "Finish Mapping"

Step 8 - SAC
- Step 9: Viewing Story
- If you head back to your story, you will now notice the newly loaded data is available for use
- This should be under Files / My Files / Public / SAP_Content / SAP__SM_Twitter_Analysis

Step 9 - SAC
Success! You now have a Twitter feed linked to SAP Analytics Cloud. You can select the refresh times based on your own preference.
[Coming Soon] Demo
We will have a demo walkthrough of the steps above as well so check back soon.
Thank you for making it this far. We do hope this guide was helpful to you and serves as a starting point for your future development using SAP Analytics Cloud and integrating with Google Drive.
As we mentioned in the overview, this blog is part of a series. Check back soon for future posts.
Part 1: How to integrate Twitter & SAP Analytics Cloud: Step-by-step Walkthrough
[Coming Soon] Part 2
Thank you!
- SAP Managed Tags:
- SAP Analytics Cloud
Labels:
7 Comments
You must be a registered user to add a comment. If you've already registered, sign in. Otherwise, register and sign in.
Labels in this area
-
ABAP CDS Views - CDC (Change Data Capture)
2 -
AI
1 -
Analyze Workload Data
1 -
BTP
1 -
Business and IT Integration
2 -
Business application stu
1 -
Business Technology Platform
1 -
Business Trends
1,658 -
Business Trends
104 -
CAP
1 -
cf
1 -
Cloud Foundry
1 -
Confluent
1 -
Customer COE Basics and Fundamentals
1 -
Customer COE Latest and Greatest
3 -
Customer Data Browser app
1 -
Data Analysis Tool
1 -
data migration
1 -
data transfer
1 -
Datasphere
2 -
Event Information
1,400 -
Event Information
69 -
Expert
1 -
Expert Insights
177 -
Expert Insights
334 -
General
1 -
Google cloud
1 -
Google Next'24
1 -
GraphQL
1 -
Kafka
1 -
Life at SAP
780 -
Life at SAP
13 -
Migrate your Data App
1 -
MTA
1 -
Network Performance Analysis
1 -
NodeJS
1 -
PDF
1 -
POC
1 -
Product Updates
4,575 -
Product Updates
378 -
Replication Flow
1 -
REST API
1 -
RisewithSAP
1 -
SAP BTP
1 -
SAP BTP Cloud Foundry
1 -
SAP Cloud ALM
1 -
SAP Cloud Application Programming Model
1 -
SAP Datasphere
2 -
SAP S4HANA Cloud
1 -
SAP S4HANA Migration Cockpit
1 -
Technology Updates
6,872 -
Technology Updates
467 -
Workload Fluctuations
1
Related Content
- Order siblings in a Hierarchy with Directory with SAP Datasphere in Technology Blogs by SAP
- SAP Datasphere News in January in Technology Blogs by SAP
- SAP Datasphere connection with Confluent Cloud in Technology Blogs by SAP
- Practical Guide: How to build SAP Analytics Cloud stories using SAP Datasphere in Technology Blogs by SAP
- Creating a Hierarchy with Directory in SAP Datasphere in Technology Blogs by SAP
Top kudoed authors
| User | Count |
|---|---|
| 17 | |
| 12 | |
| 11 | |
| 8 | |
| 7 | |
| 6 | |
| 6 | |
| 6 | |
| 6 | |
| 5 |