This blog post will teach you how to set up AppGyver in your existing SAP Business Technology Platform (SAP BTP) Subaccount. You can choose between a free plan and the standard plan during setup.
To try out SAP AppGyver, it is enough to activate the free plan.
SAP AppGyver is a service within the SAP Business Technology Platform. With SAP AppGyver you have a no-code platform that allows you to build your apps without writing a single line of code.
SAP AppGyver
To activate
SAP AppGyver and SAP Business Application Studio, use the Booster Function (
described in more detail in this tutorial) of the SAP BTP Cockpit. This will start the setup wizard and do the installation for both of the tools automatically for you.
To activate
only SAP AppGyver within your existing subaccount, we need to go through the following steps:
- Make sure Cloud Foundry is enabled in your subaccount
- Add the SAP AppGyver Entitlements and Service
- Create a Role Collection for SAP AppGyver
- Create your SAP AppGyver Bookmark
1. Make sure Cloud Foundry is enabled in your subaccount
Within your subaccount on the Overview page is the
Cloud Foundry Environment tab. If Cloud Foundry is enabled, you will find API Endpoint details as well as the option to disable Cloud Foundry. If you don't see any details here, activate Cloud Foundry by clicking on the activate Cloud Foundry button.
2. Add the AppGyver Entitelments and Service
On the subaccount level, click on
Entitlements on the left side and add the SAP AppGyver service via
Configure Entitlements. Here you can select the individual plans that will be available later when creating the service.

Set SAP AppGyver Entitelments
Add your selected Services.
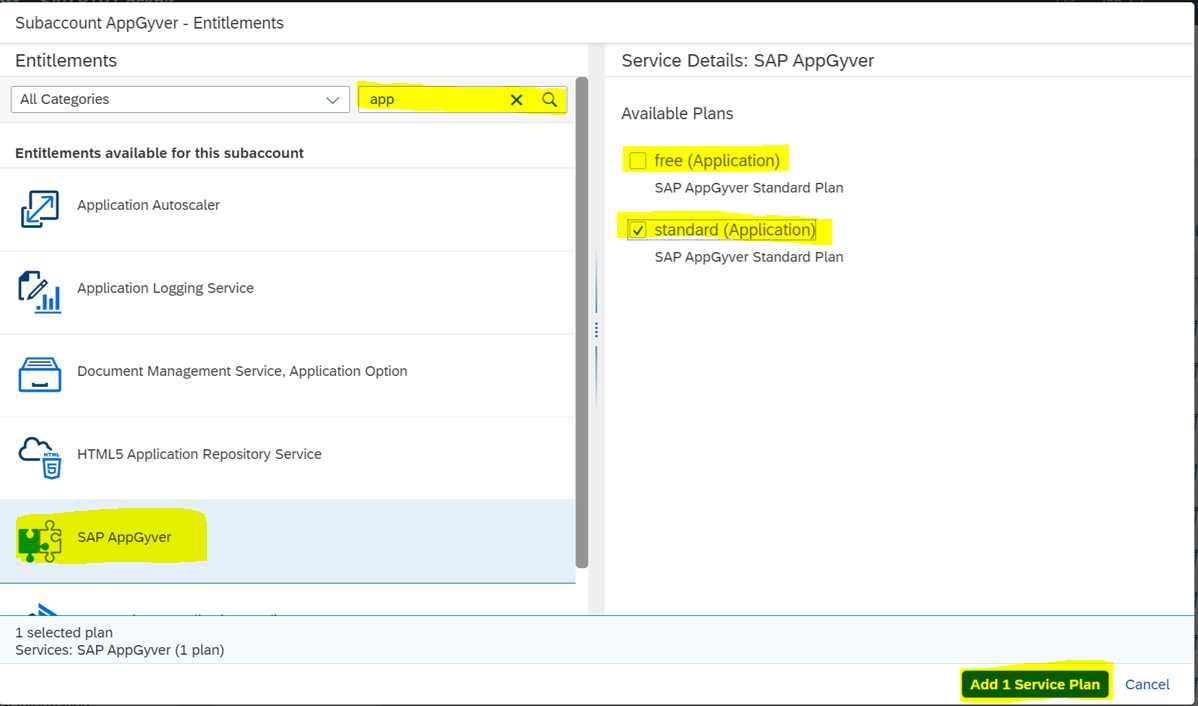
Search for SAP AppGyver and add the services
After you have set the Entitlements, you have to activate the service. To do this, click on the
Service Marketplace tab on the left and search for SAP AppGyver. Click on the service to see details and click on
Create to configure the service for the subaccount. Select the plan that suits you (free or standard) and click create. If you can't see one of the two plans here, it's possible that the Entitlements are not set correctly.

Create the SAP AppGyver Service for your subaccount
SAP AppGyver is now successfully activated as a service within the subaccount and is just waiting for your first project.
3. Create a Role Collection for SAP AppGyver
Now you want to start right away, but you get the message: SAP AppGyver - Access denied.

SAP AppGyver - Access Denied Error
This is because you have not yet given your user the necessary roles.
Creating a role collection allows you to organize the different roles in your organization. Click on
Role Collections on the left side. In our case, we create a role collection for admin users. Here, you can also create additional role collections for developers.
Add the following roles (for admin access) to your Admin Role Collection:
RegistryAdmin
AppGyverAdmin
For your Developer Role Collection, the following roles are suitable:
AppGyverDeveloper
RegistryDeveloper

Add Role Collection
After successfully creating your Role Collections, you have to add yourself as a user. You can add your respective users within your created Role Collection via the ID.
Now you can use SAP AppGyver and realize your first projects!
If you still get an Access Denied error message, even though you have created the roles and assigned them to your user, it makes sense to reload the page and delete the cookies or access SAP AppGyver via the incognito mode.
4. Create your SAP AppGyver Bookmark
Now that you have access to SAP AppGyver, of course, you want to be able to access it quickly. The easiest way to do this is via a bookmark. Navigate to
Instances and Subscriptions in your subaccount and you will find SAP AppGyver under the Subscriptions tab. Open the app and create a bookmark.
Now you can use SAP AppGyver and realize your first projects!
Here you can find more tutorials on SAP AppGyver to get started.
Do you have additional questions regarding SAP AppGyver?
Feel free to ask your SAP AppGyver questions to the SAP Community
Have fun developing!
