
- SAP Community
- Products and Technology
- Technology
- Technology Blogs by SAP
- My First Set Up! iRPA Best Practice for S/4HANA
Technology Blogs by SAP
Learn how to extend and personalize SAP applications. Follow the SAP technology blog for insights into SAP BTP, ABAP, SAP Analytics Cloud, SAP HANA, and more.
Turn on suggestions
Auto-suggest helps you quickly narrow down your search results by suggesting possible matches as you type.
Showing results for
Product and Topic Expert
Options
- Subscribe to RSS Feed
- Mark as New
- Mark as Read
- Bookmark
- Subscribe
- Printer Friendly Page
- Report Inappropriate Content
12-03-2019
12:20 AM
************************************************************************************
Note:
I am posting this article as a part of #SAP Advent Calendar 2019 organized by SAP Technology Community (Japan) #chillSAP.
************************************************************************************
注記:このブログは、SAP Technology Community (Japan) #chillSAP 主催の
#SAPアドベントカレンダー2019の12月3日分記事として書かれました。
************************************************************************************
I'm going to share my experience of setting up one of the iRPA Best Practice for SAP S/4 HANA a few months ago.
このブログでは数か月前に実施したiRPAのS/4 HANA 向けベストプラクティスの設定について共有致します。
0. Basic Information
Find the basic information in the SAP Help Portal for iRPA.
https://help.sap.com/viewer/product/IRPA/Cloud/en-US
0. 基本情報
基本情報は、SAP Help Portal を参照。
https://help.sap.com/viewer/product/IRPA/Cloud/en-US

Below is the steps to implement the iRPA Best Practice for SAP S/4 HANA.
以下のステップでiRPA Best Practice for SAP S/4 HANAを導入します。
Detail steps:
You can download any of one components from the site. There are 3 components displayed but the contents are exactly same.
詳細手順
サイトからどれか1つコンポーネントをダウンロードします。3つのコンポーネントが表示されますが、中身は全く同じです。

2. Install Desktop Studio on your PC (See Installation Guide)
Install Desktop Studio (any of one component) to see the Installation Guide.
Please, check some required application in the Installation Guide.
2.クライアントPCにDesktop Studio のインストール (インストレーションガイド参照)
Desktop Studio (ダウンロードしたコンポーネント) を Installation Guide を見ながらインストールします。
前提条件で必要となるアプリケーションがありますので、インストールガイドで確認してください。

Select Install Option to install both Desktop Studio and Desktop Agent.
インストールオプションを選択する画面で Desktop Studio と Desktop Agentの両方を選択します。

After installation, you can start Desktop Studio to search Application from Windows task bar.
インストール後にWindows タスクバーの検索を使って、Desktop Studio を起動します。

3. Set Up SAP Cloud Platform
Refer Help Portal to set up SAP Cloud Platform sub account to enable iRPA service.
3. SAP Cloud Platform の設定
Help Portal を参照してSAP Cloud Platform を設定して、iRPA サービスを使用できるようにします。

Click "Go to Application" to Set up the Cloud Factory for iRPA.
"Go to Application" を選択して、iRPA Cloud Factory の設定を行います。

Administration > Hierarchy
Create Hierarchy from the button.
Select "Login" or "Machine (PC)" for Type.
管理 > 階層
階層を作成します。
タイプ "ログイン" または "マシン (PC)" を選択します。

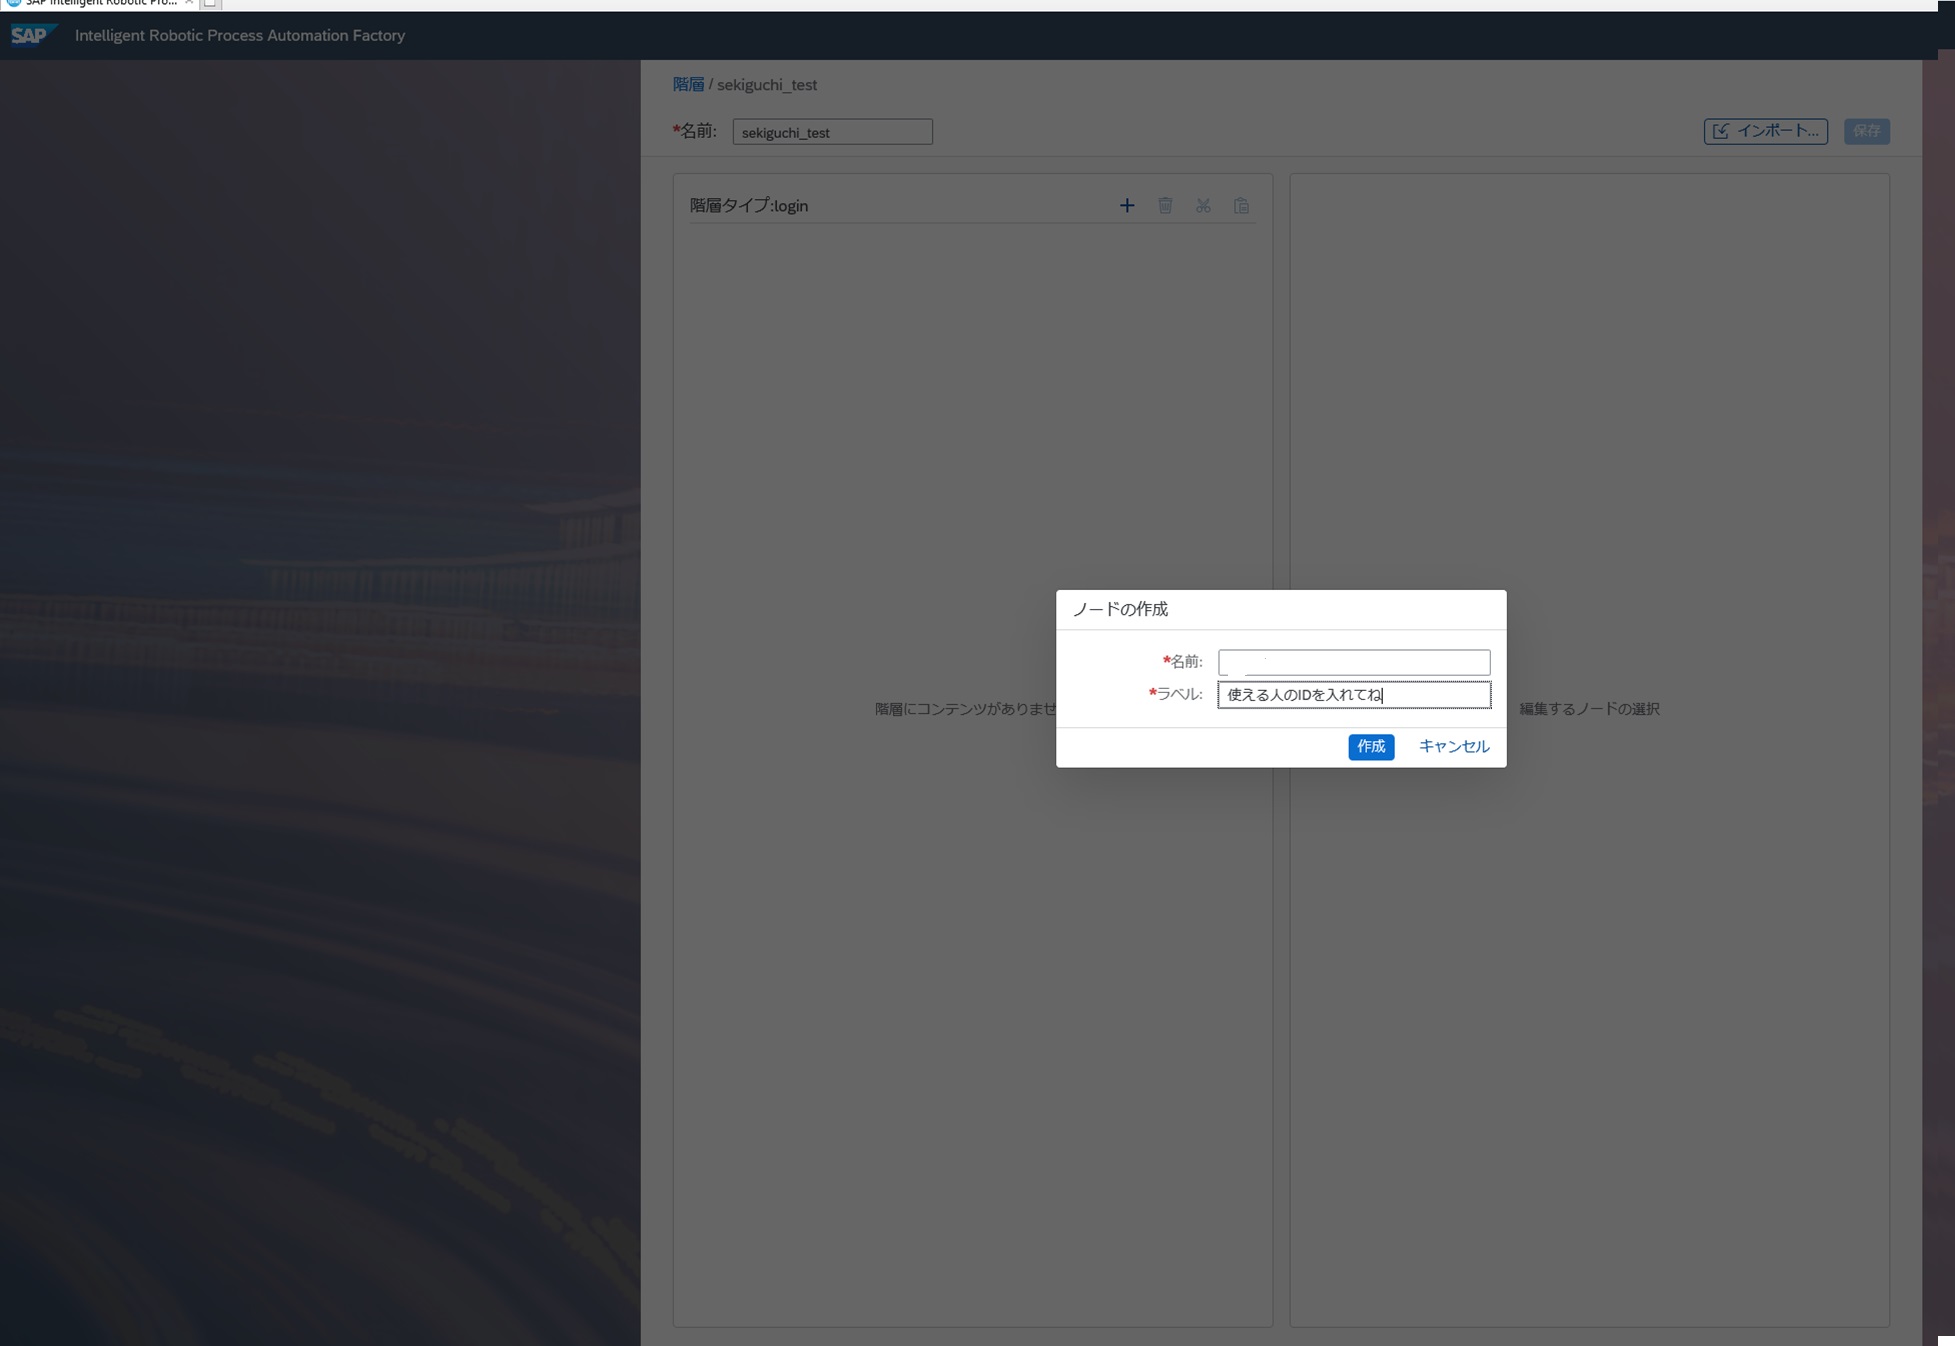
Create Node (User ID or Client PC Name) under the created hierarchy.
作成した階層以下に認証のためのノード (ユーザまたはPC名) を作成します。
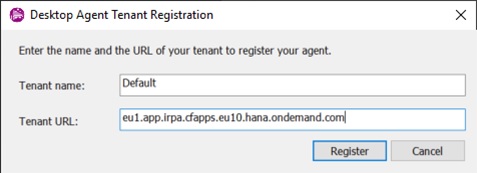
Agent Connection
After set up the SAP IRPA Factory, the factory tries to connect with Agent started in your PC.
Set up the URL for the IRPA Factory URL as below.(To see the Monitor the agent status turned as connected.)
エージェント接続
SAP IRPA Factory設定後にPCで起動しているAgent に接続するためのポップアップが起動します。
IRPA Factory の URL を入力して接続してください。(モニターで見ると接続済となります)
4. Select Best Practice Scenario and check S/4 HANA environment
Here, select Automated Upload of General Ledger Entries.
5. Download Best Practice Package from Software Download Launchpad
The content of the downloaded package consist from two types to import into Desktop Studio and Import to SAP IRPA Factory.
This time, I will import the package into Desktop Studio and Test Run.
S/4HANA URL
https://xxxxxx.s4hana.ondemand.com/ui#AccountingDocument-uploadGLDocument
>> Prepare the GL Upload CSV file for Testing.
4. 実行したい Best Practice シナリオを選択し、S/4 HANA 環境が実行可能かどうかをチェックします
ここでは、Automated Upload of General Ledger Entries というGLアップロードFioriアプリケーションの自動化を選択します。
5.Best Practice パッケージをSoftware Download Launchpad からダウンロード
ダウンロードしたパッケージには2種類が含まれています。Desktop StudioにインポートするものとSAP IRPA Factory にインポートするものです。
ここでは、Desktop Studioにインポートしてテスト実行していきます。
S/4 HANA の URL
https://xxxxxx.s4hana.ondemand.com/ui#AccountingDocument-uploadGLDocument
S/4 HANA の Fiori画面にアップロードするCSVファイルを準備します。

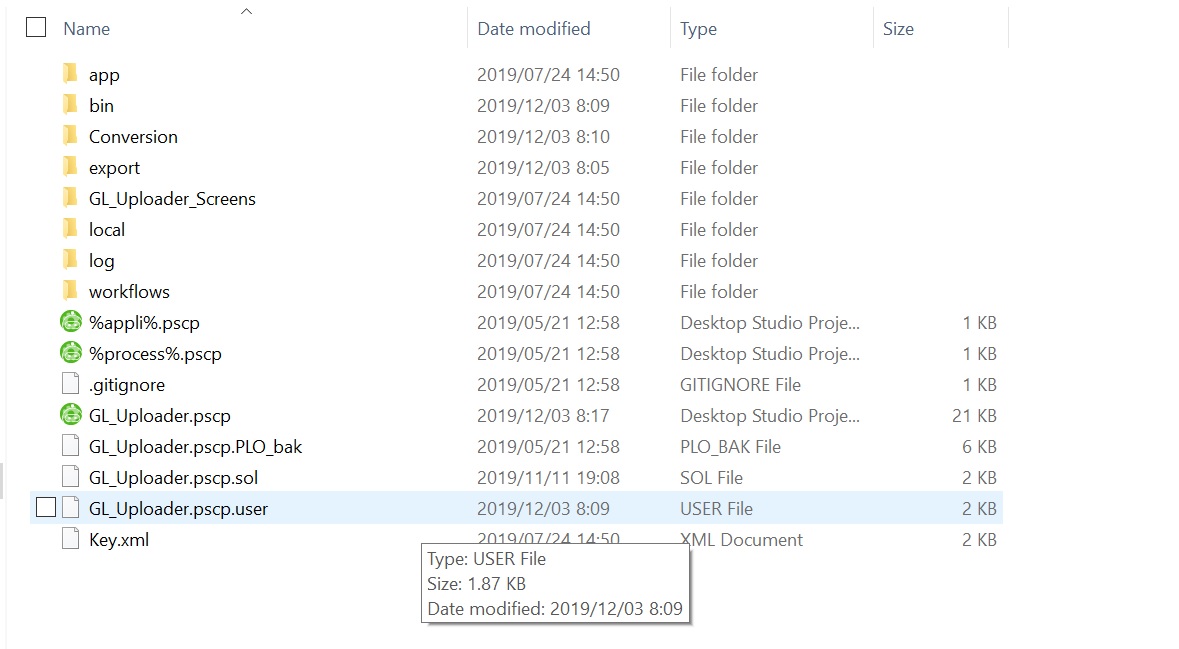
6. Import Package to Desktop Studio
Open extracted project file "GL_Uploader.pscp". When you import the package to Factory, you can import as zip file.
6. パッケージをDesktop Studio にインポート
パッケージを解凍し、"GL_Uploader.pscp"プロジェクトファイルを開きます。Factoryにインポートする場合は、ZIPファイルのままインポートを行います。
7. Run Application
Run Debugging.
7. アプリケーション実行
デバッグ実行します。

Start debugging, you see the Agent in your windows task bar.
Select menu to run the IRPA application.
デバッグを開始すると、Windowsタスクバーに Agent が表示されます。メニューを選択してIRPAアプリケーションを実行します。

When you start debug run, you will be requested to provide the folders for output the result.
And also Fiori Application URL, type your S/4 HANA URL checked above.
実行すると、実行結果の格納フォルダ選択画面が起動します。
上で確認した S/4 HANA 環境のURLをFiori System Endpoint を入力します。
S/4 HANA の URL
https://xxxxxx.s4hana.ondemand.com/ui#AccountingDocument-uploadGLDocument

Now my system does not working properly, and let me investigate a little more.
I hope you guys have a good result!
-End
今設定した後時間がたってしまいこの環境が動かないので、また調査したいと思います。
ー以上ー
Note:
I am posting this article as a part of #SAP Advent Calendar 2019 organized by SAP Technology Community (Japan) #chillSAP.
************************************************************************************
注記:このブログは、SAP Technology Community (Japan) #chillSAP 主催の
#SAPアドベントカレンダー2019の12月3日分記事として書かれました。
************************************************************************************
I'm going to share my experience of setting up one of the iRPA Best Practice for SAP S/4 HANA a few months ago.
このブログでは数か月前に実施したiRPAのS/4 HANA 向けベストプラクティスの設定について共有致します。
0. Basic Information
Find the basic information in the SAP Help Portal for iRPA.
https://help.sap.com/viewer/product/IRPA/Cloud/en-US
0. 基本情報
基本情報は、SAP Help Portal を参照。
https://help.sap.com/viewer/product/IRPA/Cloud/en-US
Below is the steps to implement the iRPA Best Practice for SAP S/4 HANA.
- Download iRPA On Premise Components from the Software Download Launchpad
- Install Desktop Studio on your PC (See Installation Guide)
- Set Up SAP Cloud Platform
- Select Best Practice Scenario and check S/4 HANA environment
- Download Best Practice Package from Software Download Launchpad
- Import Package to Desktop Studio
- Connect Agent
- Run Application
以下のステップでiRPA Best Practice for SAP S/4 HANAを導入します。
- Software Download Launchpad から iRPA オンプレミスコンポーネントをダウンロード
- クライアントPCにDesktop Studio のインストール (インストレーションガイド参照)
- SAP Cloud Platform の設定
- Best Practice シナリオの選定とS/4 HANA 環境の確認
- Best Practice パッケージをSoftware Download Launchpad からダウンロード
- パッケージをDesktop Studio にインポート
- エージェント接続
- アプリケーション実行
Detail steps:
- Download iRPA On Premise Components from the Software Download Launchpad
You can download any of one components from the site. There are 3 components displayed but the contents are exactly same.
詳細手順
- Software Download Launchpad から iRPA オンプレミスコンポーネントをダウンロード
サイトからどれか1つコンポーネントをダウンロードします。3つのコンポーネントが表示されますが、中身は全く同じです。
2. Install Desktop Studio on your PC (See Installation Guide)
Install Desktop Studio (any of one component) to see the Installation Guide.
Please, check some required application in the Installation Guide.
2.クライアントPCにDesktop Studio のインストール (インストレーションガイド参照)
Desktop Studio (ダウンロードしたコンポーネント) を Installation Guide を見ながらインストールします。
前提条件で必要となるアプリケーションがありますので、インストールガイドで確認してください。
Select Install Option to install both Desktop Studio and Desktop Agent.
インストールオプションを選択する画面で Desktop Studio と Desktop Agentの両方を選択します。
After installation, you can start Desktop Studio to search Application from Windows task bar.
インストール後にWindows タスクバーの検索を使って、Desktop Studio を起動します。
3. Set Up SAP Cloud Platform
Refer Help Portal to set up SAP Cloud Platform sub account to enable iRPA service.
3. SAP Cloud Platform の設定
Help Portal を参照してSAP Cloud Platform を設定して、iRPA サービスを使用できるようにします。
Click "Go to Application" to Set up the Cloud Factory for iRPA.
"Go to Application" を選択して、iRPA Cloud Factory の設定を行います。
Administration > Hierarchy
Create Hierarchy from the button.
Select "Login" or "Machine (PC)" for Type.
管理 > 階層
階層を作成します。
タイプ "ログイン" または "マシン (PC)" を選択します。
Create Node (User ID or Client PC Name) under the created hierarchy.
作成した階層以下に認証のためのノード (ユーザまたはPC名) を作成します。
Agent Connection
After set up the SAP IRPA Factory, the factory tries to connect with Agent started in your PC.
Set up the URL for the IRPA Factory URL as below.(To see the Monitor the agent status turned as connected.)
エージェント接続
SAP IRPA Factory設定後にPCで起動しているAgent に接続するためのポップアップが起動します。
IRPA Factory の URL を入力して接続してください。(モニターで見ると接続済となります)
4. Select Best Practice Scenario and check S/4 HANA environment
Here, select Automated Upload of General Ledger Entries.
5. Download Best Practice Package from Software Download Launchpad
The content of the downloaded package consist from two types to import into Desktop Studio and Import to SAP IRPA Factory.
This time, I will import the package into Desktop Studio and Test Run.
S/4HANA URL
https://xxxxxx.s4hana.ondemand.com/ui#AccountingDocument-uploadGLDocument
>> Prepare the GL Upload CSV file for Testing.
4. 実行したい Best Practice シナリオを選択し、S/4 HANA 環境が実行可能かどうかをチェックします
ここでは、Automated Upload of General Ledger Entries というGLアップロードFioriアプリケーションの自動化を選択します。
5.Best Practice パッケージをSoftware Download Launchpad からダウンロード
ダウンロードしたパッケージには2種類が含まれています。Desktop StudioにインポートするものとSAP IRPA Factory にインポートするものです。
ここでは、Desktop Studioにインポートしてテスト実行していきます。
S/4 HANA の URL
https://xxxxxx.s4hana.ondemand.com/ui#AccountingDocument-uploadGLDocument
S/4 HANA の Fiori画面にアップロードするCSVファイルを準備します。
6. Import Package to Desktop Studio
Open extracted project file "GL_Uploader.pscp". When you import the package to Factory, you can import as zip file.
6. パッケージをDesktop Studio にインポート
パッケージを解凍し、"GL_Uploader.pscp"プロジェクトファイルを開きます。Factoryにインポートする場合は、ZIPファイルのままインポートを行います。
7. Run Application
Run Debugging.
7. アプリケーション実行
デバッグ実行します。
Start debugging, you see the Agent in your windows task bar.
Select menu to run the IRPA application.
デバッグを開始すると、Windowsタスクバーに Agent が表示されます。メニューを選択してIRPAアプリケーションを実行します。
When you start debug run, you will be requested to provide the folders for output the result.
And also Fiori Application URL, type your S/4 HANA URL checked above.
実行すると、実行結果の格納フォルダ選択画面が起動します。
上で確認した S/4 HANA 環境のURLをFiori System Endpoint を入力します。
S/4 HANA の URL
https://xxxxxx.s4hana.ondemand.com/ui#AccountingDocument-uploadGLDocument
Now my system does not working properly, and let me investigate a little more.
I hope you guys have a good result!
-End
今設定した後時間がたってしまいこの環境が動かないので、また調査したいと思います。
ー以上ー
- SAP Managed Tags:
- SAP Business Technology Platform
Labels:
You must be a registered user to add a comment. If you've already registered, sign in. Otherwise, register and sign in.
Labels in this area
-
ABAP CDS Views - CDC (Change Data Capture)
2 -
AI
1 -
Analyze Workload Data
1 -
BTP
1 -
Business and IT Integration
2 -
Business application stu
1 -
Business Technology Platform
1 -
Business Trends
1,658 -
Business Trends
107 -
CAP
1 -
cf
1 -
Cloud Foundry
1 -
Confluent
1 -
Customer COE Basics and Fundamentals
1 -
Customer COE Latest and Greatest
3 -
Customer Data Browser app
1 -
Data Analysis Tool
1 -
data migration
1 -
data transfer
1 -
Datasphere
2 -
Event Information
1,400 -
Event Information
72 -
Expert
1 -
Expert Insights
177 -
Expert Insights
340 -
General
1 -
Google cloud
1 -
Google Next'24
1 -
GraphQL
1 -
Kafka
1 -
Life at SAP
780 -
Life at SAP
14 -
Migrate your Data App
1 -
MTA
1 -
Network Performance Analysis
1 -
NodeJS
1 -
PDF
1 -
POC
1 -
Product Updates
4,575 -
Product Updates
384 -
Replication Flow
1 -
REST API
1 -
RisewithSAP
1 -
SAP BTP
1 -
SAP BTP Cloud Foundry
1 -
SAP Cloud ALM
1 -
SAP Cloud Application Programming Model
1 -
SAP Datasphere
2 -
SAP S4HANA Cloud
1 -
SAP S4HANA Migration Cockpit
1 -
Technology Updates
6,872 -
Technology Updates
472 -
Workload Fluctuations
1
Related Content
- First steps to work with SAP Cloud ALM Deployment scenario for SAP ABAP systems (7.40 or higher) in Technology Blogs by SAP
- Connect to Data Source & Services in SAP FIORI APPLICATION (BAS) in Technology Q&A
- SAP Workzone: Task Center: Server returned HTTP response code: 401 for URL... in Technology Q&A
- SAP S4HANA Billing Document OData - Pricing Elements No Data in Technology Q&A
- App UI5 in workzone show loading screen never end in Technology Q&A
Top kudoed authors
| User | Count |
|---|---|
| 17 | |
| 14 | |
| 12 | |
| 10 | |
| 9 | |
| 8 | |
| 7 | |
| 7 | |
| 6 | |
| 6 |