
- SAP Community
- Products and Technology
- Technology
- Technology Blogs by SAP
- Part 3: How to use SAP Cloud Platform Connectivity...
Technology Blogs by SAP
Learn how to extend and personalize SAP applications. Follow the SAP technology blog for insights into SAP BTP, ABAP, SAP Analytics Cloud, SAP HANA, and more.
Turn on suggestions
Auto-suggest helps you quickly narrow down your search results by suggesting possible matches as you type.
Showing results for
Advisor
Options
- Subscribe to RSS Feed
- Mark as New
- Mark as Read
- Bookmark
- Subscribe
- Printer Friendly Page
- Report Inappropriate Content
03-09-2018
1:47 PM
In the first and second part of this blog series, you can read more on how to setup the Cloud Connector and deploy a cloud application running in the Cloud Foundry environment of SAP Cloud Platform. There you can find all details you need on how to use SAP Cloud Platform Connectivity to consume data coming from an on-premise backend system using Basic Authentication. This authentication type is good for testing but not really recommended for productive usage. In this new part of the blog series, I want to share with you which steps are needed to update the existing configuration to use principal propagation.
Note: To successfully understand the explanations below, I recommend you to go first through the previous parts of the blog series as everything here is based on them.
Before starting to explain on how to configure the Cloud Connector to propagate the user identity from the cloud application to the backend system, let's have again a short recap of what happens and emphasize the differences to Basic Authentication (colored in blue😞
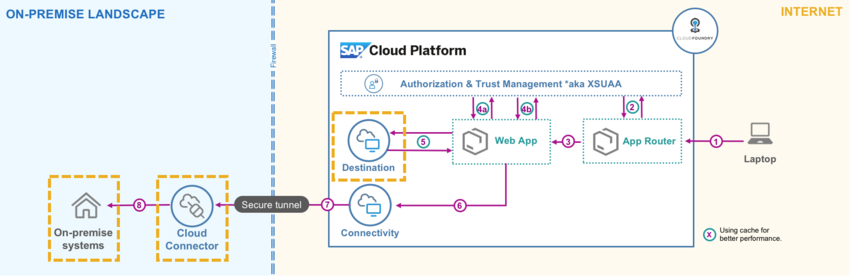
1. User calls the webApp through the AppRouter, which provides a central point of entry to business applications.
2. The request is redirected to XSUAA and the user needs to login. Then a JSON Web Token (let’s call this token JWT1) is created and sent to AppRouter. JWT1 is then cached by the AppRouter.
3. AppRouter forwards the request to the relevant Web-app URL which is defined as destination, it also passes the JWT1 token as credentials.
4a. The WebApp requests another JWT (JWT2) to access the destination instance. JWT2 should be cached for better performance.
4b. In parallel, the WebApp requests another JWT (JWT3) to access the connectivity instance. JWT3 should be cached for better performance.
5. The WebApp requests destination configuration by sending JWT2 and gets the authentication type (Principal Propagation).
6. Based on the authentication type defined in the destination, the WebApp sends a request to the connectivity instance with JWT1 and JWT3.
7. SAP Cloud Platform Connectivity forwards the request to the Cloud Connector.
8. The Cloud Connector sends a request to the on-premise system. Both need to be well configured for principal propagation (see below for details).
In the diagram you can see that you need to update the configuration in 3 different places: in the Cloud Connector, in the on-premise backend system and in the destination created in the SAP Cloud Platform. Let see now what needs to be done exactly.
a. Update the principal type of the Access Control
b. Set up a trust with the identity provider
c. Export the system certificate so that you can import it in the backend system later on
d. Configure the CA certificate for the short-living certificate
e. Adapt the subject pattern for principal propagation
f. Generate a sample certificate in order to import it in the backend.
a. Import the system certificate of the Cloud Connector to establish trust
b. Configure the Internet Communication Manager (ICM) to ensure the communication to the outside world.
c. Set up the rule-based certificate mapping (short-living certificate of the Cloud Connector)
a. Change the authentication type of the destination to "Principal Propagation"
b. That's all you need to do in the SAP Cloud Platform. Now you can test your application.
As you can see the main efforts to setup principal propagation remains in the configuration of the Cloud Connector and the backend system. That means the configuration is almost identical to what we need to do in order to propagate the user identity for the NEO environment of the SAP Cloud Platform. If you are not familiar with this configuration: we have created last year for TechEd a step-by-step guide and the good thing is that you can re-use it completely, even though it has been created for the NEO environment.
One last thing... you are probably asking yourself how the web application decides to send the Authorization header (for basic authentication) or the JWT1 (for principal propagation) based on the authentication type defined in the destination. We have just insert a condition to check it in the code. Here is the excerpt of the code, which is in the file ConnectivityServlet.java.
As mentioned in the previous blogs, you can find all the code in the sharepoint.
You can find the step-by-step guide for setting the principal propagation here on Github. To make it easier for you to use it, I have inserted below a detailed structure of what needs to be done with the direct related links, so that you can faster get to the right info. As bonus, you can find a trouble-shooting guide at the end in the same Github repository 😉
Step1: Change the principal type of the existing access control to X.509 Certificate
https://github.com/SAP/cloud-platform-connectivity-principal-propagation/tree/master/exercises/B1#us...
Step 2: Trust configuration to establish trust with the identity provider
https://github.com/SAP/cloud-platform-connectivity-principal-propagation/blob/master/exercises/B1#us...
Step 3: Configure and export the system certificate
https://github.com/SAP/cloud-platform-connectivity-principal-propagation/blob/master/exercises/B1#us...
Step 4: Set up CA certificate
https://github.com/SAP/cloud-platform-connectivity-principal-propagation/blob/master/exercises/B1#us...
Step 5: Configure a subject pattern for principal propagation and generate a sample certificate
https://github.com/SAP/cloud-platform-connectivity-principal-propagation/blob/master/exercises/B1#us...
Step 1: Establishing trust between the ABAP system and the Cloud Connector by importing the system certificate
https://github.com/SAP/cloud-platform-connectivity-principal-propagation/tree/master/exercises/B2#us...
Step 2: Configuration of the ICM
https://github.com/SAP/cloud-platform-connectivity-principal-propagation/tree/master/exercises/B2#us...
Step 3: Mapping of the short-living certificate
https://github.com/SAP/cloud-platform-connectivity-principal-propagation/tree/master/exercises/B2#us...
Step 1: Update the destination
https://github.com/SAP/cloud-platform-connectivity-principal-propagation/tree/master/exercises/B3#us...
Step 2: Launch the app 😉
Here again the repository with the code.
Be aware that this is only the basic setup to propagate the identity of the user. You will probably want to do more like setting the Trust Store in the Cloud Connector or whitelist your cloud applications as trusted. As this is not mandatory for having a working setup, I haven't mentioned it before but I would highly recommend you to have a look at it. You can find all the details and much more in our security guide that is now part of the official documentation.
Thanks for taking the time to go through this blog and please share your feedbacks. It's always much appreciated 😉
Note: To successfully understand the explanations below, I recommend you to go first through the previous parts of the blog series as everything here is based on them.
Before starting to explain on how to configure the Cloud Connector to propagate the user identity from the cloud application to the backend system, let's have again a short recap of what happens and emphasize the differences to Basic Authentication (colored in blue😞
1. User calls the webApp through the AppRouter, which provides a central point of entry to business applications.
2. The request is redirected to XSUAA and the user needs to login. Then a JSON Web Token (let’s call this token JWT1) is created and sent to AppRouter. JWT1 is then cached by the AppRouter.
3. AppRouter forwards the request to the relevant Web-app URL which is defined as destination, it also passes the JWT1 token as credentials.
4a. The WebApp requests another JWT (JWT2) to access the destination instance. JWT2 should be cached for better performance.
4b. In parallel, the WebApp requests another JWT (JWT3) to access the connectivity instance. JWT3 should be cached for better performance.
5. The WebApp requests destination configuration by sending JWT2 and gets the authentication type (Principal Propagation).
6. Based on the authentication type defined in the destination, the WebApp sends a request to the connectivity instance with JWT1 and JWT3.
7. SAP Cloud Platform Connectivity forwards the request to the Cloud Connector.
8. The Cloud Connector sends a request to the on-premise system. Both need to be well configured for principal propagation (see below for details).
In the diagram you can see that you need to update the configuration in 3 different places: in the Cloud Connector, in the on-premise backend system and in the destination created in the SAP Cloud Platform. Let see now what needs to be done exactly.
1. Configuration of the Cloud Connector
a. Update the principal type of the Access Control
b. Set up a trust with the identity provider
c. Export the system certificate so that you can import it in the backend system later on
d. Configure the CA certificate for the short-living certificate
e. Adapt the subject pattern for principal propagation
f. Generate a sample certificate in order to import it in the backend.
2. Configuration of the on-premise backend system
a. Import the system certificate of the Cloud Connector to establish trust
b. Configure the Internet Communication Manager (ICM) to ensure the communication to the outside world.
c. Set up the rule-based certificate mapping (short-living certificate of the Cloud Connector)
3. Update of the destination in SAP Cloud Platform
a. Change the authentication type of the destination to "Principal Propagation"
b. That's all you need to do in the SAP Cloud Platform. Now you can test your application.
As you can see the main efforts to setup principal propagation remains in the configuration of the Cloud Connector and the backend system. That means the configuration is almost identical to what we need to do in order to propagate the user identity for the NEO environment of the SAP Cloud Platform. If you are not familiar with this configuration: we have created last year for TechEd a step-by-step guide and the good thing is that you can re-use it completely, even though it has been created for the NEO environment.
One last thing... you are probably asking yourself how the web application decides to send the Authorization header (for basic authentication) or the JWT1 (for principal propagation) based on the authentication type defined in the destination. We have just insert a condition to check it in the code. Here is the excerpt of the code, which is in the file ConnectivityServlet.java.
switch (authType) {

			case NO_AUTHENTICATION:

				// No action needed

				break;

			case PRINCIPAL_PROPAGATION:

				// Forward JWT token to Connectivity Service

				client.setRequestProperty(SharedConstants.HEADER_SAP_CONNECTIVITY_AUTHENTICATION,

						SharedConstants.BEARER_WITH_TRAILING_SPACE + token);

				break;

			case BASIC_AUTHENTICATION:

				client.setRequestProperty(SharedConstants.HEADER_AUTORIZATION, SharedConstants.BASIC_WITH_TRAILING_SPACE +

						connectionAttributes.getAuthenticationToken());

				break;

			case SAMLBEARER_AUTHENTICATION:

				String authHeader = SharedConstants.BEARER_WITH_TRAILING_SPACE

						+ connectionAttributes.getAuthenticationToken();

				LOGGER.info(SharedConstants.HEADER_AUTORIZATION + ": " + authHeader);

				client.setRequestProperty(SharedConstants.HEADER_AUTORIZATION, authHeader);

			default:

				break;

			}
As mentioned in the previous blogs, you can find all the code in the sharepoint.
You can find the step-by-step guide for setting the principal propagation here on Github. To make it easier for you to use it, I have inserted below a detailed structure of what needs to be done with the direct related links, so that you can faster get to the right info. As bonus, you can find a trouble-shooting guide at the end in the same Github repository 😉
A. Steps needed in the Cloud Connector
Step1: Change the principal type of the existing access control to X.509 Certificate
https://github.com/SAP/cloud-platform-connectivity-principal-propagation/tree/master/exercises/B1#us...
Step 2: Trust configuration to establish trust with the identity provider
https://github.com/SAP/cloud-platform-connectivity-principal-propagation/blob/master/exercises/B1#us...
Step 3: Configure and export the system certificate
https://github.com/SAP/cloud-platform-connectivity-principal-propagation/blob/master/exercises/B1#us...
Step 4: Set up CA certificate
https://github.com/SAP/cloud-platform-connectivity-principal-propagation/blob/master/exercises/B1#us...
Step 5: Configure a subject pattern for principal propagation and generate a sample certificate
https://github.com/SAP/cloud-platform-connectivity-principal-propagation/blob/master/exercises/B1#us...
B. Steps needed in the on-premise backend system
Step 1: Establishing trust between the ABAP system and the Cloud Connector by importing the system certificate
https://github.com/SAP/cloud-platform-connectivity-principal-propagation/tree/master/exercises/B2#us...
Step 2: Configuration of the ICM
https://github.com/SAP/cloud-platform-connectivity-principal-propagation/tree/master/exercises/B2#us...
Step 3: Mapping of the short-living certificate
https://github.com/SAP/cloud-platform-connectivity-principal-propagation/tree/master/exercises/B2#us...
C. Steps needed in the SAP Cloud Platform
Step 1: Update the destination
https://github.com/SAP/cloud-platform-connectivity-principal-propagation/tree/master/exercises/B3#us...
Step 2: Launch the app 😉
Here again the repository with the code.
Be aware that this is only the basic setup to propagate the identity of the user. You will probably want to do more like setting the Trust Store in the Cloud Connector or whitelist your cloud applications as trusted. As this is not mandatory for having a working setup, I haven't mentioned it before but I would highly recommend you to have a look at it. You can find all the details and much more in our security guide that is now part of the official documentation.
Thanks for taking the time to go through this blog and please share your feedbacks. It's always much appreciated 😉
- SAP Managed Tags:
- SAP BTP, Cloud Foundry runtime and environment,
- SAP Connectivity service
Labels:
9 Comments
You must be a registered user to add a comment. If you've already registered, sign in. Otherwise, register and sign in.
Labels in this area
-
ABAP CDS Views - CDC (Change Data Capture)
2 -
AI
1 -
Analyze Workload Data
1 -
BTP
1 -
Business and IT Integration
2 -
Business application stu
1 -
Business Technology Platform
1 -
Business Trends
1,658 -
Business Trends
126 -
CAP
1 -
cf
1 -
Cloud Foundry
1 -
Confluent
1 -
Customer COE Basics and Fundamentals
1 -
Customer COE Latest and Greatest
3 -
Customer Data Browser app
1 -
Data Analysis Tool
1 -
data migration
1 -
data transfer
1 -
Datasphere
2 -
Event Information
1,400 -
Event Information
86 -
Expert
1 -
Expert Insights
177 -
Expert Insights
406 -
General
2 -
Getting Started
1 -
Google cloud
1 -
Google Next'24
1 -
GraphQL
1 -
Kafka
1 -
Life at SAP
780 -
Life at SAP
18 -
Migrate your Data App
1 -
MTA
1 -
Network Performance Analysis
1 -
NodeJS
1 -
PDF
1 -
POC
1 -
Product Updates
4,571 -
Product Updates
448 -
Replication Flow
1 -
REST API
1 -
RisewithSAP
1 -
SAP BTP
1 -
SAP BTP Cloud Foundry
1 -
SAP Cloud ALM
1 -
SAP Cloud Application Programming Model
1 -
SAP Datasphere
2 -
SAP S4HANA Cloud
1 -
SAP S4HANA Migration Cockpit
1 -
Technology Updates
6,868 -
Technology Updates
538 -
Workload Fluctuations
1
Related Content
- Consuming SAP with SAP Build Apps - adding S/4HANA Cloud in Technology Blogs by SAP
- Visualize Mobile Services Destination using SAP Mobile Backend Tools and OData CSDL Modeler in Technology Blogs by SAP
- "SAP Private Link and Azure Private Link" in the Context of SAP Enterprise Cloud Services in Technology Blogs by SAP
- SAP AI Core Static Deployment URL in Technology Blogs by SAP
- SAP BTP FAQs - Part 4 (DevOps) in Technology Blogs by SAP
Top kudoed authors
| User | Count |
|---|---|
| 13 | |
| 10 | |
| 9 | |
| 8 | |
| 7 | |
| 7 | |
| 7 | |
| 7 | |
| 7 | |
| 6 |