


- SAP Community
- Products and Technology
- Technology
- Technology Blogs by SAP
- Query on CMIS Repository #3
Technology Blogs by SAP
Learn how to extend and personalize SAP applications. Follow the SAP technology blog for insights into SAP BTP, ABAP, SAP Analytics Cloud, SAP HANA, and more.
Turn on suggestions
Auto-suggest helps you quickly narrow down your search results by suggesting possible matches as you type.
Showing results for
Product and Topic Expert
Options
- Subscribe to RSS Feed
- Mark as New
- Mark as Read
- Bookmark
- Subscribe
- Printer Friendly Page
- Report Inappropriate Content
08-07-2022
7:30 AM
A framework of languages, libraries, and tools called the SAP Cloud Application Programming Model (CAP) is used to create enterprise-level services and applications. The CAP framework combines open-source and SAP technologies that have been successfully deployed and are widely used.On top of open source technologies, the key additions made by CAP are:
In my first blog post(click here) in this blog series, I discussed CMIS standards and a step-by-step procedure for setting up an SAP Document Management Service instance.
In my second blog entry(click here), I described how we created a unique CMIS client to establish a connection with the SAP Document Management Service instance and launch a session to query the Repository.
This blog article aims to use CAP Java SDK to build a basic CAP application to integrate with the SAP Document Management Service instance and Also try to understand the sequence of steps during the User token Exchange. To get the access token for the XSUAA first and exchange it with the SAP Document Management Service credential(another client id and secret) for a new access token with technical access metadata, like scopes.
You need to have:
Before we start, if you haven’t already, create a new directory called “sdmapps.” Open a terminal on your computer and type in the following:
OR Clone the repository and fetch java branch as shown below and Please note that if you clone the repository, you can skip to Step 8
To start, change to the java/sdm-service directory inside the sdmapps:
Token exchange is an extension to OAuth 2.0 for implementing scenarios where one token needs to be swapped for another. It could be in the following situations: the first situation is delegation (on behalf of); supplying a service with a token to access a backend resource to complete a token-authorized request, and the second situation is Impersonation (act as); giving a super user access as an ordinary user to a resource via a token.
An authorization server's standard token endpoint is where the exchange takes place, and a particular grant type (urn:ietf:params:oauth:grant-type:token-exchange) has been created just for it.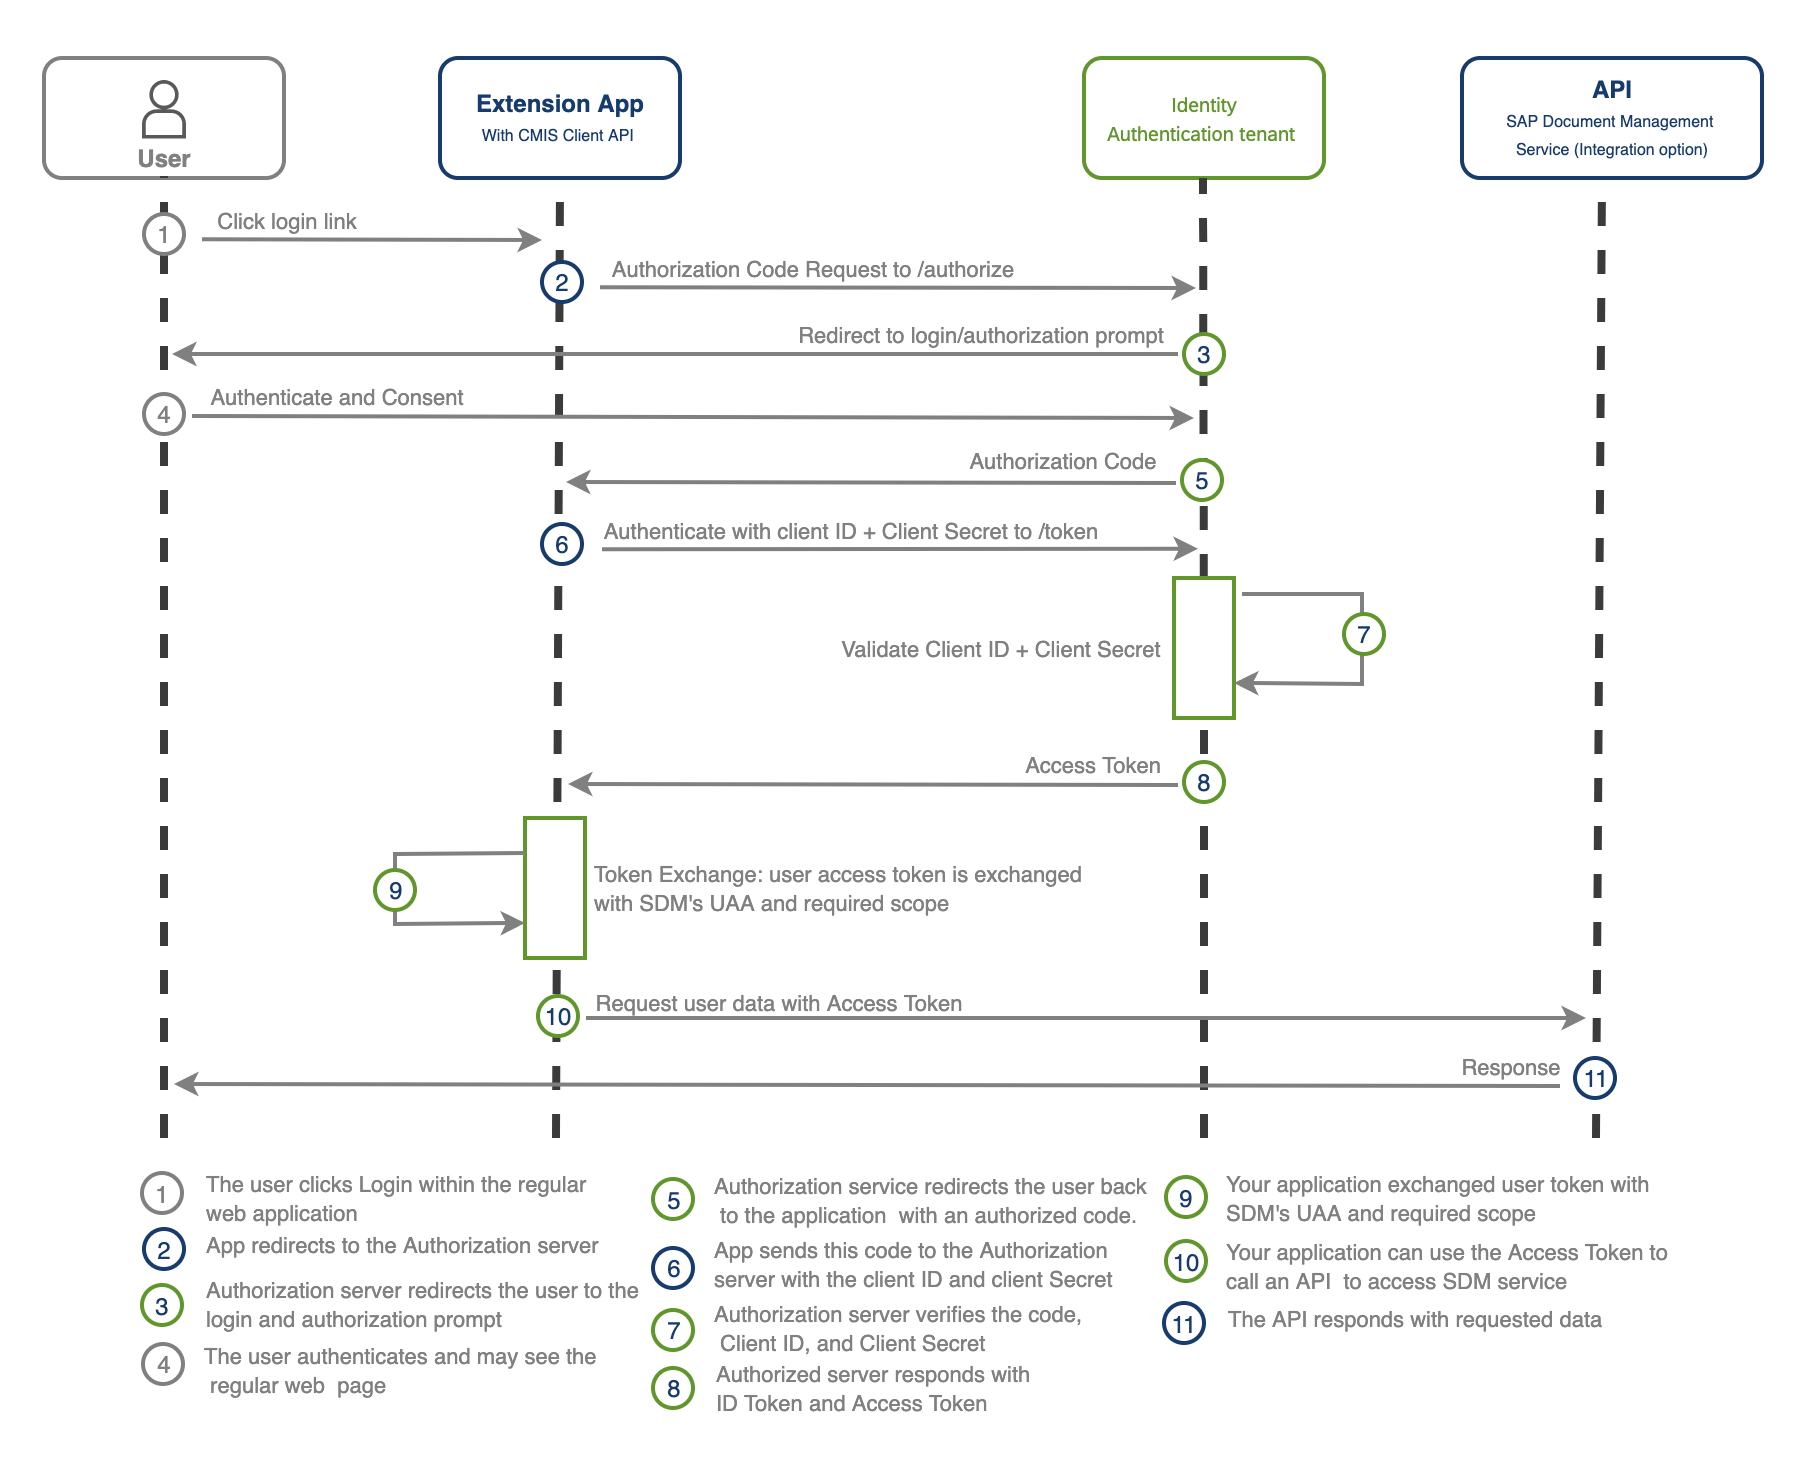
First, run the following command:
This will initialize the application using the maven archetype cds-services-archetype and create your project as follows:
Change the directory to "sdm-service" and Open VS Code from the terminal by typing:
Go to your db folder and create a file called schema.cds
Add the following code to your newly created schema.cds file and make sure you Save the file:
Go to your srv folder and open the service.cds file.
Replace the content with the following code and make sure you Save the file:
Run the following command in the terminal to trigger the maven build process:
Running this for the first time might take a while. Before continuing with the tutorial, please wait until you see the BUILD SUCCESS message.
After running this command, some files are generated and added to the srv/src/main/resources/edmx folder. This is the default path, where CAP Java runtime looks for the model definitions.
Create the JAVA package by creating a new folder called handlers under srv/src/main/java/com/sap/cap/sdmservice
Create the Java class file DocumentService.java in the created handlers folder with the following content and make sure you Save the file:
This class handles the READ and UPDATE events that target the Pictures entity of the DocumentService. The READ operation just returns all entities kept in memory. The UPDATE event updates the entity content.
These two events we will extend with custom code to integrate with the Document Management Service instance.
Edit the pom.xml in the srv directory (not the pom.xml file located in the root project folder), and add the following dependencies. Make sure you Save the file.
Create a folder model and add a file name SDMUaa.java. Please copy the below code:
This class works as a container that contains the SDM service UAA data to help us with the user token exchange flow.
Create a folder config and add a file name ConnectSDMDataSource.java. Please copy the below code:
OpenCMIS heavily uses property Maps as a simple way to collect named value pairs of parameters for operations; this Class creates a session by adding the required default SessionParameters and sets access token with the default CMIS repository into the Map to connect.
We annotated this Class with @Component, which allows Spring to automatically detect and register it in the context as a Spring bean. In other words, without having to write explicit code, Spring will scan our application for classes annotated with @Component. Instantiate them, inject any specified dependencies into them and Inject them wherever needed.
Add another file name SDMDataSource.java in the config folder. Please copy the below code:
We annotated this Class also with @Component, so it will also register in the context as a Spring bean and will inject wherever needed. This Class help us to get the SDM service binding with the credentials(another clientId and client_secert) to store in the sdmUaa object and use it to create the OAuth2ServiceConfigurationBuilder object to create a configuration for the XsuaaTokenFlows.
The XsuaaTokenFlows provides a builder-pattern API that allows applications to easily create and execute each flow, guiding developers to only set relevant properties for the respective token flow.
In our case, userTokenFlows exchanges the user token with another access token to access the SAP Document Management Service Repository.
We are all set with the custom Classes required now; let's update the Event handler to use those classes. When running in Spring, we can use auto wiring on properties, setters, and constructors after enabling annotation injection.
We have annotated connectSDMDataSource and db property using @Autowired to inject ConnectSDMDataSource and PersistenceService Bean. We have also defined the function which returns the required session/connection with the CMIS repository. This session holds the configuration setting for multiple calls to the Repository. The session is also the entry point to perform all operations on the Repository.
Update the following code in cdsService.EVENT_UPDATE method and make sure you Save the file:
The @On annotation used to register the method indicate that it should be called whenever the Pictures entity will update. By default, The UPDATE operation update the entity fields. If Update Event Context is for content field, then this method store the image content on the CMIS Repository with the ID plus fileExtension as file name.
Update the following code in cdsService.EVENT_READ method and make sure you Save the file:
The @On annotation used to register the method indicate that it should be called whenever the Pictures entity will read. By default, The READ operation returns all entities kept in memory. If Read Event Context is for specific records to get an image, then this method query on the CMIS Repository and sets the content in the Picture Object to the context response result.
Cloud Foundry supports multiple Node.js major versions (like 14 and 16) and usually uses the lowest available by default. Therefore, it is essential to declare which Node.js version should be used.
Open the file package.json and add the following snippet:
The MTA deployment is described in the MTA Deployment Descriptor, a file called mta.yaml. As the first step, let the CAP server generate an initial mta.yaml file.
Run the following command from the project root folder:
The file is generated based on your previously created settings in the package.json file.
The mta.yaml file consists of different modules (Cloud Foundry apps) and resources (Cloud Foundry services).
The next step is to add the Authorization and Trust Management service to mta.yaml to allow user login, authorization, and authentication checks and add the SAP Document Management Service. Update the name and resource as shown.
The configuration for XSUAA is read from the xs-security.json file.
But in the config element, values can be added and overwritten. The value xsappname gets overwritten with a space-dependent value. The name has to be unique within a subaccount.
Delete your older package-lock.json to avoid errors due to using older versions. Build the MTA module from your project root folder:
This creates a mtar file sdm-service_1.0.0-SNAPSHOT.mtar in the current folder (option: -t ./).
Use the following command to see if the deployed application is running or not and to get the application URL:
The cf env command displays the cloud foundry environment variable for your application. You can manually copy VCAP_SERVICE environment variable found in the service bindings area for an application and paste it into the default-env.json file in the application root directory OR use the following command.
Please note the application URL we will use for accessing application resources.
On the first request, we need to configure a new token, and it is necessary to know the client id, client secret and authorization server URL to configure the new token. We can find this information in the environment variable of the application in the following properties:
To get the environment variables, open default-env.json file and take note of these three property values (I’ve marked them in the screenshot below) clientid, clientsecret and url.
After all required information is determined to configure the access token, select the "Authorization" tab and select Authorization Type "OAuth 2.0". Enter the missing values accordingly, as mentioned below.
Click on "Get New Access Token". It will prompt you to enter your credentials and retrieve the authorization code. It automatically exchanges the authorization code for an access token using the client id, secret; if everything is successful, you will receive your access token.
As we are using OData v4, we can store an image by sending one request to create an entity without media data. In payload, we have added repositoryId which we created in our first blog post.
After a successful call, returns the response with the property ID required for the next call. Please take note of it. The second request is to upload the image using the id returned by the first request using the PUT Method.
Read media data using GET
Well, that’s it from my side! I appreciate your patience and following this blog post series to the very end. We are very interested to hear about your own experiences and ideas. With a understanding of the presented concepts and the provided sample application, you should be well equipped to get your own scenario started.
Stay curious!
OpenCMIS
Cloud Security XSUAA Integration
SAP Document Management Service
SAP Document Management Service Authorization
The OAuth 2.0 Authorization Framework
The OAuth 2.0 Token Exchange
Core Data Services (CDS) which serves as a standard modelling language for both domain models and service descriptions. Service SDKs and runtimes for Java and Node.js. They provide frameworks for creating and using services and generic provider implementations that can automatically handle many requests.
In my first blog post(click here) in this blog series, I discussed CMIS standards and a step-by-step procedure for setting up an SAP Document Management Service instance.
In my second blog entry(click here), I described how we created a unique CMIS client to establish a connection with the SAP Document Management Service instance and launch a session to query the Repository.
This blog article aims to use CAP Java SDK to build a basic CAP application to integrate with the SAP Document Management Service instance and Also try to understand the sequence of steps during the User token Exchange. To get the access token for the XSUAA first and exchange it with the SAP Document Management Service credential(another client id and secret) for a new access token with technical access metadata, like scopes.

Prerequisite
You need to have:
- It would be ideal if you followed and completed the steps mentioned in my previous articles(Click on #1 & #2) before moving on to this one.
- Install the CDS tools by following the steps mentioned in the link.
- Install Apache Maven (at least version 3.5.0 is required).
- Install the latest version of the MBT for your operating system. you can install using npm command npm install -g mbt
Let’s proceed step by step
Before we start, if you haven’t already, create a new directory called “sdmapps.” Open a terminal on your computer and type in the following:
mkdir sdmapps sdmapps/javaOR Clone the repository and fetch java branch as shown below and Please note that if you clone the repository, you can skip to Step 8
git clone -b java https://github.com/alphageek7443/sdmappsTo start, change to the java/sdm-service directory inside the sdmapps:
cd sdmapps/java/sdm-serviceUser Token Exchange
Token exchange is an extension to OAuth 2.0 for implementing scenarios where one token needs to be swapped for another. It could be in the following situations: the first situation is delegation (on behalf of); supplying a service with a token to access a backend resource to complete a token-authorized request, and the second situation is Impersonation (act as); giving a super user access as an ordinary user to a resource via a token.
An authorization server's standard token endpoint is where the exchange takes place, and a particular grant type (urn:ietf:params:oauth:grant-type:token-exchange) has been created just for it.
Step 1: Create an Application
First, run the following command:
mvn -B archetype:generate \

-DarchetypeArtifactId=cds-services-archetype \

-DarchetypeGroupId=com.sap.cds \

-DarchetypeVersion=RELEASE \

-DgroupId=com.sap.cap -DartifactId=sdm-service
This will initialize the application using the maven archetype cds-services-archetype and create your project as follows:
- The project is named sdm-service.
- The db folder stores database-related artefacts.
- The srv folder stores your Java application.
Change the directory to "sdm-service" and Open VS Code from the terminal by typing:
cd sdm-service

code .

Go to your db folder and create a file called schema.cds
Add the following code to your newly created schema.cds file and make sure you Save the file:
namespace sap.capire.media;


entity Pictures {

  key ID       : UUID;

  name         : String;

  repositoryId : String;

  content      : LargeBinary  @Core.MediaType: mediaType;

  mediaType    : String       @Core.IsMediaType : true;

}
Go to your srv folder and open the service.cds file.
Replace the content with the following code and make sure you Save the file:
using { sap.capire.media as db } from '../db/schema';


service DocumentService{

    entity Pictures as projection on db.Pictures;

}
Run the following command in the terminal to trigger the maven build process:
mvn clean installRunning this for the first time might take a while. Before continuing with the tutorial, please wait until you see the BUILD SUCCESS message.

After running this command, some files are generated and added to the srv/src/main/resources/edmx folder. This is the default path, where CAP Java runtime looks for the model definitions.
Step 2: Add Custom Event Handler
Create the JAVA package by creating a new folder called handlers under srv/src/main/java/com/sap/cap/sdmservice
Create the Java class file DocumentService.java in the created handlers folder with the following content and make sure you Save the file:
package com.sap.cap.sdmservice.handlers;


import org.springframework.stereotype.Component;

import com.sap.cds.services.cds.CdsReadEventContext;

import com.sap.cds.services.cds.CdsService;

import com.sap.cds.services.cds.CdsUpdateEventContext;

import com.sap.cds.services.handler.EventHandler;

import com.sap.cds.services.handler.annotations.On;

import com.sap.cds.services.handler.annotations.ServiceName;


import cds.gen.documentservice.DocumentService_;

import cds.gen.documentservice.Pictures;

import cds.gen.documentservice.Pictures_;


@Component

@ServiceName(DocumentService_.CDS_NAME)

public class DocumentService implements EventHandler {


    @On(event =  CdsService.EVENT_READ, entity = Pictures_.CDS_NAME)

    public void read(CdsReadEventContext context){

        System.out.println(this.getClass().getSimpleName()+": "

        +context.getEvent());


    }


    @On(event = CdsService.EVENT_UPDATE, entity = Pictures_.CDS_NAME)

    public void update(CdsUpdateEventContext context, Pictures pictures) {

        System.out.println(this.getClass().getSimpleName()+": "

        +context.getEvent());


    }

}
This class handles the READ and UPDATE events that target the Pictures entity of the DocumentService. The READ operation just returns all entities kept in memory. The UPDATE event updates the entity content.
These two events we will extend with custom code to integrate with the Document Management Service instance.
Step 4: Add Dependencies
Edit the pom.xml in the srv directory (not the pom.xml file located in the root project folder), and add the following dependencies. Make sure you Save the file.
<dependency>

  <groupId>com.sap.cds</groupId>

  <artifactId>cds-starter-cloudfoundry</artifactId>

</dependency>


<dependency>

  <groupId>org.apache.chemistry.opencmis</groupId>

  <artifactId>chemistry-opencmis-client-impl</artifactId>

  <version>1.1.0</version>

</dependency>


<dependency>

<groupId>com.sap.cloud.security.xsuaa</groupId>

  <artifactId>token-client</artifactId>

  <version>2.13.0</version>

</dependency>


<dependency>

  <groupId>org.apache.httpcomponents</groupId>

  <artifactId>httpclient</artifactId>

</dependency>
Step 5: Add Required Packages and Classes
Create a folder model and add a file name SDMUaa.java. Please copy the below code:
package com.sap.cap.sdmservice.model;


import java.util.LinkedHashMap;

import java.util.Map;


import com.sap.cloud.security.config.CredentialType;

import com.sap.cloud.security.xsuaa.XsuaaCredentials;


public class SDMUaa {

    private final String uri;

    private final XsuaaCredentials credentials;


    public SDMUaa(Map<String, Object> credentials){

        @SuppressWarnings (value="unchecked")

        Map<String, String> uaa = (LinkedHashMap<String, String>)

        credentials.get("uaa");

        this.uri =(String) credentials.get("uri");

        this.credentials = new XsuaaCredentials();

        this.credentials.setClientId(uaa.get("clientid"));

        this.credentials.setClientSecret(uaa.get("clientsecret"));

        this.credentials.setUrl(uaa.get("url"));

        this.credentials.setCredentialType(CredentialType

        .from(uaa.get("credential-type")));

    }


    public String getUri() {

        return this.uri;

    }


    public XsuaaCredentials getCredentials() {

        return this.credentials;

    }

}
This class works as a container that contains the SDM service UAA data to help us with the user token exchange flow.
Create a folder config and add a file name ConnectSDMDataSource.java. Please copy the below code:
package com.sap.cap.sdmservice.config;


import java.util.HashMap;


import org.apache.chemistry.opencmis.client.api.Session;

import org.apache.chemistry.opencmis.client.api.SessionFactory;

import org.apache.chemistry.opencmis.client.runtime.SessionFactoryImpl;

import org.apache.chemistry.opencmis.commons.SessionParameter;

import org.apache.chemistry.opencmis.commons.enums.BindingType;

import org.springframework.beans.factory.annotation.Autowired;

import org.springframework.stereotype.Component;


import com.sap.cds.services.EventContext;

import com.sap.cds.services.authentication.JwtTokenAuthenticationInfo;


@Component

public class ConnectSDMDataSource {


    private HashMap<String, String> parameters;

    private SDMDataSource sdmDataSource;


    @Autowired

    public ConnectSDMDataSource(SDMDataSource sdmDataSource){

        this.sdmDataSource = sdmDataSource;

        this.parameters =  new HashMap<String, String>();

        parameters.put(SessionParameter.BINDING_TYPE,

        BindingType.BROWSER.value());

        parameters.put(SessionParameter.AUTH_HTTP_BASIC, "false");

        parameters.put(SessionParameter.AUTH_SOAP_USERNAMETOKEN, "false");

        parameters.put(SessionParameter.AUTH_OAUTH_BEARER, "true");

    }


    public ConnectSDMDataSource setParameter(String parameter, String value){

        this.parameters.put(parameter, value);

        return this;

    }


    public Session getSession(EventContext context,String repositoryId){


        JwtTokenAuthenticationInfo jwtTokenAuthenticationInfo =

        context.getAuthenticationInfo().as(JwtTokenAuthenticationInfo.class);

        String token = sdmDataSource.getUserAccessToken(

            jwtTokenAuthenticationInfo.getToken()).get();


        this.setParameter(SessionParameter.BROWSER_URL,

        sdmDataSource.getBrowerUrl())

        .setParameter(SessionParameter.OAUTH_ACCESS_TOKEN, token)

		.setParameter(SessionParameter.REPOSITORY_ID, repositoryId);


        SessionFactory factory = SessionFactoryImpl.newInstance();

        return factory.createSession(parameters);

    }

}
OpenCMIS heavily uses property Maps as a simple way to collect named value pairs of parameters for operations; this Class creates a session by adding the required default SessionParameters and sets access token with the default CMIS repository into the Map to connect.
We annotated this Class with @Component, which allows Spring to automatically detect and register it in the context as a Spring bean. In other words, without having to write explicit code, Spring will scan our application for classes annotated with @Component. Instantiate them, inject any specified dependencies into them and Inject them wherever needed.
Add another file name SDMDataSource.java in the config folder. Please copy the below code:
package com.sap.cap.sdmservice.config;


import java.util.List;

import java.util.Optional;

import java.util.stream.Collectors;


import org.springframework.beans.factory.annotation.Autowired;

import org.springframework.stereotype.Component;


import com.sap.cap.sdmservice.model.SDMUaa;

import com.sap.cds.services.runtime.CdsRuntime;

import com.sap.cloud.security.client.HttpClientFactory;

import com.sap.cloud.security.config.OAuth2ServiceConfiguration;

import com.sap.cloud.security.config.OAuth2ServiceConfigurationBuilder;

import com.sap.cloud.security.config.Service;

import com.sap.cloud.security.xsuaa.client.DefaultOAuth2TokenService;

import com.sap.cloud.security.xsuaa.client.OAuth2TokenResponse;

import com.sap.cloud.security.xsuaa.client.XsuaaDefaultEndpoints;

import com.sap.cloud.security.xsuaa.tokenflows.TokenFlowException;

import com.sap.cloud.security.xsuaa.tokenflows.UserTokenFlow;

import com.sap.cloud.security.xsuaa.tokenflows.XsuaaTokenFlows;


@Component

public class SDMDataSource {


    private CdsRuntime cdsRuntime;

    private SDMUaa sdmUaa;

    private UserTokenFlow userTokenFlow;


    @Autowired

    public SDMDataSource(CdsRuntime cdsRuntime){

        this.cdsRuntime = cdsRuntime;

        createDataSource();

        setUserTokenFlow();

    }


    public Optional<String> getUserAccessToken(String token) {

        OAuth2TokenResponse oAuth2TokenResponse = null;

        try {

            oAuth2TokenResponse = this.userTokenFlow

            .token(token).execute();

        } catch (TokenFlowException ex) {

            ex.printStackTrace();

        }

        return Optional.ofNullable(oAuth2TokenResponse.getAccessToken());

    }


    public String getBrowerUrl(){

        return this.sdmUaa.getUri()+"browser";

    }


    private void createDataSource() {

        List<SDMUaa> sdmUaas = cdsRuntime.getEnvironment()

        .getServiceBindings()

        .filter(b -> b.matches("sdm", "sdm"))

        .map(b -> new SDMUaa(b.getCredentials()))

        .collect(Collectors.toList());

        this.sdmUaa = sdmUaas.stream().findFirst().orElse(null);

    }


    private void setUserTokenFlow(){


        OAuth2ServiceConfigurationBuilder builder =

        OAuth2ServiceConfigurationBuilder.forService(Service.XSUAA);

        OAuth2ServiceConfiguration config = builder

            .withClientId(sdmUaa.getCredentials().getClientId())

            .withClientSecret(sdmUaa.getCredentials().getClientSecret())

            .withPrivateKey(sdmUaa.getCredentials().getKey())

            .withUrl(sdmUaa.getCredentials().getUrl())

            .build();


        XsuaaTokenFlows xsuaaTokenFlows = new XsuaaTokenFlows(

            new DefaultOAuth2TokenService(HttpClientFactory

            .create(config.getClientIdentity())),

            new XsuaaDefaultEndpoints(config),

            config.getClientIdentity());


        this.userTokenFlow= xsuaaTokenFlows.userTokenFlow();

    }

}
We annotated this Class also with @Component, so it will also register in the context as a Spring bean and will inject wherever needed. This Class help us to get the SDM service binding with the credentials(another clientId and client_secert) to store in the sdmUaa object and use it to create the OAuth2ServiceConfigurationBuilder object to create a configuration for the XsuaaTokenFlows.
The XsuaaTokenFlows provides a builder-pattern API that allows applications to easily create and execute each flow, guiding developers to only set relevant properties for the respective token flow.
In our case, userTokenFlows exchanges the user token with another access token to access the SAP Document Management Service Repository.
Step 6: Update Event Handler
We are all set with the custom Classes required now; let's update the Event handler to use those classes. When running in Spring, we can use auto wiring on properties, setters, and constructors after enabling annotation injection.
@Autowired

private ConnectSDMDataSource connectSDMDataSource;


@Autowired

private PersistenceService db;


private final CqnAnalyzer analyzer;


@Autowired

DocumentService(CdsModel model) {

   this.analyzer = CqnAnalyzer.create(model);

}


private Session getCMISSession(

   EventContext context, String repositoryId) {

      return connectSDMDataSource.getSession(context, repositoryId);

}
We have annotated connectSDMDataSource and db property using @Autowired to inject ConnectSDMDataSource and PersistenceService Bean. We have also defined the function which returns the required session/connection with the CMIS repository. This session holds the configuration setting for multiple calls to the Repository. The session is also the entry point to perform all operations on the Repository.
Update the following code in cdsService.EVENT_UPDATE method and make sure you Save the file:
 @On(event = CdsService.EVENT_UPDATE, entity = Pictures_.CDS_NAME)

    public void update(CdsUpdateEventContext context, Pictures pictures) {


        Result result = db.run(Select.from(Pictures_.CDS_NAME)

        .byId(pictures.getId()));

        Pictures picture = result.listOf(Pictures.class).get(0);


        String repositoryId = result.first().get()

        .get(Pictures.REPOSITORY_ID).toString();

        String fileExtension= MimeTypeUtils.parseMimeType

        (pictures.getMediaType().toString()).getSubtype();

        String fileName = result.first().get().get(Pictures.ID)

        .toString()+"."+fileExtension;

        Session session = this.getCMISSession(context, repositoryId);


        Map<String, Object> properties = new HashMap<String, Object>();

        properties.put(PropertyIds.OBJECT_TYPE_ID, "cmis:document");

        properties.put(PropertyIds.NAME, fileName);


        try {

            ContentStream contentStream = ContentStreamUtils

            .createByteArrayContentStream(

                fileName, IOUtils.toByteArray( pictures.getContent()),

            pictures.getMediaType());

            Folder folder = session.getRootFolder();

            Document document = folder.createDocument(properties,

            contentStream, VersioningState.MAJOR);

            System.out.println(document.getContentUrl());


        } catch (IOException e) {

            e.printStackTrace();

        }


        picture.setMediaType(pictures.getMediaType().toString());

        context.setResult(Arrays.asList(picture));

        context.setCompleted();

    }
The @On annotation used to register the method indicate that it should be called whenever the Pictures entity will update. By default, The UPDATE operation update the entity fields. If Update Event Context is for content field, then this method store the image content on the CMIS Repository with the ID plus fileExtension as file name.
Update the following code in cdsService.EVENT_READ method and make sure you Save the file:
 @On(event =  CdsService.EVENT_READ, entity = Pictures_.CDS_NAME)

    public void read(CdsReadEventContext context){

        AnalysisResult analysisResult = analyzer

        .analyze(context.getCqn().ref());

        Object id = analysisResult.rootKeys().get("ID");

        ArrayList<ResolvedRefItem> resolvedRefItems =

        (ArrayList<ResolvedRefItem>) analyzer

                .resolveRefItems(context.getCqn());


        if (id != null && resolvedRefItems.size() == 2

                && resolvedRefItems.get(0)

                .displayName().equals("content")) {


            Result resultQuery = db.run(Select.from(DocumentService_.PICTURES)

            .where(picture -> picture.ID().eq(id.toString())));

            Pictures picture = resultQuery.listOf(Pictures.class).get(0);


            Session session = getCMISSession(context, picture.getRepositoryId());

            String filename = picture.getId().toString();

            ItemIterable <QueryResult> cmisResults =session.query(

                "SELECT cmis:objectId FROM cmis:document where cmis:name LIKE "+

                "'"+filename+"%'",

                false);


            String objectId = null;

            for(QueryResult hit: cmisResults) {

                for(PropertyData<?> property: hit.getProperties()) {


                    if(property.getQueryName().equals("cmis:objectId")){

                        objectId = property.getFirstValue().toString();

                        break;

                    }

                }

            }


            Document document = session.getLatestDocumentVersion(objectId);

            picture.setContent(document.getContentStream().getStream());

            picture.setMediaType(document.getContentStreamMimeType());

            context.setResult(Arrays.asList(picture));

        }

    }
The @On annotation used to register the method indicate that it should be called whenever the Pictures entity will read. By default, The READ operation returns all entities kept in memory. If Read Event Context is for specific records to get an image, then this method query on the CMIS Repository and sets the content in the Picture Object to the context response result.
Add the following import statements to the top of the DocumentService.java class and make sure you Save the file:
import java.io.IOException;

import java.util.ArrayList;

import java.util.Arrays;

import java.util.HashMap;

import java.util.Map;


import org.apache.chemistry.opencmis.client.api.Document;

import org.apache.chemistry.opencmis.client.api.Folder;

import org.apache.chemistry.opencmis.client.api.ItemIterable;

import org.apache.chemistry.opencmis.client.api.QueryResult;

import org.apache.chemistry.opencmis.client.api.Session;

import org.apache.chemistry.opencmis.client.util.ContentStreamUtils;

import org.apache.chemistry.opencmis.commons.PropertyIds;

import org.apache.chemistry.opencmis.commons.data.ContentStream;

import org.apache.chemistry.opencmis.commons.data.PropertyData;

import org.apache.chemistry.opencmis.commons.enums.VersioningState;

import org.apache.commons.io.IOUtils;

import org.springframework.beans.factory.annotation.Autowired;

import org.springframework.stereotype.Component;

import org.springframework.util.MimeTypeUtils;


import com.sap.cap.sdmservice.config.ConnectSDMDataSource;

import com.sap.cds.Result;

import com.sap.cds.ql.Select;

import com.sap.cds.ql.cqn.AnalysisResult;

import com.sap.cds.ql.cqn.CqnAnalyzer;

import com.sap.cds.ql.cqn.ResolvedRefItem;

import com.sap.cds.reflect.CdsModel;

import com.sap.cds.services.EventContext;

import com.sap.cds.services.cds.CdsReadEventContext;

import com.sap.cds.services.cds.CdsService;

import com.sap.cds.services.cds.CdsUpdateEventContext;

import com.sap.cds.services.handler.EventHandler;

import com.sap.cds.services.handler.annotations.On;

import com.sap.cds.services.handler.annotations.ServiceName;

import com.sap.cds.services.persistence.PersistenceService;


import cds.gen.documentservice.DocumentService_;

import cds.gen.documentservice.Pictures;

import cds.gen.documentservice.Pictures_;
Step 7: Create MTA File
Cloud Foundry supports multiple Node.js major versions (like 14 and 16) and usually uses the lowest available by default. Therefore, it is essential to declare which Node.js version should be used.
Open the file package.json and add the following snippet:
{

  ...

  "devDependencies": {

    ...

  },

  "engines": {

    "node": "^16"

  },
The MTA deployment is described in the MTA Deployment Descriptor, a file called mta.yaml. As the first step, let the CAP server generate an initial mta.yaml file.
Run the following command from the project root folder:
cds add mtaThe file is generated based on your previously created settings in the package.json file.
The mta.yaml file consists of different modules (Cloud Foundry apps) and resources (Cloud Foundry services).
The next step is to add the Authorization and Trust Management service to mta.yaml to allow user login, authorization, and authentication checks and add the SAP Document Management Service. Update the name and resource as shown.
...

    requires:

        - name: sdmsrv

        - name: sdmxsuaa

resources:

 - name: sdmxsuaa

   type: org.cloudfoundry.managed-service

   parameters:

     service: xsuaa

     service-plan: application

     path: ./xs-security.json

 - name: sdmsrv

   type: org.cloudfoundry.managed-service

   parameters:

     service: sdm

     service-plan: free
The configuration for XSUAA is read from the xs-security.json file.
{

    "xsappname": "sdmxsuaa",

    "tenant-mode": "dedicated",

    "description": "Security profile for SDM Application ",

    "scopes": [

        {

            "name": "uaa.user",

            "description": "UAA"

        }

    ],

    "role-templates": [

        {

            "name": "Token_Exchange",

            "description": "UAA",

            "scope-references": [

                "uaa.user"

            ]

        }

    ]

}
But in the config element, values can be added and overwritten. The value xsappname gets overwritten with a space-dependent value. The name has to be unique within a subaccount.
Step 8: Build and Deploy
Delete your older package-lock.json to avoid errors due to using older versions. Build the MTA module from your project root folder:
mbt build -t ./This creates a mtar file sdm-service_1.0.0-SNAPSHOT.mtar in the current folder (option: -t ./).
cf deploy sdm-service_1.0.0-SNAPSHOT.mtarUse the following command to see if the deployed application is running or not and to get the application URL:
cf appsThe cf env command displays the cloud foundry environment variable for your application. You can manually copy VCAP_SERVICE environment variable found in the service bindings area for an application and paste it into the default-env.json file in the application root directory OR use the following command.
cf env sdm-service-srv \

| sed -n '/VCAP_SERVICES/,/VCAP_APPLICATION/p' \

| sed '$d' \

| sed '1s;^;{\n;' \

| sed '$s/$/}/' \

| sed '/^{}$/d' > default-env.json
Please note the application URL we will use for accessing application resources.
Step 9: Test Application
On the first request, we need to configure a new token, and it is necessary to know the client id, client secret and authorization server URL to configure the new token. We can find this information in the environment variable of the application in the following properties:
- VCAP_SERVICES.xsuaa.credentials.clientid
- VCAP_SERVICES.xsuaa.credentials.clientsecret
- VCAP_SERVICES.xsuaa.credentials.url (XSUAA server url which provides the required access token endpoint)
To get the environment variables, open default-env.json file and take note of these three property values (I’ve marked them in the screenshot below) clientid, clientsecret and url.
After all required information is determined to configure the access token, select the "Authorization" tab and select Authorization Type "OAuth 2.0". Enter the missing values accordingly, as mentioned below.
- Token Name: Enter the token name, example: AuthToken
- Grant Type: Select Grant Type "Authorization Code"
- Callback URL: Url that will be redirected to after your application is authorized for our case; it will be https://{{application URL}}/odata/v4/DocumentService/Pictures
- Auth URL: The endpoint of authorization server for our case. this is used to get the authorization code; it will be https://{{VCAP_SERVICES.xsuaa.credentials.url}}/oauth/authorize
- Access Token URL: The endpoint of authorization server. This is used to exchange the authorization code for an access token https://{{VCAP_SERVICES.xsuaa.credentials.url}}/oauth/token
- Client ID: VCAP_SERVICES.xsuaa.credentials.clientid
- Client Secret: VCAP_SERVICES.xsuaa.credentials.clientsecret
Click on "Get New Access Token". It will prompt you to enter your credentials and retrieve the authorization code. It automatically exchanges the authorization code for an access token using the client id, secret; if everything is successful, you will receive your access token.
As we are using OData v4, we can store an image by sending one request to create an entity without media data. In payload, we have added repositoryId which we created in our first blog post.
POST  https://{{application URL}}/odata/v4/DocumentService/Pictures

Authorization: Bearer {{token}}

Content-Type: application/json

{

    "name":"SAP BTP image",

    "repositoryId": "7cac5ffa-63f7-43f9-8b20-52d78f494f09"

}
After a successful call, returns the response with the property ID required for the next call. Please take note of it. The second request is to upload the image using the id returned by the first request using the PUT Method.
PUT https://{{application URL}}/odata/v4/DocumentService/Pictures/{{id}}/content

Authorization: Bearer {{token}}

Content-Type: image/png


<MEDIA>
Read media data using GET
GET https://{{application URL}}/odata/v4/DocumentService/Pictures/{{id}}/content

Authorization: Bearer {{token}}
What’s next?
Well, that’s it from my side! I appreciate your patience and following this blog post series to the very end. We are very interested to hear about your own experiences and ideas. With a understanding of the presented concepts and the provided sample application, you should be well equipped to get your own scenario started.
Stay curious!
Reference & Further Reading
OpenCMIS
Cloud Security XSUAA Integration
SAP Document Management Service
SAP Document Management Service Authorization
The OAuth 2.0 Authorization Framework
The OAuth 2.0 Token Exchange
Labels:
6 Comments
You must be a registered user to add a comment. If you've already registered, sign in. Otherwise, register and sign in.
Labels in this area
-
ABAP CDS Views - CDC (Change Data Capture)
2 -
AI
1 -
Analyze Workload Data
1 -
BTP
1 -
Business and IT Integration
2 -
Business application stu
1 -
Business Technology Platform
1 -
Business Trends
1,658 -
Business Trends
106 -
CAP
1 -
cf
1 -
Cloud Foundry
1 -
Confluent
1 -
Customer COE Basics and Fundamentals
1 -
Customer COE Latest and Greatest
3 -
Customer Data Browser app
1 -
Data Analysis Tool
1 -
data migration
1 -
data transfer
1 -
Datasphere
2 -
Event Information
1,400 -
Event Information
70 -
Expert
1 -
Expert Insights
177 -
Expert Insights
339 -
General
1 -
Google cloud
1 -
Google Next'24
1 -
GraphQL
1 -
Kafka
1 -
Life at SAP
780 -
Life at SAP
14 -
Migrate your Data App
1 -
MTA
1 -
Network Performance Analysis
1 -
NodeJS
1 -
PDF
1 -
POC
1 -
Product Updates
4,575 -
Product Updates
381 -
Replication Flow
1 -
REST API
1 -
RisewithSAP
1 -
SAP BTP
1 -
SAP BTP Cloud Foundry
1 -
SAP Cloud ALM
1 -
SAP Cloud Application Programming Model
1 -
SAP Datasphere
2 -
SAP S4HANA Cloud
1 -
SAP S4HANA Migration Cockpit
1 -
Technology Updates
6,872 -
Technology Updates
470 -
Workload Fluctuations
1
Related Content
- Embedding Business Context with the SAP HANA Cloud, Vector Engine in Technology Blogs by SAP
- What’s New in SAP Analytics Cloud Q2 2024 in Technology Blogs by SAP
- SAP BAS (Can I Deploy multiple times UI5 Application into ABAP Repository using BAS Trail Version) in Technology Q&A
- SAP CAP: Controller - Service - Repository architecture in Technology Blogs by Members
- What are steps and prerequisite to create a content repository using CMIS as a content server in Technology Q&A
Top kudoed authors
| User | Count |
|---|---|
| 17 | |
| 11 | |
| 7 | |
| 7 | |
| 7 | |
| 7 | |
| 6 | |
| 6 | |
| 6 | |
| 6 |