
- SAP Community
- Products and Technology
- Technology
- Technology Blogs by SAP
- Realize Service Delivery with SAP SuccessFactors W...
Technology Blogs by SAP
Learn how to extend and personalize SAP applications. Follow the SAP technology blog for insights into SAP BTP, ABAP, SAP Analytics Cloud, SAP HANA, and more.
Turn on suggestions
Auto-suggest helps you quickly narrow down your search results by suggesting possible matches as you type.
Showing results for
Product and Topic Expert
Options
- Subscribe to RSS Feed
- Mark as New
- Mark as Read
- Bookmark
- Subscribe
- Printer Friendly Page
- Report Inappropriate Content
12-13-2023
4:29 PM
In the technical introduction of this series we explained how a UI Integration Card can be setup to allow the user in the SAP SuccessFactors Work Zone creating a ticket in the SAP Customer Experience (Employee Central Service Center). However, you may remember that we used a technical user to do so. In this article will now shd light on how to create the ticket on behalf of the logged in user.
Goal
Goal of this tutorial is therefore to resolve the user identity and provide the correct information to the SAP Customer Experience so that the requestor can be identified.

Overview Software Components
Series:
This blog post is part of a series
Prerequisites:
In order to complete this tutorial, you will need some basic understanding of the SAP Business technology Platform (BTP), Business Application Studio (BAS) and SAP SuccessFactors Work Zone.
BAS and SAP SuccessFactors Work Zone should be configured so that a direct deployment is possible, but this is not mandatory.
Further Information how to set up the deployment can be found here Link
As ticket system, we will be using is SAP Customer Experience, but you could adapt the following tutorial to any other system providing REST APIs for external communication.
Required Software Components
To implement the solution described in this tutorial, you should have access to the BTP Cockpit, BAS, SAP SuccessFactors Work Zone and SAP Customer Experience.
Implementation
During this tutorial, we will impersonate 2 users: the administrator (or technical user) and the end user.
The main effort will reside on the administrator side, who will:
- Adapt the API Permissions
- Add a Data Source for User Information
- Ui Integration Card Adaption
Eventually, the end user will create a ticket through the SAP SuccessFactors Work Zone UI Integration Card.

Architectural Overview
Adapt the API permissions of the technical user in SAP Service Cloud
As you may know, the technical user in SAP Service Cloud has only limited permissions. To gather user information from the application we need to extend the permissions first.
Login to your SAP Service Cloud as administrator and go to General Settings. Scroll to the Integration area and select Communication Arrangements. Here you’ll see a list of your Communication arrangements including the one you created for the initial card
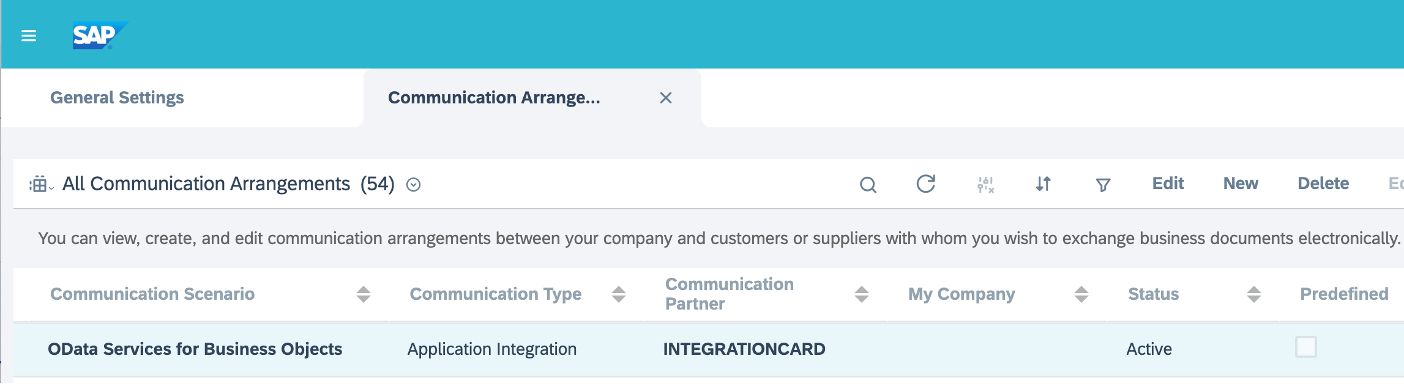
SAP Service Cloud - Communication Arrangements
Select it and click Edit in the upper right corner and get to the tab Technical Data. Here you’ll see the services we assigned as first part of this series.
Add the following services: employeeanduser and employeebasicdata

SAP Service Cloud - Communication Arrangements Services
Save and Reactivate your Communication Arrangement.
Add a Data Source for the User Information in SAP Service Cloud
Log in to your SAP BTP Subaccount and go to Connectivity > Destination where you initially created the destination for the first part of this Series.
In here we could easily adapt the current Destination and/or create new ones. For this tutorial we will clone the existing SAP CX Destination.

BTP Destination
Rename your cloned Destination to SAPCX_Employee and adapt the URL of the Destination as followed
……/sap/c4c/odata/v1/c4codataapi/
Your URL should look something like this:
https://<your_id>.crm.ondemand.com/sap/c4c/odata/v1/c4codataapi
Provide your password which you defined in the technical introduction of this series
Resolve the User Context Variable & Adapt the payload
Open your BAS and the project which was created in Part I of this series. Go to the manifest and add the following parameter to the configuration:
"parameters": {

                "userId": {

                    "value": "{context>sap.successfactors/currentUser/id/value}",

                    "type": "string",

                    "visible": true

                }
This will resolve the SAP SuccessFactors User Id from the context and can be used to gather the correct user Id’s from SAP Service Cloud. Alternatively, you could also use the Identity Management Service as source for various IDs. In this scenario we will continue with the direct connection to SAP Service Cloud.
Add the newly created destination to your destinations in the UI Integration Card
"destinations": {

                "SAPCX": {

                    "name": "SAPCX"

                },

                "SAPCX_Employee": {

                    "name": "SAPCX_Employee"

                }
And add the following code to the sap.card area of the manifest. This will call the User information of the logged in user from the SAP Service Cloud.
"content": {

            "$schema": "http://adaptivecards.io/schemas/adaptive-card.json",

            "type": "AdaptiveCard",

            "data": {

                "request": {

                    "url": "{{destinations.SAPCX_Employee}}/EmployeeCollection?$filter=EmployeeID eq '{{parameters.userId}}'",

                    "parameters": {

                        "$format": "json"

                    },

                    "withCredentials": true

                },

                "path": "/d/results/0"

            }
Now we need to add the response of the call to our payload. Therefore, add a new field to you UI Integration Card:
{

                    "type": "Input.Text",

                    "placeholder": "User ID",

                    "label": "Your ECSC User ID",

                    "isRequired": true,

                    "value" : "${BusinessPartnerID}",

                    "style": "text",

                    "id": "User"

                }
To identity the user ID needed for the payload we use the field BusinessPartnerID from the response payload. If your configuration is different, adapt the value of the field with the correct value. The final step is now to add the field value to the payload of the card. Therefore, simply add the field to the payload defined in your manifest. Your payload of the actionHandler should then look like this:
"parameters": {

                        "Name": "{form>/Subject}",

                        "ReportedForPartyID": "{form>/User}"

                    }
Your card should now look like this:
As the user field should not be accessible, we add the following attribute to the newly created field:
"isVisible": false
Now deploy the card while providing a new version to it.
Validation
Login to your SAP SuccessFactors Work Zone and access the card provide a meaningful description and submit it

UI Integration Card in SAP SuccessFactors Work Zone
Switch to your SAP Service Cloud and see the result.

Ticket in SAP Service Cloud
Conclusion
In this tutorial it was shown how to connect an SAP Service Cloud application to the SAP SuccessFactors Work Zone to empower employees to submit specific service requests to the service delivery organization in the form of tickets.
The creation of a ticket can now be gently and personalized done from the SAP SuccessFactors Work Zone vie a UI Integration Card consuming the BTP Destination service and finally posting against the SAP Service Cloud.
Labels:
You must be a registered user to add a comment. If you've already registered, sign in. Otherwise, register and sign in.
Labels in this area
-
ABAP CDS Views - CDC (Change Data Capture)
2 -
AI
1 -
Analyze Workload Data
1 -
BTP
1 -
Business and IT Integration
2 -
Business application stu
1 -
Business Technology Platform
1 -
Business Trends
1,658 -
Business Trends
110 -
CAP
1 -
cf
1 -
Cloud Foundry
1 -
Confluent
1 -
Customer COE Basics and Fundamentals
1 -
Customer COE Latest and Greatest
3 -
Customer Data Browser app
1 -
Data Analysis Tool
1 -
data migration
1 -
data transfer
1 -
Datasphere
2 -
Event Information
1,400 -
Event Information
74 -
Expert
1 -
Expert Insights
177 -
Expert Insights
348 -
General
1 -
Google cloud
1 -
Google Next'24
1 -
GraphQL
1 -
Kafka
1 -
Life at SAP
780 -
Life at SAP
14 -
Migrate your Data App
1 -
MTA
1 -
Network Performance Analysis
1 -
NodeJS
1 -
PDF
1 -
POC
1 -
Product Updates
4,575 -
Product Updates
391 -
Replication Flow
1 -
REST API
1 -
RisewithSAP
1 -
SAP BTP
1 -
SAP BTP Cloud Foundry
1 -
SAP Cloud ALM
1 -
SAP Cloud Application Programming Model
1 -
SAP Datasphere
2 -
SAP S4HANA Cloud
1 -
SAP S4HANA Migration Cockpit
1 -
Technology Updates
6,871 -
Technology Updates
482 -
Workload Fluctuations
1
Related Content
- Building an integration from a third party ATS to SuccessFactors Onboarding in Technology Blogs by SAP
- Demystifying the Common Super Domain for SAP Mobile Start in Technology Blogs by SAP
- How to use AI services to translate Picklists in SAP SuccessFactors - An example in Technology Blogs by SAP
- SAP Successfactors Implementation and Maintenance in Projects in 2024 in Technology Blogs by Members
- Single Sign On to SAP Cloud Integration (CPI runtime) from an external Identity Provider in Technology Blogs by SAP
Top kudoed authors
| User | Count |
|---|---|
| 15 | |
| 11 | |
| 10 | |
| 9 | |
| 8 | |
| 7 | |
| 7 | |
| 7 | |
| 7 | |
| 7 |