
- SAP Community
- Products and Technology
- Technology
- Technology Blogs by SAP
- SAP Integration Suite - External logging to Splunk
Technology Blogs by SAP
Learn how to extend and personalize SAP applications. Follow the SAP technology blog for insights into SAP BTP, ABAP, SAP Analytics Cloud, SAP HANA, and more.
Turn on suggestions
Auto-suggest helps you quickly narrow down your search results by suggesting possible matches as you type.
Showing results for
Product and Topic Expert
Options
- Subscribe to RSS Feed
- Mark as New
- Mark as Read
- Bookmark
- Subscribe
- Printer Friendly Page
- Report Inappropriate Content
06-23-2023
2:07 PM

Many customers use Splunk to aggregate and analyse logs from various applications.
If you want to do the same for Cloud Integration, part of SAP BTP Integration Suite, this blog is for you.
And I am not talking about the Splunk Adapter that was released in January. I am talking about the external logging feature.
Using the Splunk Adapter may give you flexibility, but if you keep in mind the licensing, it also means that messages will be metered. Also, there may be technical limitations that could impact the rest of your integration flow. Basically, it makes more sense to use the built in feature of Cloud Integration.
Since I love to test things before I talk about them, here is a summary of how I configured that external logging on my tenant. A "thank you" goes out especially to sunny.kapoor2 and the SAP PM, Dev & Ops teams who are always keen on helping.
Splunk Setup
Let's ready your Splunk environment first. There is not much to do actually, but let's go through it.
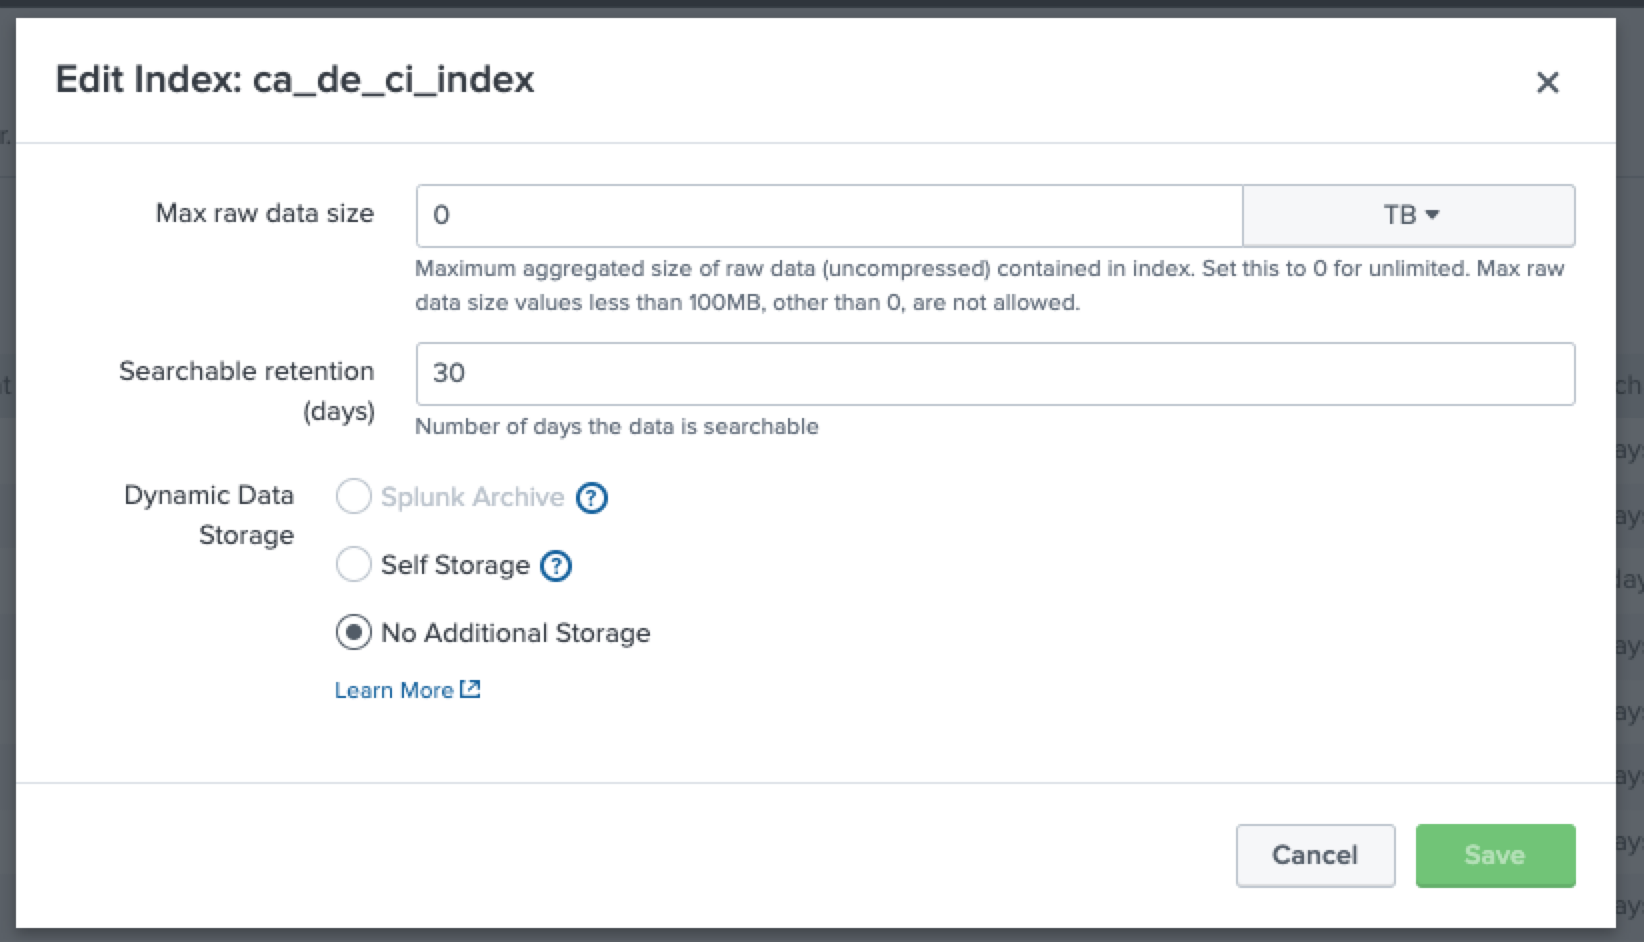
First, define an index using the Settings/Indexes page of your Splunk environment, using a meaningful name. I used "ca_de_ci_index" as you will see later. Make sure to remember the name.
I am no Splunk specialist so I am simply leaving the fields as per default:

Now we need to define how Cloud Integration will talk to Splunk. We'll do this over the "Data Inputs", especially the "HTTP Event Collector".
To do so, create a new "HTTP Event Collector" from the Settings/Data Inputs page.


Use the index you have created previously.

In the overview page, copy the token that has been generated for you. You will need it in a minute.

Now that we have configured Splunk, we can move on to the SAP BTP configuration.
SAP BTP configuration
Create Destination
As explained in the documentation, you will first need to create a destination to Splunk. That will happen in the BTP sub-account where Integration Suite is residing.
The name of the destination should be "CloudIntegration_MonitoringDataConsumer". Otherwise you may get an error during the activation of the external logging.
- The "URL" property is the one from your Splunk tenant (I am using Splunk Cloud)
- The "AuthHeader" property contains "Splunk" followed by the token you previously generated in Splunk.
- The "IndexName" property is the one you configured previously.
- The "TargetSystem" property should be "Splunk".
For your convenience, here is a screenshot of the configuration that works for me.

Enabling access to the Cloud Integration APIs
In order to access the APIs of Cloud Integration that will let you enable, disable and check external logging, you will need to generate a service key with the correct rights.
This is done in multiple steps, explained below.
Create a new role collection
In my experience I could not add the correct roles to the service key (that we will need later) if my user account had not these roles.
Hence I created a new "Role Collection" which will contain the "ExternalLoggingActivate" and "ExternalLoggingActivationRead" roles.
I assigned that role collection to the user who will create the API Service key, which was myself.
All of this can be done within one screen and is pretty easy.

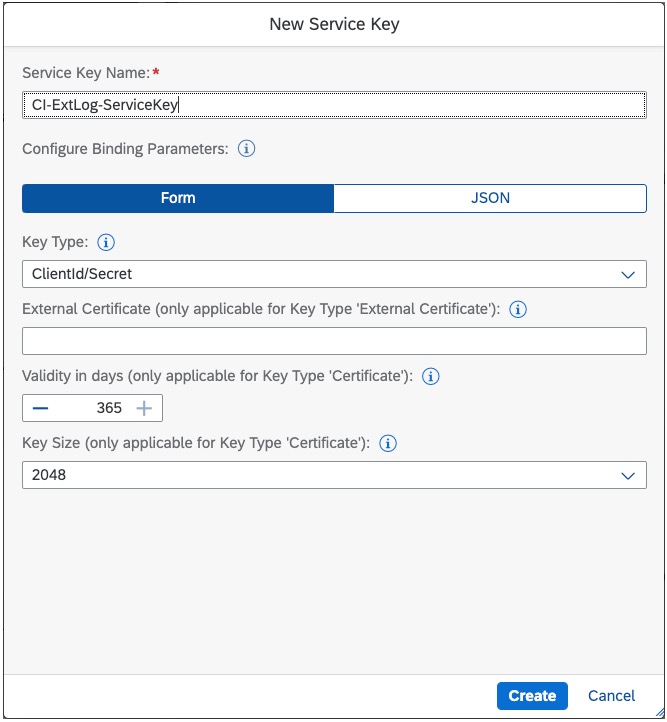
Create an API Service Key
As you know, to access the underlying Cloud Integration APIs, you need to generate a Service Key with the right grant types and roles.
This can be generated easily when you go into the Integration Suite sub-account, and click on "Create" on the top right button.

Create a new "service instance".
Select the "Process Integration Runtime" service, select the "api" plan and give it a meaningful name.

In the second step, select the "ExternalLoggingActivate" and "ExternalLoggingActivationRead" roles. Select the "client_credentials" and "password" grant-types.

In case you are interested, here is the JSON format of the settings:
{

 "grant-types": [

  "client_credentials",

  "password"

 ],

 "redirect-uris": [],

 "roles": [

 "ExternalLoggingActivate",

 "ExternalLoggingActivationRead"

 ]

}
Create service key
Now that you have a service instance, you will create a service key that will contain the credentials to call the Cloud Integration APIs.
Click on the 3 dots next to your service instance and select "Create service key".

Give it a meaningful name and click "Create". You can leave all the defaults.
Activate the external logging
The activation of external logging is done over an API Call that you will make against the Cloud Integration APIs, using the credentials previously setup. Note that this API is not yet documented in the SAP Accelerator Hub.
Open you preferred API tool, like Postman, in order to build the POST request against your Cloud Integration management API.
You can get the endpoint URL from the service key previously created:

Now that you have the endpoint, append the following to it:
/api/v1/activateExternalLogging
The tricky part comes with the Authorization, which at this point, seems to only work with "Password Credentials".
I recommend to use the very convenient Postman features that generate tokens for you after configuration.
To do so, Select the "Oauth" Authorization type in the Authorization part of your request.
In the "Configure new token" part of the wizard, fill out the details as needed and matching your configuration.
- The "Grant Type" needs to be "Password Credentials".
- The "Access Token URL", "ClientID" and "ClientSecret" needs to be copied from your service key.
- The "Username" and "Password" are the ones you use to login to your BTP.
- The "Client Authentication" should be sent as "Basic Auth Header".

Now let Postman generate the token by clicking on "Get new access token" button at the bottom of the page. If something fails, please review your parameters carefully.
Once you have generated the token, send the request to the backend Cloud Integration API.
If everything goes right, you should have enabled external logging in Cloud Integration.
If you are sure that all your parameters are right, and you are still getting an error like the one below, it makes sense to contact support.
Please do so by opening a ticket on the component "lod-hci-pi-ops".

Operations had to change some parameters on my tenant, however I am not using a productive one so that could have been the origin of the issue.
Check Splunk
If everything went fine, you are now seeing the Cloud Integration logs in Splunk.
Simply filter on the index you have created: you can see your logs and analyse them as needed.

In case you want to deactivate the external logging to Splunk, use the following API call:
/api/v1/deactivateExternalLogging
Integration flow configuration
As you may have seen from the documentation, you can defined what kind of logs should be sent to Splunk (NONE, INFO, ERROR). That applies to the whole of your Cloud Integration tenant.
To configure this in a more granular way, you can setup the external logging on integration flow level.
To do so, simply go into your Integration Monitor and set the level you require for each integration flow.

- SAP Managed Tags:
- SAP Integration Suite,
- Cloud Integration
Labels:
16 Comments
You must be a registered user to add a comment. If you've already registered, sign in. Otherwise, register and sign in.
Labels in this area
-
ABAP CDS Views - CDC (Change Data Capture)
2 -
AI
1 -
Analyze Workload Data
1 -
BTP
1 -
Business and IT Integration
2 -
Business application stu
1 -
Business Technology Platform
1 -
Business Trends
1,658 -
Business Trends
118 -
CAP
1 -
cf
1 -
Cloud Foundry
1 -
Confluent
1 -
Customer COE Basics and Fundamentals
1 -
Customer COE Latest and Greatest
3 -
Customer Data Browser app
1 -
Data Analysis Tool
1 -
data migration
1 -
data transfer
1 -
Datasphere
2 -
Event Information
1,400 -
Event Information
76 -
Expert
1 -
Expert Insights
177 -
Expert Insights
361 -
General
1 -
Google cloud
1 -
Google Next'24
1 -
GraphQL
1 -
Kafka
1 -
Life at SAP
780 -
Life at SAP
15 -
Migrate your Data App
1 -
MTA
1 -
Network Performance Analysis
1 -
NodeJS
1 -
PDF
1 -
POC
1 -
Product Updates
4,574 -
Product Updates
400 -
Replication Flow
1 -
REST API
1 -
RisewithSAP
1 -
SAP BTP
1 -
SAP BTP Cloud Foundry
1 -
SAP Cloud ALM
1 -
SAP Cloud Application Programming Model
1 -
SAP Datasphere
2 -
SAP S4HANA Cloud
1 -
SAP S4HANA Migration Cockpit
1 -
Technology Updates
6,871 -
Technology Updates
495 -
Workload Fluctuations
1
Related Content
- Supplier Insights in Manage Sourcing Projects SAP S/4HANA Private Cloud in Technology Blogs by SAP
- S/4HANA - ODATA API's - is it time for a "Safety Belt" ? in Technology Blogs by Members
- Deploying SAP Edge Integration Cell Playground in Technology Blogs by SAP
- Creating RFC function module , Its Web services in SAP & Testing using SOAPUI. in Technology Q&A
- Important Notice: Changes in SAP Analytics Cloud Classic Stories & Analytic Applications in Technology Blogs by SAP
Top kudoed authors
| User | Count |
|---|---|
| 14 | |
| 7 | |
| 7 | |
| 7 | |
| 6 | |
| 6 | |
| 6 | |
| 6 | |
| 6 | |
| 5 |