
- SAP Community
- Products and Technology
- Technology
- Technology Blogs by SAP
- SAP Process Automation, Workflow, DMS: Streamlinin...
Technology Blogs by SAP
Learn how to extend and personalize SAP applications. Follow the SAP technology blog for insights into SAP BTP, ABAP, SAP Analytics Cloud, SAP HANA, and more.
Turn on suggestions
Auto-suggest helps you quickly narrow down your search results by suggesting possible matches as you type.
Showing results for
Employee
Options
- Subscribe to RSS Feed
- Mark as New
- Mark as Read
- Bookmark
- Subscribe
- Printer Friendly Page
- Report Inappropriate Content
08-15-2022
8:07 PM
Overview and motivation
When it comes to manual, repetitive work such as data entry, SAP Process Automation promises an improvement in efficiency and accuracy. It provides businesses with an extra pair of hands, freeing up workers to focus on more complex tasks, thus improving productivity. Yet it is important to include human intervention steps to ensure visibility into the automations.
This solution builds upon the work in a previous blog post from gunteralbrecht about SAP Process Automation: Read website data and update MS Excel file. Specifically, we will be using SAP Workflow and SAP Document Management Service (DMS) to provide extra visibility into this process and create additional ease of access to the file.
This blog post will focus on the utilization of Workflow to prompt a human review of the changes made to the file, how to make API calls in SAP Process Automation and Workflow to connect these services to each other, as well as utilizing Process Automation triggers to shift the file to the desired folder in the DMS.
Solution
Here is an overview of the end to end process. This solution uses 3 different SAP services. The steps and their respective services are as follows:
- Using SAP Process Automation: Read data from a website and update an Excel file
- Using SAP Process Automation: Upload the file to DMS
- Using SAP Process Automation: Start an SAP Workflow instance to prompt the user to review the updated file
- Using SAP Workflow Management and SAP Process Automation: User approves or rejects changes made and an SAP Process Automation API Trigger is immediately called to shift the file in DMS
Here is a walk through of the solution.
Technical Architecture

technical architecture
A closer look step-by-step
For the sake of brevity, I will skip the steps talked about in the previous blog, and move directly to step 2 from the technical architecture.
Uploading the file to SAP Document Management Service
Before we are able to call DMS' API to upload the file, we need to get the access token. We use Process Automation's Custom script and Web Service tools to make the request for the token as follows.
Create a Custom script with the following code, this script will be fed as input to the Web Service.
let callParameters = {

    grant_type: "client_credentials"

};


var wsCallData = {

    resolveBodyOnly : true,

    method: 'POST',

    url: oauthUrl,

    searchParams: callParameters,

    headers: {

        'Accept': 'application/json',

        'Authorization': 'Basic ' + oauthBase64Credentials,

        'Content-Type': 'application/json'

    },

    body: ""

};

return wsCallData;
WS for access token
Now, we can move on to making the API call to upload the file using the access token. There are two things to note here. Firstly, the wsObject returned from the previous API call needs to be parsed to JSON format, and then the access token must be extracted. Secondly, the API call can only take a form-data body. We need to use a workaround in Process Automation's custom script as FormData JavaScript object is not usable (at the time of writing).
// Prepare call to upload file to SAP DMS


let oauthToken = JSON.parse(wsTokenData);

var callParameters = {


};


var uploadMetadata = [

    {

        name: 'cmisAction',

        value: 'createDocument'

    },

    {

        name: 'propertyId[0]',

        value: 'cmis:name'

    },

    {

        name: 'propertyValue[0]',

        value: 'Your_Filename_Here_' + Date.now() + '.xlsx'

    },

    {

        name: 'propertyId[1]',

        value: 'cmis:objectTypeId'

    },

    {

        name: 'propertyValue[1]',

        value: 'cmis:document'

    },

    {

        name: '_charset',

        value: 'UTF-8'

    },

    {

        name: 'filename',

        value: 'Your_Filename_Here.xlsx'

    },

    {

        name: 'media',

        file: 'C:\\Temp\\Your_Filename_Here.xlsx',,

        type: 'application/vnd.openxmlformats-officedocument.spreadsheetml.sheet'

    }

];


var wsDocMgtmtObj = {

    resolveBodyOnly : true,

    metadataType: irpa_core.enums.request.metadataType.formData,

    metadata : uploadMetadata,

    method: 'POST',

    url: docMgtmCallUrl + '/browser/' + repositoryId + '/root/' + folderName,

    headers: {

        'Accept': 'application/json',

        'Authorization': 'Bearer ' + oauthToken.access_token,

        'DataServiceVersion': '2.0'

    }

};
As with the previous step, feed this custom script as input to a Web Service tool and let Process Automation handle the rest.
Create a Workflow to review changes to the file
Now that we have uploaded the file to DMS, let's create a Workflow instance to notify a user that a review of the changes is required.

approval workflow
Below is the workflow approval form that is sent to the user to notify them of changes made to the file. The user will be able to access the file using the URL in the File Link box of the form. We also see an approve and reject button, which the user can use once the review is completed.

Approval request in SAP Workflow
The file is originally in the Excel Workflow folder. At the click of the "Approve" or "Reject" buttons, the file will be shifted to either the "Excel Approved" or "Excel Rejected" folder respectively.

DMS folders
Connecting your Workflow and Process Automation
We need to start the above Workflow definition from our automation. This is done through an API call from Process Automation to Workflow. Here you can find the Workflow API for Cloud Foundry. We will be using this API to instantiate the Workflow definition we created in the previous step.
As with the previous API calls from Process Automation, prepare the necessary details in a Custom script and use that as input to a Web Service. One thing to note here is that Workflow's API allows us to provide a JSON body, thus making this step simpler.
var bodyContent = {

    "definitionId": "yourWorkflowDefinition",

    "context": {

        "fileName": fileName,

        "docID": docID,

        "token": oauthToken.access_token

    }

};


var bodyContentJson = JSON.stringify(bodyContent);


var wsCallData2 = {

    resolveBodyOnly : true,

    method: 'POST',

    url: wfRestUrl + "/v1/workflow-instances",

    searchParams: callParameters,

    headers: {

        'Accept': 'application/json',

        'Authorization': 'Bearer ' + oauthToken.access_token,

        'Content-Type': 'application/json'

    },

    body: bodyContentJson

};
Now, once the data from the website is recorded and the updated file has been uploaded to DMS, the workflow definition will be instantiated automatically.
Create a new Process Automation API trigger to shift the file in DMS
For the last step, we are interested in shifting the file in DMS based on whether the user approves or rejects the changes made.
Workflow does not allow use to create custom API calls. Instead, it only allows us to call a Destination in the Business Technology Platform (BTP). This means that we need to create the custom API call in Process Automation, deploy it as a trigger, then create it as a Destination in BTP. This way, we will be able to shift the file in DMS through Workflow, by calling the Process Automation trigger.
Here is the SAP Process Automation documentation on adding an API Trigger, as well as a tutorial.
Connect the API trigger to Workflow via BTP Destinations
Create a destination in BTP and use this in the SAP Workflow Service task, "Trigger Process Automation to Move File to Folder", as shown in the approval workflow diagram above.
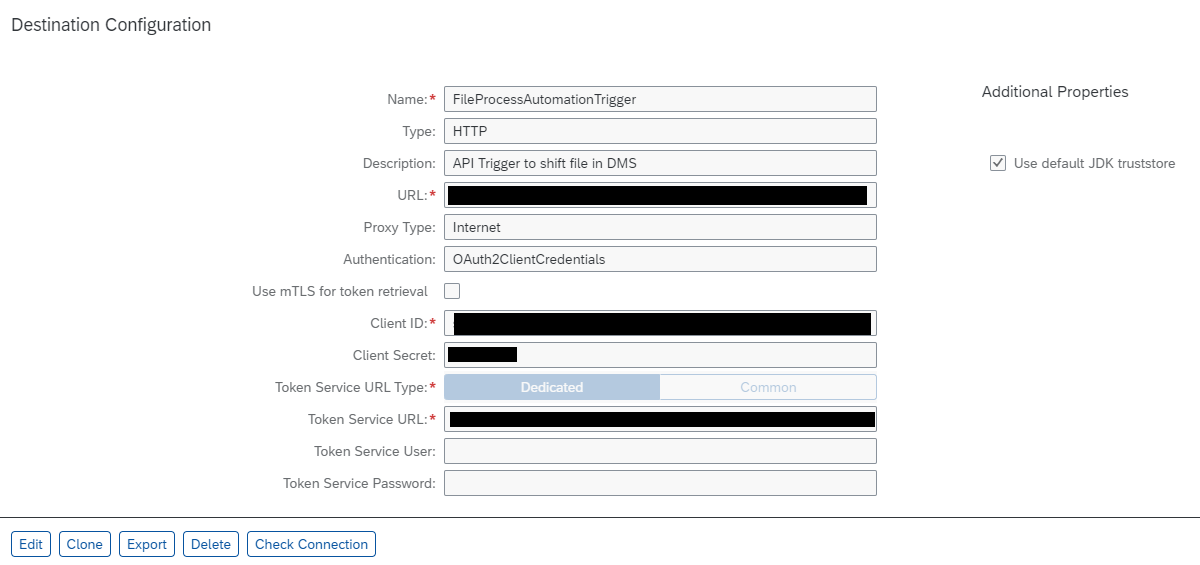
destination in BTP for Process Automation trigger
This is the final step, and once you connect this destination to the service task you created in Workflow you are done!
Closing
To summarize, we have used SAP Process Automation, SAP Workflow and DMS to streamline a manual data entry task. SAP Process Automation shows great promise in delivering efficiency and improving productivity, and you can check the Road Map here for more information on the features being rolled out.
Credits
Thanks to gunteralbrecht for his earlier work which this solution builds upon, as well as for providing guidance and help throughout the development of this solution. Thanks to aditi.arora16 for her help and advice on writing this blog post.
- SAP Managed Tags:
- SAP Workflow Management,
- SAP Document Management service,
- SAP Build Process Automation
Labels:
You must be a registered user to add a comment. If you've already registered, sign in. Otherwise, register and sign in.
Labels in this area
-
ABAP CDS Views - CDC (Change Data Capture)
2 -
AI
1 -
Analyze Workload Data
1 -
BTP
1 -
Business and IT Integration
2 -
Business application stu
1 -
Business Technology Platform
1 -
Business Trends
1,658 -
Business Trends
107 -
CAP
1 -
cf
1 -
Cloud Foundry
1 -
Confluent
1 -
Customer COE Basics and Fundamentals
1 -
Customer COE Latest and Greatest
3 -
Customer Data Browser app
1 -
Data Analysis Tool
1 -
data migration
1 -
data transfer
1 -
Datasphere
2 -
Event Information
1,400 -
Event Information
72 -
Expert
1 -
Expert Insights
177 -
Expert Insights
340 -
General
1 -
Google cloud
1 -
Google Next'24
1 -
GraphQL
1 -
Kafka
1 -
Life at SAP
780 -
Life at SAP
14 -
Migrate your Data App
1 -
MTA
1 -
Network Performance Analysis
1 -
NodeJS
1 -
PDF
1 -
POC
1 -
Product Updates
4,575 -
Product Updates
384 -
Replication Flow
1 -
REST API
1 -
RisewithSAP
1 -
SAP BTP
1 -
SAP BTP Cloud Foundry
1 -
SAP Cloud ALM
1 -
SAP Cloud Application Programming Model
1 -
SAP Datasphere
2 -
SAP S4HANA Cloud
1 -
SAP S4HANA Migration Cockpit
1 -
Technology Updates
6,872 -
Technology Updates
472 -
Workload Fluctuations
1
Related Content
- Tracking HANA Machine Learning experiments with MLflow: A conceptual guide for MLOps in Technology Blogs by SAP
- Going Beyond Traditional Task Mining in Technology Blogs by SAP
- SAP BTP FAQs - Part 1 (General Topics in SAP BTP) in Technology Blogs by SAP
- 10+ ways to reshape your SAP landscape with SAP Business Technology Platform – Blog 7 in Technology Blogs by SAP
- SAP Pipeline Concept and B2B TPM testing in Technology Blogs by Members
Top kudoed authors
| User | Count |
|---|---|
| 17 | |
| 14 | |
| 12 | |
| 10 | |
| 9 | |
| 8 | |
| 7 | |
| 7 | |
| 6 | |
| 6 |