
- SAP Community
- Products and Technology
- Technology
- Technology Blogs by SAP
- Single end point to access multiple services on Vi...
Technology Blogs by SAP
Learn how to extend and personalize SAP applications. Follow the SAP technology blog for insights into SAP BTP, ABAP, SAP Analytics Cloud, SAP HANA, and more.
Turn on suggestions
Auto-suggest helps you quickly narrow down your search results by suggesting possible matches as you type.
Showing results for
former_member19
Active Participant
Options
- Subscribe to RSS Feed
- Mark as New
- Mark as Read
- Bookmark
- Subscribe
- Printer Friendly Page
- Report Inappropriate Content
01-07-2018
12:51 PM
On behalf of SAP Cloud Platform, I would like to wish you a very Happy New Year 2018!! Here is a technical blog post that explains one of the usecases of Virtual Machine, I hope you would love to read.
In the previous blog, we saw how to install the SMTP server on Virtual Machine (VM) in SAP Cloud Platform. This blog talks about how to access multiple applications or servers installed on a single instance of Virtual Machine on SAP Cloud Platform.
Many a times, the virtual machine on SAP Cloud Platform would have multiple applications and software installed and running simultaneously. You would intend to expose the services of these applications and software onto the web. The following architecture explains how this can be achieved.
The architecture involves a proxy layer that is used to redirect the request based on the URI path.
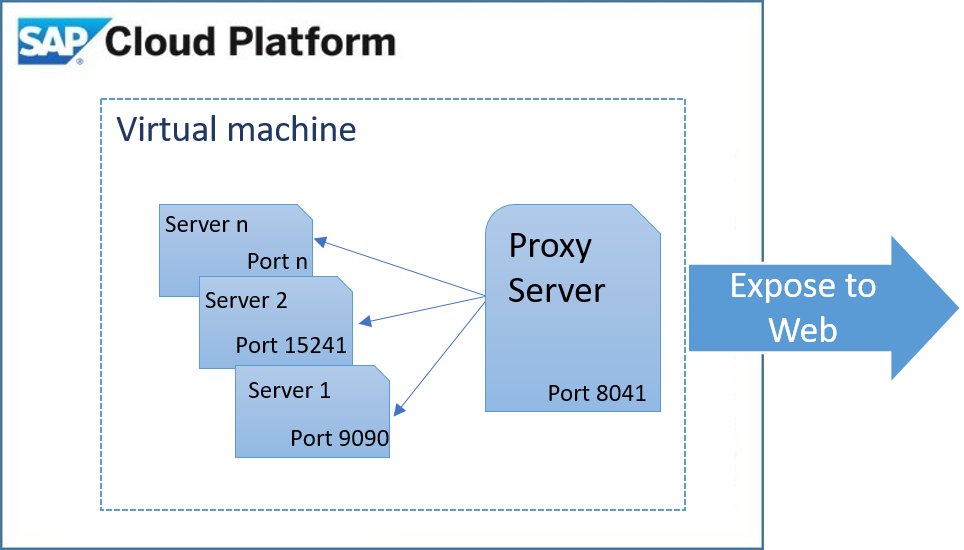
As an example, in this blog, we will have two separate servers running:
As mentioned in the example use case above, we will create a directory listing service in the VM instance on SAP Cloud Platform. The example uses nginx server as the directory listing server. It will also be used as a proxy server that runs on port 8041. As mentioned in the blog, the VM considered here has got OpenSUSE 12 SP1. We will be using zypper to add the repository of nginx and install the same in the VM instance.
We will first create the VM instance on SAP Cloud Platform as mentioned in the blog. We will name the VM as ‘singleendpoint’. Keep the key prepared as mentioned in the blog to access the VM. The VM instance created must be visible in the cockpit as shown below:

Login to the VM using the procedure mentioned in the blog and lets start installing nginx by adding the zypper repo. Use the following command to add the necessary repo:
Continue to accept the keys. Once the command is executed successfully, you will see the server_http added in the zypper repository by executing the command:

Now execute the following command to install ngnix:
Refer the screenshot below to provide appropriate inputs:

Now that the server is installed, there are certain configurations required to provide the directory listing service. Following are the list of configurations to be done:
To change the port, goto the server block (line 50) and change the listen port to 8041. Enter the root directory and enable autoindex as shown in the screenshot below. Note that the screenshot shows the root folder as /var/www, feel free to provide a location of your choice and add some sample files in the location for the directory listing.

The service is normally exposed using the https protocol and this requires us to configure the SSL on the nginx server. We must configure the self signed certificate generated by OpenSSL for the server to work on https protocol. Execute the following command to create the necessary certificates:

At the end, you will have two files with extensions ".key"and ".crt". Now configure the nginx with the generated certificate and key after the location block as shown in the screenshot below:

Once this is done, save the file (by entering the command :qw) and restart the service.
The only step pending to see the directory listing on web is to expose the virtual machine to web. To do so, navigate to the virtual machine on SAP Cloud Platform cockpit and enable ‘Expose to web’ as shown below:

Once it is enabled, you will get a URL to access the virtual machine from web on the same page. Upon accessing the link, you can see the directory listing as shown below. For this example, a sample folder and file is added to /var/www location.

As second part of this blog, to showcase a sample server, we will install Apache web server in the same VM instance and check how we can access this server from the same URL mentioned above.
To understand in depth, follow the blog that explains installing and running Apache on SAP Cloud Platform Virtual Machine. Ensure to run Apache on a different port than 8041, as nginx is running that port. Below is an extract (hello_world.sh) from the above blog mentioned above to install and run the Apache service:
The Apache service is run on the port 8080 as configured above. Run the above file:
Once the file runs without any errors, you will see the ‘Hello World’ output by executing the following command:
Now that the nginx and apache server are set up, configure nginx to act as a proxy server for the Apache server as well. This way nginx can act as a single end point for all the requests. The URL paths act as a directory for the services running on the virtual machine.
Add a new location path (just above the ssl configuration) that contains the Apache redirect configuration in the nginx confi file (vi /etc/nginx/nginx.conf).
Once added, the location blocks should look like below:

Now restart the nginx service again with the following command:
Now, navigate to the VM using the web exposed URL. The default path must give the directory listing as mentioned in the first part of this blog. Append the Apache URI path to hit the Apache service.

Till the next blog, Bye!
In the previous blog, we saw how to install the SMTP server on Virtual Machine (VM) in SAP Cloud Platform. This blog talks about how to access multiple applications or servers installed on a single instance of Virtual Machine on SAP Cloud Platform.
Use Case
Many a times, the virtual machine on SAP Cloud Platform would have multiple applications and software installed and running simultaneously. You would intend to expose the services of these applications and software onto the web. The following architecture explains how this can be achieved.
The architecture involves a proxy layer that is used to redirect the request based on the URI path.
As an example, in this blog, we will have two separate servers running:
- Proxy server: Accepts requests from client applications. We will reuse the server as a directory listing service as well
- Web server: A simple webserver that renders a HTML page
Proxy Server
Implementation
As mentioned in the example use case above, we will create a directory listing service in the VM instance on SAP Cloud Platform. The example uses nginx server as the directory listing server. It will also be used as a proxy server that runs on port 8041. As mentioned in the blog, the VM considered here has got OpenSUSE 12 SP1. We will be using zypper to add the repository of nginx and install the same in the VM instance.
We will first create the VM instance on SAP Cloud Platform as mentioned in the blog. We will name the VM as ‘singleendpoint’. Keep the key prepared as mentioned in the blog to access the VM. The VM instance created must be visible in the cockpit as shown below:
Login to the VM using the procedure mentioned in the blog and lets start installing nginx by adding the zypper repo. Use the following command to add the necessary repo:
zypper addrepo https://download.opensuse.org/repositories/server:/http/SLE_12/server:http.repo


zypper refresh
Continue to accept the keys. Once the command is executed successfully, you will see the server_http added in the zypper repository by executing the command:
zypper lsNow execute the following command to install ngnix:
Zypper install nginxRefer the screenshot below to provide appropriate inputs:
Configuration
Now that the server is installed, there are certain configurations required to provide the directory listing service. Following are the list of configurations to be done:
- Change the port to 8041 that is used by the virtual machine to expose services to the web
- Enable directory listing and choose a root directory
To change the port, goto the server block (line 50) and change the listen port to 8041. Enter the root directory and enable autoindex as shown in the screenshot below. Note that the screenshot shows the root folder as /var/www, feel free to provide a location of your choice and add some sample files in the location for the directory listing.
vi /etc/nginx/nginx.confThe service is normally exposed using the https protocol and this requires us to configure the SSL on the nginx server. We must configure the self signed certificate generated by OpenSSL for the server to work on https protocol. Execute the following command to create the necessary certificates:
openssl req -new -x509 -newkey rsa:2048 -days 360 -nodes -keyout server.key -out server.crtAt the end, you will have two files with extensions ".key"and ".crt". Now configure the nginx with the generated certificate and key after the location block as shown in the screenshot below:
Once this is done, save the file (by entering the command :qw) and restart the service.
service nginx restartThe only step pending to see the directory listing on web is to expose the virtual machine to web. To do so, navigate to the virtual machine on SAP Cloud Platform cockpit and enable ‘Expose to web’ as shown below:
Once it is enabled, you will get a URL to access the virtual machine from web on the same page. Upon accessing the link, you can see the directory listing as shown below. For this example, a sample folder and file is added to /var/www location.
Web Server
As second part of this blog, to showcase a sample server, we will install Apache web server in the same VM instance and check how we can access this server from the same URL mentioned above.
To understand in depth, follow the blog that explains installing and running Apache on SAP Cloud Platform Virtual Machine. Ensure to run Apache on a different port than 8041, as nginx is running that port. Below is an extract (hello_world.sh) from the above blog mentioned above to install and run the Apache service:
#!/bin/bash

zypper -n ar -f $1 SLES

zypper --no-gpg-checks --non-interactive -n install apache2 openssl

#### Enable SSL

echo "Setup apache for SSL"

a2enmod ssl

a2enflag SSL

#### Generate ss cert for apache, you can tweak the attributes below

echo "Generate self-signed cert"

cat > /tmp/openssl.cnf <<EOF

 [ req ]

 default_bits           = 2048

 distinguished_name     = req_distinguished_name

 attributes             = req_attributes

 prompt                 = no

 output_password        =

 [ req_distinguished_name ]

 C                      = IN

 ST                     = KA

 L                      = BLR

 O                      = SAP

 OU                     = SAP

 CN                     = Common Name

 emailAddress           = test@email.address

 [ req_attributes ]

 challengePassword              =

EOF

openssl req -x509 -nodes -days 365 -newkey rsa:2048 -keyout /etc/apache2/ssl.key/server.key -out /etc/apache2/ssl.crt/server.crt -config /tmp/openssl.cnf

chmod 600 /etc/apache2/ssl.key/server.key /etc/apache2/ssl.crt/server.crt

rm /tmp/openssl.cnf


##### Generating default vhost for your site, warning does not support SNI

echo "Generate vhost for your website"

cat > /etc/apache2/vhosts.d/openstack-ssl.conf <<EOF

<IfDefine SSL>

<IfDefine !NOSSL>

Listen 8080

<VirtualHost _default_:8080>

        DocumentRoot "/srv/www/htdocs"

        ErrorLog /var/log/apache2/error_log

        TransferLog /var/log/apache2/access_log

        SSLEngine on

        SSLProtocol all -SSLv2 -SSLv3

        SSLCertificateFile /etc/apache2/ssl.crt/server.crt

        SSLCertificateKeyFile /etc/apache2/ssl.key/server.key

        <FilesMatch "\.(cgi|shtml|phtml|php)$">

            SSLOptions +StdEnvVars

        </FilesMatch>

        <Directory "/srv/www/cgi-bin">

            SSLOptions +StdEnvVars

        </Directory>


        BrowserMatch "MSIE [2-5]" \

                 nokeepalive ssl-unclean-shutdown \

                 downgrade-1.0 force-response-1.0

        CustomLog /var/log/apache2/ssl_request_log   ssl_combined

</VirtualHost>

</IfDefine>

</IfDefine>

EOF


echo "Creating test page"

echo "Hello World" > /srv/www/htdocs/index.html

echo "Restart apache"

service apache2 restart

#systemctl reload apache2
The Apache service is run on the port 8080 as configured above. Run the above file:
./hello_world.sh https://slesrepo.hana.ondemand.com/repo/SUSE/Products/SLE-SERVER/12/x86_64/product/Once the file runs without any errors, you will see the ‘Hello World’ output by executing the following command:
curl https://localhost:8080 --insecureSingle Endpoint Configuration
Now that the nginx and apache server are set up, configure nginx to act as a proxy server for the Apache server as well. This way nginx can act as a single end point for all the requests. The URL paths act as a directory for the services running on the virtual machine.
Add a new location path (just above the ssl configuration) that contains the Apache redirect configuration in the nginx confi file (vi /etc/nginx/nginx.conf).
location /apache {

            proxy_pass https://localhost:8080/;

            proxy_set_header Host $host;

            proxy_set_header X-Real-IP $remote_addr;

            proxy_set_header X-Forwarded-For $proxy_add_x_forwarded_for;

            proxy_set_header X-Forwarded-Proto $scheme;

}
Once added, the location blocks should look like below:
Now restart the nginx service again with the following command:
service nginx restartNow, navigate to the VM using the web exposed URL. The default path must give the directory listing as mentioned in the first part of this blog. Append the Apache URI path to hit the Apache service.
Till the next blog, Bye!
- SAP Managed Tags:
- SAP Business Technology Platform
3 Comments
You must be a registered user to add a comment. If you've already registered, sign in. Otherwise, register and sign in.
Labels in this area
-
ABAP CDS Views - CDC (Change Data Capture)
2 -
AI
1 -
Analyze Workload Data
1 -
BTP
1 -
Business and IT Integration
2 -
Business application stu
1 -
Business Technology Platform
1 -
Business Trends
1,658 -
Business Trends
116 -
CAP
1 -
cf
1 -
Cloud Foundry
1 -
Confluent
1 -
Customer COE Basics and Fundamentals
1 -
Customer COE Latest and Greatest
3 -
Customer Data Browser app
1 -
Data Analysis Tool
1 -
data migration
1 -
data transfer
1 -
Datasphere
2 -
Event Information
1,400 -
Event Information
75 -
Expert
1 -
Expert Insights
177 -
Expert Insights
357 -
General
1 -
Google cloud
1 -
Google Next'24
1 -
GraphQL
1 -
Kafka
1 -
Life at SAP
780 -
Life at SAP
14 -
Migrate your Data App
1 -
MTA
1 -
Network Performance Analysis
1 -
NodeJS
1 -
PDF
1 -
POC
1 -
Product Updates
4,575 -
Product Updates
398 -
Replication Flow
1 -
REST API
1 -
RisewithSAP
1 -
SAP BTP
1 -
SAP BTP Cloud Foundry
1 -
SAP Cloud ALM
1 -
SAP Cloud Application Programming Model
1 -
SAP Datasphere
2 -
SAP S4HANA Cloud
1 -
SAP S4HANA Migration Cockpit
1 -
Technology Updates
6,871 -
Technology Updates
493 -
Workload Fluctuations
1
Related Content
- Deploying SAP Edge Integration Cell Playground in Technology Blogs by SAP
- Creating RFC function module , Its Web services in SAP & Testing using SOAPUI. in Technology Q&A
- Syniti RDG provides a simplified design to create Multi Value Validation and Derivation Rules in Technology Blogs by Members
- Develop with Joule in SAP Build Code in Technology Blogs by SAP
- SAP BTP FAQs - Part 3 (Security) in Technology Blogs by SAP
Top kudoed authors
| User | Count |
|---|---|
| 20 | |
| 11 | |
| 8 | |
| 8 | |
| 7 | |
| 7 | |
| 7 | |
| 6 | |
| 6 | |
| 6 |