
- SAP Community
- Products and Technology
- Technology
- Technology Blogs by SAP
- Working with Encrypted Key Value Maps using SAP Cl...
Technology Blogs by SAP
Learn how to extend and personalize SAP applications. Follow the SAP technology blog for insights into SAP BTP, ABAP, SAP Analytics Cloud, SAP HANA, and more.
Turn on suggestions
Auto-suggest helps you quickly narrow down your search results by suggesting possible matches as you type.
Showing results for
Advisor
Options
- Subscribe to RSS Feed
- Mark as New
- Mark as Read
- Bookmark
- Subscribe
- Printer Friendly Page
- Report Inappropriate Content
04-05-2019
12:52 PM
As an exciting update to SAP API Management three major updates have been made for the Key Value Map concept.
#1 - You can now securely encrypt the actual data stored within a Key Value Map, allowing for storage of sensitive data.
#2 - You can now access and update Key Value Map information through the SAP API Management Design Time UI in addition to API calls.
#3 - You can now add Key Value Maps at an API proxy level rather than the environment level. Read more here.
In this Blog I will assume that you would have already read the excellent previous blog on using Key Value Maps (KVMs) located here to understand what a KVM is, what it is used for, and when to use it. I will be focusing on using the Design Time UI to generate an encrypted KVM in a codeless manner and accessing that Encrypted KVMs data at runtime.
Note: I will also be working from the assumption that you have created the ES5_Gateway account and API Provider.
Oftentimes customers would like to access data from the SAP ERP Backend and expose this for consumption into an application either within their organization or to partners / 3rd party providers. Since ERP data is extremely valuable and important there is a very tight security process in place for adding users, which makes it impractical to administer for an unknown and potentially high number of incoming users.
This is where the common use case of Bi-Modal IT, with API Management as the "Umbrella" governance layer providing Agility and secure exposure on top of existing Legacy systems comes into the picture. SAP API Management will be the public facing access point, and will invisibly transform consumer requests into a service user provisioned on the Backend. One analogy is the funnel.

Exposing this sensitive ERP data will require some gating mechanism, so in this blog will explore utilizing the API Key as the new authentication mechanism, however API Management supports many other more advanced patterns, like OAuth, SAP IDP, callout to 3rd party IDP, IP whitelisting, etc. which I will not explore here.
As before we start by entering the API Portal from SAP Cloud Platform

From the API Portal Home page expand the Menu and select Configure

In the Configure menu that comes up, select the Sub-tab Key Value Maps to pull up a list of Key Value Maps configured on your SAP API Management tenant. Click Create to generate a new KVM in the UI.

This will bring up the Create Key Value Map wizard. In this screen provide a distinct name for the KVM, this will be used in the API Proxy so make it something memorable but not too complex. Check the Encrypt Key Value Map box. You will notice when this box is checked, even in the Create Key Value Map screen the Value Data is hidden.
Then under Entries enter a distinct Key name, and a value for this Key, then click Add to enter additional entries. For this Blog, since we will be defining a Service user I will enter Username and Password keys:

Once you have filled in all the KVM information, and are satisfied, click Save. Once you receive the message that it was saved successfully, we can create an API Proxy that leverages these credentials.
Open the Menu and select Develop to start creating an API Proxy. Then click Create to bring up the Create API Proxy window.

Now in the Create API Proxy Wizard, select the API Provider Radio Button and select your ES5 API Provider from the drop down list.

Click the Discover button to bring up the list of APIs defined in the ERP system.
In the Search field search for GWSAMPLE and select the GWSAMPLE_BASIC service and click OK.

Enter distinct information for the API Proxy describing what the API is and what it does. For the Blog I will be naming this as an Open API integration for ERP, using the following information:


Click Create to get into the final page of API creation, and then Click Deploy to bring the API live. Once the API has been successfully deployed, if you like, you can try the API at this point, and if you do not provide credentials, it will provide a 401 Unauthorized error as expected.
Within the API Proxy window you just created, click the Policies button on the top right of the API Proxy to enter the Policy Editor.
For passing Authentication credentials to the backend, it makes sense to place this policy at the end of the API Flow, so I will be placing these Policies in the Target Endpoint PostFlow, although this could be done elsewhere in the flow as well. If you need a refresher on API Policy Flows I recommend reviewing this intro blog or this advanced blog on flows
In the Flows section first click the Edit button on the top right. Then in the Flows window in the top left, either collapse the ProxyEndpoint flows, or scroll down until you see TargetEndpoint, and select PostFlow to add Policies there.
On the right hand side, scroll down the Policies list to Mediation Policies, and click the + symbol next to Key Value Map Operations to add the KVM Policy. This policy will be pulling the encrypted User Credentials before passing the request to the backend.
In the Add Policy Wizard enter the following information and then click Add:
Now select the newly created KVM Policy and replace the code with the following:
This policy is creating an internal variable called "username" and "password" with the private flag to denote that this is coming from the encrypted data store, from the entries defined in the myES5Credential KVM step.

On the right hand side, scroll to the Policies list to Security Policies, and click the + symbol next to Basic Authentication to add the Auth Policy. This policy will be generating an encoded Header containing the User Credentials to be passed with the request to the backend.
In the Add Policy Wizard enter the following information and then click Add:

Select the newly created Basic Authentication policy and replace the code with the following:
Here SAP API Management Basic Auth is encoding a header containing User / Password called from the previously defined KVM variables calling against the encrypted KVM variables.
It is important that the policies happen in the correct order, KVM policy first, then Basic Authentication following after.

Once done, click Update in the Policy Editor to be taken back to the API Proxy page. Then click Save to save the changes to the runtime.
After you receive the success message - click the API Proxy URL to access the API, you should see a successful request without any request for credential information, generating the Service User call that we were looking to create at the start.
The calling user has now been successfully mapped to a service user in API Management, removing the need to onboard any consumers into the Backend ERP system, however this is not a secure exposure. So the last step would be to add an authentication mechanism in API Management, such as API Key. See an example of utilizing API Keys within Fiori Applications against APIs from API management here
#1 - You can now securely encrypt the actual data stored within a Key Value Map, allowing for storage of sensitive data.
#2 - You can now access and update Key Value Map information through the SAP API Management Design Time UI in addition to API calls.
#3 - You can now add Key Value Maps at an API proxy level rather than the environment level. Read more here.
In this Blog I will assume that you would have already read the excellent previous blog on using Key Value Maps (KVMs) located here to understand what a KVM is, what it is used for, and when to use it. I will be focusing on using the Design Time UI to generate an encrypted KVM in a codeless manner and accessing that Encrypted KVMs data at runtime.
Note: I will also be working from the assumption that you have created the ES5_Gateway account and API Provider.
Use-case Background
Oftentimes customers would like to access data from the SAP ERP Backend and expose this for consumption into an application either within their organization or to partners / 3rd party providers. Since ERP data is extremely valuable and important there is a very tight security process in place for adding users, which makes it impractical to administer for an unknown and potentially high number of incoming users.
This is where the common use case of Bi-Modal IT, with API Management as the "Umbrella" governance layer providing Agility and secure exposure on top of existing Legacy systems comes into the picture. SAP API Management will be the public facing access point, and will invisibly transform consumer requests into a service user provisioned on the Backend. One analogy is the funnel.
Exposing this sensitive ERP data will require some gating mechanism, so in this blog will explore utilizing the API Key as the new authentication mechanism, however API Management supports many other more advanced patterns, like OAuth, SAP IDP, callout to 3rd party IDP, IP whitelisting, etc. which I will not explore here.
Let’s get started!
As before we start by entering the API Portal from SAP Cloud Platform
Creating the Key Value Map
From the API Portal Home page expand the Menu and select Configure
In the Configure menu that comes up, select the Sub-tab Key Value Maps to pull up a list of Key Value Maps configured on your SAP API Management tenant. Click Create to generate a new KVM in the UI.
This will bring up the Create Key Value Map wizard. In this screen provide a distinct name for the KVM, this will be used in the API Proxy so make it something memorable but not too complex. Check the Encrypt Key Value Map box. You will notice when this box is checked, even in the Create Key Value Map screen the Value Data is hidden.
Then under Entries enter a distinct Key name, and a value for this Key, then click Add to enter additional entries. For this Blog, since we will be defining a Service user I will enter Username and Password keys:
| KVM Name | ES5Credentials |
| Key: ES5User | Value: <Your ES5 User ID> |
| Key Name: ES5Pass | Value: <Your ES5 Password> |
Once you have filled in all the KVM information, and are satisfied, click Save. Once you receive the message that it was saved successfully, we can create an API Proxy that leverages these credentials.
Creating an API Proxy
Open the Menu and select Develop to start creating an API Proxy. Then click Create to bring up the Create API Proxy window.
Now in the Create API Proxy Wizard, select the API Provider Radio Button and select your ES5 API Provider from the drop down list.
Click the Discover button to bring up the list of APIs defined in the ERP system.
In the Search field search for GWSAMPLE and select the GWSAMPLE_BASIC service and click OK.
Enter distinct information for the API Proxy describing what the API is and what it does. For the Blog I will be naming this as an Open API integration for ERP, using the following information:
| Name | Open_ERP |
| Title | Open authentication API for ERP |
| Description | <Leave as Default> |
| Host Alias | <Leave as Default> |
| API Base Path | /api/odata/v1/openerp |
| Service Type | ODATA |
Click Create to get into the final page of API creation, and then Click Deploy to bring the API live. Once the API has been successfully deployed, if you like, you can try the API at this point, and if you do not provide credentials, it will provide a 401 Unauthorized error as expected.
Adding KVM & Auth Policy to API Proxy
Within the API Proxy window you just created, click the Policies button on the top right of the API Proxy to enter the Policy Editor.
For passing Authentication credentials to the backend, it makes sense to place this policy at the end of the API Flow, so I will be placing these Policies in the Target Endpoint PostFlow, although this could be done elsewhere in the flow as well. If you need a refresher on API Policy Flows I recommend reviewing this intro blog or this advanced blog on flows
In the Flows section first click the Edit button on the top right. Then in the Flows window in the top left, either collapse the ProxyEndpoint flows, or scroll down until you see TargetEndpoint, and select PostFlow to add Policies there.
Adding KVM Policy
On the right hand side, scroll down the Policies list to Mediation Policies, and click the + symbol next to Key Value Map Operations to add the KVM Policy. This policy will be pulling the encrypted User Credentials before passing the request to the backend.
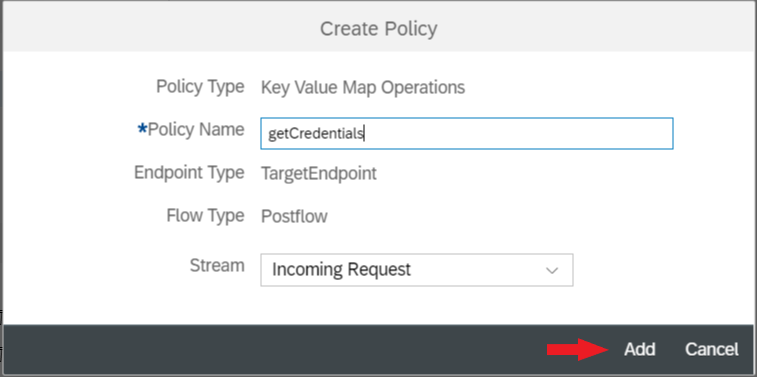
In the Add Policy Wizard enter the following information and then click Add:
| Policy Name | getCredentials |
| Stream | Incoming Request |
Now select the newly created KVM Policy and replace the code with the following:
<!-- Key/value pairs can be stored, retrieved, and deleted from named existing maps by configuring this policy by specifying PUT, GET, or DELETE operations -->

<!-- mapIdentifier refers to the name of the key value map -->

<KeyValueMapOperations mapIdentifier="ES5Credentials" async="true" continueOnError="false" enabled="true" xmlns="http://www.sap.com/apimgmt">

	<!-- PUT stores the key value pair mentioned inside the element -->

	<Get assignTo="private.username">

    <Key>

      <Parameter>ES5User</Parameter>

    </Key>

  </Get>

  <Get assignTo="private.password">

  <Key>

      <Parameter>ES5Pass</Parameter>

  </Key>

  </Get>

	<!-- the scope of the key value map. Valid values are environment, organization, apiproxy and policy -->

	<Scope>environment</Scope>

</KeyValueMapOperations>
This policy is creating an internal variable called "username" and "password" with the private flag to denote that this is coming from the encrypted data store, from the entries defined in the myES5Credential KVM step.
Adding Basic Authentication Policy
On the right hand side, scroll to the Policies list to Security Policies, and click the + symbol next to Basic Authentication to add the Auth Policy. This policy will be generating an encoded Header containing the User Credentials to be passed with the request to the backend.
In the Add Policy Wizard enter the following information and then click Add:
| Policy Name | setCredentials |
| Stream | Incoming Request |
Select the newly created Basic Authentication policy and replace the code with the following:
<BasicAuthentication async='true' continueOnError='false' enabled='true' xmlns='http://www.sap.com/apimgmt'>

 	<!-- Operation can be Encode or Decode -->

	<Operation>Encode</Operation>

	<IgnoreUnresolvedVariables>true</IgnoreUnresolvedVariables>

 	<!-- for Encode, User element can be used to dynamically populate the user value -->

	<User ref='private.username' />

 	<!-- for Encode, Password element can be used to dynamically populate the password value -->

	<Password ref='private.password' />

 	<!-- Source is used to retrieve the encoded value of username and password. This should not be used if the operation is Encode-->

 	<Source>request.header.Authorization</Source>

 	<!-- Assign to is used to assign the encoded value of username and password to a variable. This should not be used if the operation is Decode -->

	<AssignTo createNew="false">request.header.Authorization</AssignTo>

</BasicAuthentication>
Here SAP API Management Basic Auth is encoding a header containing User / Password called from the previously defined KVM variables calling against the encrypted KVM variables.
It is important that the policies happen in the correct order, KVM policy first, then Basic Authentication following after.
Once done, click Update in the Policy Editor to be taken back to the API Proxy page. Then click Save to save the changes to the runtime.
After you receive the success message - click the API Proxy URL to access the API, you should see a successful request without any request for credential information, generating the Service User call that we were looking to create at the start.
Securing the API Proxy
The calling user has now been successfully mapped to a service user in API Management, removing the need to onboard any consumers into the Backend ERP system, however this is not a secure exposure. So the last step would be to add an authentication mechanism in API Management, such as API Key. See an example of utilizing API Keys within Fiori Applications against APIs from API management here
Further Reads
- API Security Best Practices Blog Series
- For more blogs on SAP Cloud Platform, API Management visit us at SCN
- SAP Managed Tags:
- SAP Integration Suite,
- API,
- API Management
Labels:
6 Comments
You must be a registered user to add a comment. If you've already registered, sign in. Otherwise, register and sign in.
Labels in this area
-
ABAP CDS Views - CDC (Change Data Capture)
2 -
AI
1 -
Analyze Workload Data
1 -
BTP
1 -
Business and IT Integration
2 -
Business application stu
1 -
Business Technology Platform
1 -
Business Trends
1,658 -
Business Trends
118 -
CAP
1 -
cf
1 -
Cloud Foundry
1 -
Confluent
1 -
Customer COE Basics and Fundamentals
1 -
Customer COE Latest and Greatest
3 -
Customer Data Browser app
1 -
Data Analysis Tool
1 -
data migration
1 -
data transfer
1 -
Datasphere
2 -
Event Information
1,400 -
Event Information
76 -
Expert
1 -
Expert Insights
177 -
Expert Insights
360 -
General
1 -
Google cloud
1 -
Google Next'24
1 -
GraphQL
1 -
Kafka
1 -
Life at SAP
780 -
Life at SAP
15 -
Migrate your Data App
1 -
MTA
1 -
Network Performance Analysis
1 -
NodeJS
1 -
PDF
1 -
POC
1 -
Product Updates
4,574 -
Product Updates
400 -
Replication Flow
1 -
REST API
1 -
RisewithSAP
1 -
SAP BTP
1 -
SAP BTP Cloud Foundry
1 -
SAP Cloud ALM
1 -
SAP Cloud Application Programming Model
1 -
SAP Datasphere
2 -
SAP S4HANA Cloud
1 -
SAP S4HANA Migration Cockpit
1 -
Technology Updates
6,871 -
Technology Updates
495 -
Workload Fluctuations
1
Related Content
- SAP Datasphere – “The Next Big Step in Unified Analytics “ in Technology Blogs by SAP
- AI@FRE (Part 1) - Enabling Enterprise AI Adoption through the BTP FRE Engagement Model in Technology Blogs by SAP
- Redefining Supply Chain Optimization With GenAI – Supply Chain Advisor in Technology Blogs by SAP
- Deploying SAP Edge Integration Cell Playground in Technology Blogs by SAP
- Develop with Joule in SAP Build Code in Technology Blogs by SAP
Top kudoed authors
| User | Count |
|---|---|
| 14 | |
| 7 | |
| 7 | |
| 7 | |
| 6 | |
| 6 | |
| 6 | |
| 5 | |
| 5 | |
| 5 |