
- SAP Community
- Groups
- Interest Groups
- Application Development
- Blog Posts
- Application modernization with Google Cloud Platfo...
Application Development Blog Posts
Learn and share on deeper, cross technology development topics such as integration and connectivity, automation, cloud extensibility, developing at scale, and security.
Turn on suggestions
Auto-suggest helps you quickly narrow down your search results by suggesting possible matches as you type.
Showing results for
_IvanFemia_
Active Contributor
Options
- Subscribe to RSS Feed
- Mark as New
- Mark as Read
- Bookmark
- Subscribe
- Printer Friendly Page
- Report Inappropriate Content
03-09-2021
3:58 PM
It has been a very long time since my last blog on SCN and even if I left SAP I'm still very close to the SAP ecosystem.
Today I would like to share with you my experience in Application modernization with Google Cloud Platform and in this first episode we will focus on Apigee as the API Management platform for SAP OData endpoints.
I think you may already familiar with the concept of APIs, but the great advantage of using APIs is that we can securely and easily create public endpoints that can be consumed by different consumers such as Mobile Applications, Vendors' and/or Consumer integrations, or other services.
In this blog we will use the well know SAP ES5 Gateway system to expose an SAP OData end point using Apigee.
The scope of this blog is to give the architecture best practices and the code to extend, change and adapt the scope of the API proxy to your specific needs.
The sample code is not intended for production usage.
You need few prerequisites in order to proceed with this demo:
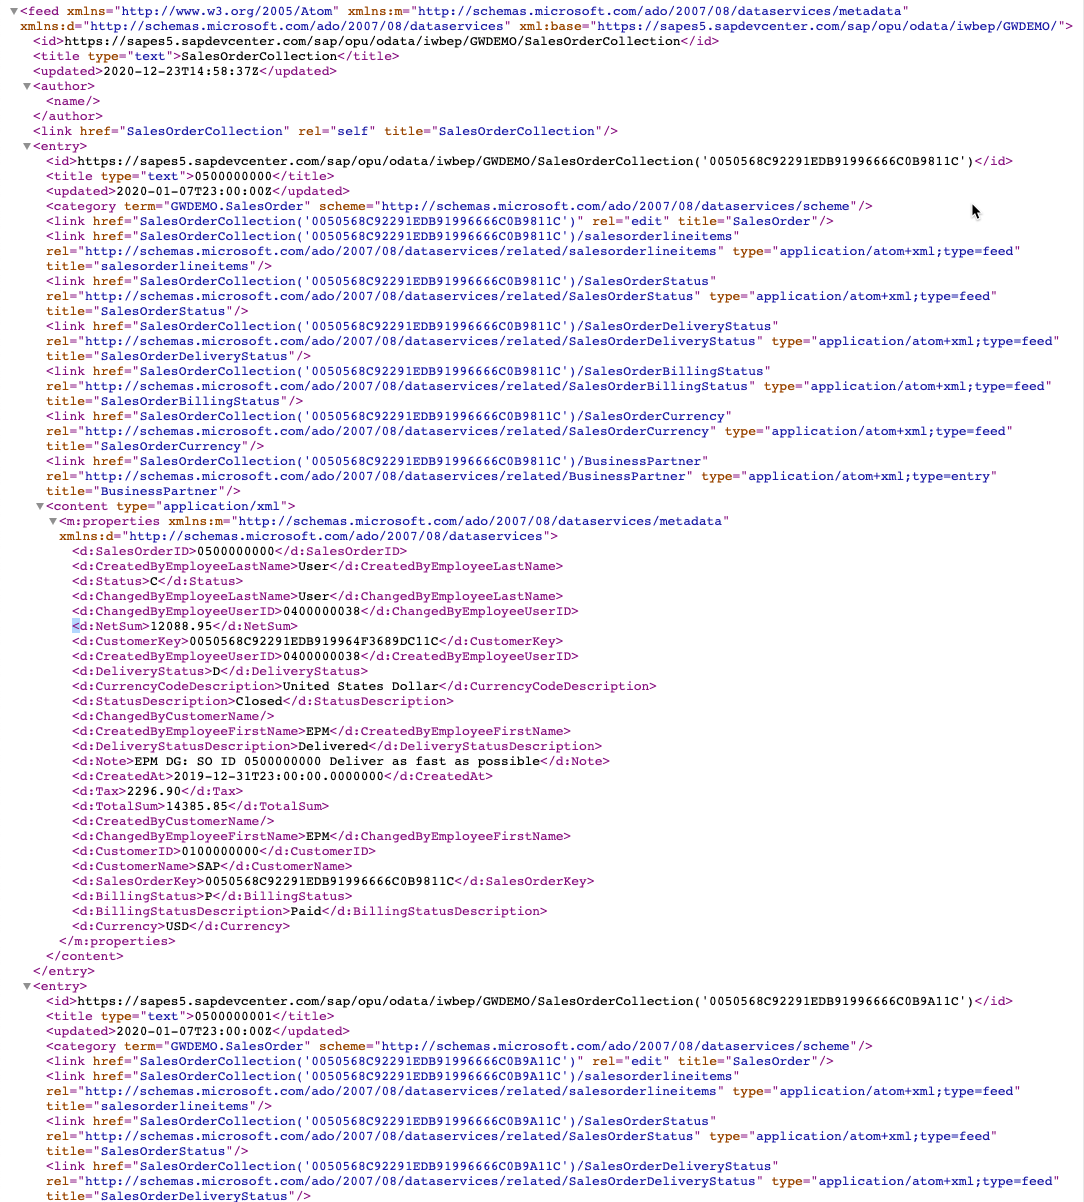
Let's quick verify that we are all set to start. We can perform a quick check calling the SAP OData endpoint on the ES5 demo system at https://sapes5.sapdevcenter.com/sap/opu/odata/iwbep/GWDEMO/SalesOrderCollection
If everything works as expected you should get a response similar to the one below:
In this step you will create an API proxy that connects to the SAP OData endpoint on the SAP Gateway ES5
In this section we introduce few steps that are very common in SAP OData management with API: backend authentication and payload management.
Apigee provides multiple authentication methods such as Basic, OAuth and SAML2 Authentication. These based on the application context of the API can be preferred one over the others.
Specifically to the demo context, we will use a Basic Authentication.
The first best practice for implementing Basic Authentication is to store the credential in a secure store in Apigee, this is the Key Value Maps (KVM).
Our credential are now stored in a safe place, we can now proceed and introduce the Basic Authentication.
In this final step, we will convert the default SAP XML Atom payload in a more API friendly JSON format
The SAP OData payload has many information that enrich the response with many extra information that can increase the complexity of an API consumer. With a simple javascript we will extract only the relevant information.
In this step we will create an API product that contain the API proxy the we just created and allows us to register it against an application
In this final step we will create an Application that consumes our APIs
In this final section we will test the API created.
The API created has a very basic endpoint, you can have a more advanced API importing a preconfigured API proxy into your Apigee organization.
This new API proxy includes enhanced javascript code (Javascript-1.js and Javascript-2.js) to handle different navigations in the SAP OData endpoint such search for a single sales order, display the details of a single sales order and the sales order items associated to a specific sales order.
Note: the code is stored in a public Google Cloud Storage Bucket and you'll need gsutil tool to download it
This demonstration shows how we can easily expose standard SAP OData endpoint in more modern and standardized Rest Odata to be consumed by any application. In my next blog we will start modernizing the access to SAP utilizing a Chatbot build using Dialogflow CX.
Today I would like to share with you my experience in Application modernization with Google Cloud Platform and in this first episode we will focus on Apigee as the API Management platform for SAP OData endpoints.
I think you may already familiar with the concept of APIs, but the great advantage of using APIs is that we can securely and easily create public endpoints that can be consumed by different consumers such as Mobile Applications, Vendors' and/or Consumer integrations, or other services.
In this blog we will use the well know SAP ES5 Gateway system to expose an SAP OData end point using Apigee.
The scope of this blog is to give the architecture best practices and the code to extend, change and adapt the scope of the API proxy to your specific needs.
The sample code is not intended for production usage.
Prerequisites
You need few prerequisites in order to proceed with this demo:
Test the SAP OData endpoint
Let's quick verify that we are all set to start. We can perform a quick check calling the SAP OData endpoint on the ES5 demo system at https://sapes5.sapdevcenter.com/sap/opu/odata/iwbep/GWDEMO/SalesOrderCollection
If everything works as expected you should get a response similar to the one below:
Create an API proxy
In this step you will create an API proxy that connects to the SAP OData endpoint on the SAP Gateway ES5
- Login to Apigee Edge.
- Click on Develop > API Proxies to create an API Proxy.

Open API Proxies
- Click on +Proxy on the top right to create a new API Proxy
- Select the Reverse proxy (most common) option in the list.
- In the following wizard, we will need to define few parameters for the API proxy:
| Parameter | value |
|---|---|
| Name | SalesOrder |
| Base path | /salesorder |
| Description | Sales orders from SAP NetWeaver Gateway ES5 |
| Target (Existing API) | https://sapes5.sapdevcenter.com/sap/opu/odata/iwbep/GWDEMO/SalesOrderCollection |

API Proxy Create
- Click Next
- Set up the common policies enabling the API Key and the Quota

API Proxy Policies
- Click Next
- Set up the Virtual host leaving the default value as below

API Proxy Virtual host
- Click Next
- In the summary section check the test deployment

API Proxy Summary
- Click Create and deploy
- The system creates and deploys the API proxy
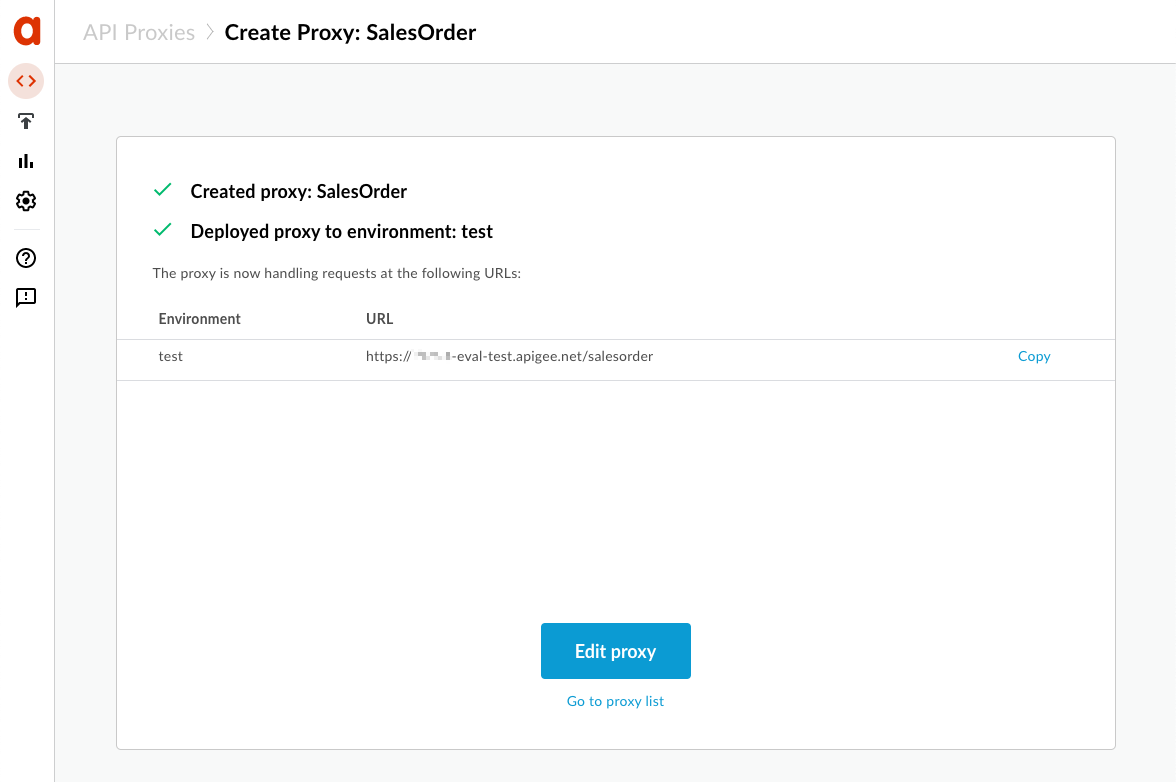
API Proxy Deploy
Authentication and payload for SAP OData
In this section we introduce few steps that are very common in SAP OData management with API: backend authentication and payload management.
Authenticate the caller in SAP Gateway
Apigee provides multiple authentication methods such as Basic, OAuth and SAML2 Authentication. These based on the application context of the API can be preferred one over the others.
Specifically to the demo context, we will use a Basic Authentication.
Store your credential in KVM
The first best practice for implementing Basic Authentication is to store the credential in a secure store in Apigee, this is the Key Value Maps (KVM).
- Click on Admin > Environments > Key Value Maps.

Open KVM
- Switch from Prod to test using the drop down on the top left
- Click on +Key value map on the top right to create a new KVM
- In the popup add a name for the KVM and check Encrypted

Create KVM
- Click on the newly created KVM and create two keys
| Name | Value |
|---|---|
| user | <your ES5 username> |
| password | <your ES5 password> |

Create key
Retrieve credentials from the KVM
Our credential are now stored in a safe place, we can now proceed and introduce the Basic Authentication.
- Navigate to the API proxies Develop > API Proxies as done before
- Click on the API proxy SalesOrders that we just created
- This opens the API proxy overview with all the basic information of our API proxy

API Proxy overview
- Switch to the develop tab from the top right

API Proxy develop
- The API proxy develop opens
- First we add a step in the request to read the KVM value
- Click on the + Step button in the top flow (Request)

API Proxy add policy
- In the list look for Key Value Map Operations
- Select the policy and click Add

API Proxy KVM
- Select the new policy element in the flow
- Edit the policy configuration XML using the following code
<?xml version="1.0" encoding="UTF-8" standalone="yes"?>

<KeyValueMapOperations async="false" continueOnError="false" enabled="true" name="Key-Value-Map-Operations-1" mapIdentifier="ES5">

     <DisplayName>Key Value Map Operations-1</DisplayName>

     <Properties/>

     <ExclusiveCache>false</ExclusiveCache>

     <ExpiryTimeInSecs>300</ExpiryTimeInSecs>

     <Get assignTo="private.username">

          <Key>

               <Parameter>user</Parameter>

          </Key>

     </Get>

     <Get assignTo="private.password">

          <Key>

               <Parameter>password</Parameter>

          </Key>

     </Get>

     <Scope>environment</Scope>

</KeyValueMapOperations>
Add Basic Authentication
- Next step we add the Basic Authentication policy
- Click on the + Step button in the top flow
- In the list look for Basic Authentication and click Add

API Proxy Basic Authentication
- In the policy configuration XML paste the following code
<?xml version="1.0" encoding="UTF-8" standalone="yes"?>

<BasicAuthentication async="false" continueOnError="false" enabled="true" name="Basic-Authentication-1">

     <DisplayName>Basic Authentication-1</DisplayName>

     <Operation>Encode</Operation>

     <IgnoreUnresolvedVariables>false</IgnoreUnresolvedVariables>

     <User ref="private.username"/>

     <Password ref="private.password"/>

     <AssignTo createNew="false">request.header.Authorization</AssignTo>

     <Source>request.header.Authorization</Source>

</BasicAuthentication>
Convert payload to a simplified JSON
In this final step, we will convert the default SAP XML Atom payload in a more API friendly JSON format
Convert ATOM XML to JSON
- Click on the + Step button in the bottom flow (Response)

API Proxy add policy
- In the list look for XML to JSON and click Add

APi Proxy XML to JSON
- Open the XML policy configuration and change the Output variable to sap.body

API Proxy Javascript
<?xml version="1.0" encoding="UTF-8" standalone="yes"?>

<XMLToJSON async="false" continueOnError="false" enabled="true" name="XML-to-JSON-1">

    <DisplayName>XML to JSON-1</DisplayName>

    <Properties/>

    <Format>yahoo</Format>

    <OutputVariable>sap.body</OutputVariable>

    <Source>response</Source>

</XMLToJSON>
Simplify the SAP payload
The SAP OData payload has many information that enrich the response with many extra information that can increase the complexity of an API consumer. With a simple javascript we will extract only the relevant information.
- Click on the + Step button in the bottom flow (Response)
- In the list look for Javascript and click Add

API Proxy Javascript
- Select the js script source and copy and paste the code below

API Proxy Javascript code
var resp = context.getVariable('sap.body');

var data = JSON.parse(resp);


var newContent = JSON.parse('{"salesOrders":[]}');


var salesOrder = data.feed.entry;

for(var entry in salesOrder) {

    newContent.salesOrders[entry] = salesOrder[entry].content.properties;

}


context.setVariable("sap.response",JSON.stringify(newContent));
Assign the new payload to the response
- Click on the + Step button in the bottom flow (Response)
- In the list look for Assign Message and click Add

API Proxy Assign Message
- Open the XML policy configuration and change the content as below
<?xml version="1.0" encoding="UTF-8" standalone="yes"?>

<AssignMessage name="AssignResponsePayload">

    <IgnoreUnresolvedVariables>true</IgnoreUnresolvedVariables>

    <Set>

        <Payload contentType="application/json">{sap.response}</Payload>

    </Set>

</AssignMessage>
Save and deploy
- Your API flow should look like this

API Proxy flow
- Click the Save button
Create an API product
In this step we will create an API product that contain the API proxy the we just created and allows us to register it against an application
- Click on Publish > API Products to create an API Product.

Open API Products
- Click on +API Product on the top right
- In the following wizard, we will need to define few parameters for the API product:
| Parameter | value |
|---|---|
| Name | Order to Cash |
| Display name | Order to Cash |
| Environment | test |
| Access | Private |
- In the API resources section, click on Add a proxy
- Select the newly created proxy SalesOrder

API Products details
- Click Save
Create an Application
In this final step we will create an Application that consumes our APIs
- Click on Publish > Apps to create an Application.
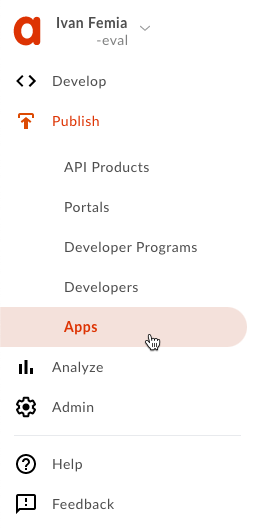
Open API Products
- Click on +App on the top right to create a new Application {value=2}
- In the following wizard, we will need to define few parameters for the application:
| Parameter | value |
|---|---|
| Name | Sales Orders |
| Display name | Sales Orders |
| Developer option | |
| Developer | Select any available in the list |
- In the Credentials section, click on Add product
- Select the newly created product Order to cash

Application details
- Click Create
Test the API
In this final section we will test the API created.
- Open your application and click on the show button to see the API Key associated to the application

Application API key
- Open a web browser (yes, Chrome is preferred)
- Browse to the URL https://<;your org>.apigee.net/salesorders?apikey=<your apikey>
Note: The full URL can be verified in the Overview tab of the API Proxy
- The output should be similar to the below

Final output
Further enhancements
The API created has a very basic endpoint, you can have a more advanced API importing a preconfigured API proxy into your Apigee organization.
This new API proxy includes enhanced javascript code (Javascript-1.js and Javascript-2.js) to handle different navigations in the SAP OData endpoint such search for a single sales order, display the details of a single sales order and the sales order items associated to a specific sales order.
- Download the apigee proxy zip file into your local PC
gsutil cp gs://public-demo-assets/apigee/SalesOrders_apiproxy.zip ./Note: the code is stored in a public Google Cloud Storage Bucket and you'll need gsutil tool to download it
- Upload the API proxy in your Apigee dashboard selecting Upload proxy bundle

Upload Proxy Bundle
- Deploy the proxy
- Include it in the Order to cash API product
Where next?
This demonstration shows how we can easily expose standard SAP OData endpoint in more modern and standardized Rest Odata to be consumed by any application. In my next blog we will start modernizing the access to SAP utilizing a Chatbot build using Dialogflow CX.
3 Comments
You must be a registered user to add a comment. If you've already registered, sign in. Otherwise, register and sign in.
Labels in this area
-
A Dynamic Memory Allocation Tool
1 -
ABAP
10 -
ABAP 7.4
1 -
abap cds
1 -
ABAP CDS Views
14 -
ABAP class
1 -
ABAP Cloud
1 -
ABAP Development
5 -
ABAP in Eclipse
2 -
ABAP Keyword Documentation
2 -
ABAP OOABAP
3 -
ABAP Programming
1 -
ABAP RESTFul API
1 -
abap technical
1 -
ABAP test cockpit
7 -
ABAP test cokpit
1 -
Adobe Form
1 -
ADT
1 -
Advanced Event Mesh
1 -
AEM
2 -
AI
1 -
ALV
1 -
alv oo
1 -
API and Integration
2 -
APIs
10 -
APIs ABAP
1 -
App Dev and Integration
2 -
Application Development
2 -
application job
1 -
archivelinks
1 -
Automation
4 -
B2B Integration
1 -
BTP
1 -
BTP Destination
1 -
Business Application Studio
1 -
Business Technology Platform
1 -
CAP
2 -
CAP CDS
1 -
CAP development
1 -
CAPM
1 -
Career Development
4 -
CL_GUI_FRONTEND_SERVICES
1 -
CL_SALV_TABLE
2 -
Cloud Extensibility
8 -
Cloud Native
8 -
Cloud Platform Integration
1 -
CloudEvents
2 -
CMIS
1 -
Connection
1 -
container
1 -
Customer Experience
1 -
Customer Portal
1 -
Debugging
2 -
Developer extensibility
1 -
Developing at Scale
3 -
DMS
1 -
dynamic logpoints
1 -
Dynpro
1 -
Dynpro Width
1 -
Eclipse ADT ABAP Development Tools
1 -
EDA
1 -
Event Mesh
1 -
Expert
1 -
Field Symbols in ABAP
1 -
Figma
1 -
Fiori
1 -
Fiori App Extension
1 -
Forms & Templates
1 -
General
1 -
Getting Started
1 -
IBM watsonx
2 -
Integration
1 -
Integration & Connectivity
11 -
Introduction
1 -
JavaScript
1 -
JavaScripts used by Adobe Forms
1 -
joule
1 -
NodeJS
1 -
ODATA
3 -
OOABAP
4 -
Outbound queue
1 -
ProCustomer
1 -
Product Updates
1 -
Programming Models
14 -
React
1 -
React and CAP App – Deployed in BTP
1 -
Restful webservices Using POST MAN
1 -
RFC
1 -
RFFOEDI1
1 -
SAP BAS
1 -
SAP BTP
1 -
SAP Build
1 -
SAP Build apps
1 -
SAP Build CodeJam
1 -
SAP CodeTalk
1 -
SAP Odata
2 -
SAP SEGW
1 -
SAP Tech Bytes
1 -
SAP UI5
1 -
SAP UI5 Custom Library
1 -
SAPEnhancements
1 -
SapMachine
1 -
security
3 -
SM30
1 -
Table Maintenance Generator
1 -
text editor
1 -
Tools
18 -
translation
1 -
User Experience
7 -
Width
1
- « Previous
- Next »
Top kudoed authors
| User | Count |
|---|---|
| 2 | |
| 1 | |
| 1 | |
| 1 | |
| 1 | |
| 1 | |
| 1 | |
| 1 | |
| 1 |