
- SAP Community
- Products and Technology
- Human Capital Management
- HCM Blogs by SAP
- Configurable New Hire for Onboarding
Human Capital Management Blogs by SAP
Get insider info on SAP SuccessFactors HCM suite for core HR and payroll, time and attendance, talent management, employee experience management, and more in this SAP blog.
Turn on suggestions
Auto-suggest helps you quickly narrow down your search results by suggesting possible matches as you type.
Showing results for
Advisor
Options
- Subscribe to RSS Feed
- Mark as New
- Mark as Read
- Bookmark
- Subscribe
- Printer Friendly Page
- Report Inappropriate Content
05-17-2023
10:09 PM
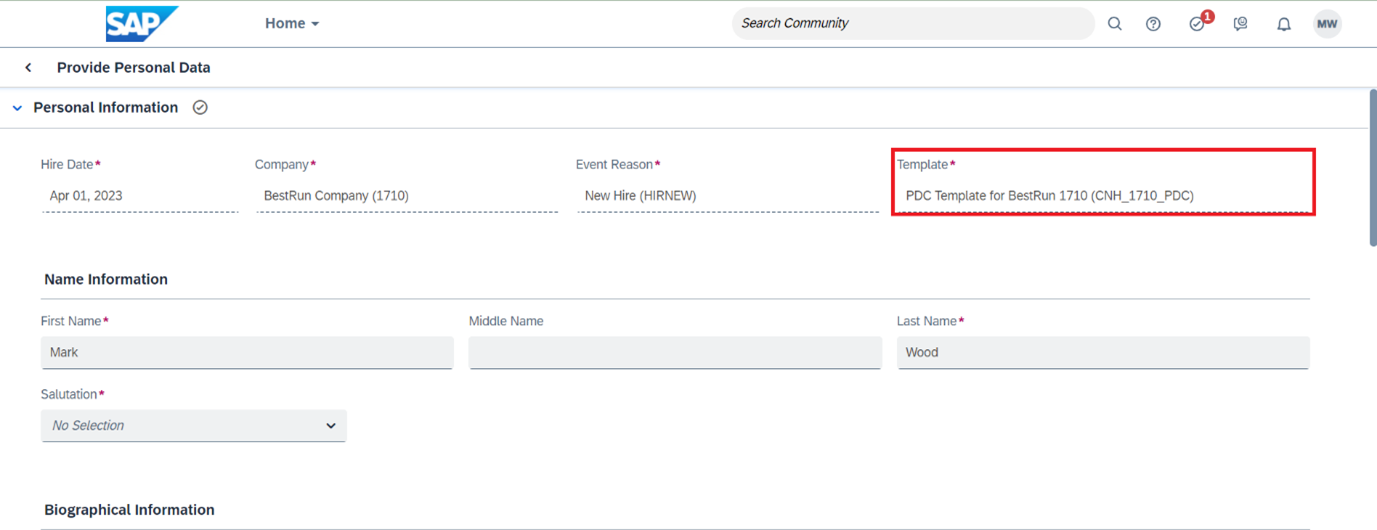
With SAP SuccessFactors 1H 2023 release you can streamline and personalize new hire data collection with Configurable New Hire to maximize efficiency and user experience.
Configurable New Hire provides the ability to configure the hiring process which caters for the various needs of your workforce, that is hired through the Onboarding application. Using this feature, you can create effective-dated templates for specific hiring scenarios, for example, for seasonal workers, interns, or full-time employees. You can also configure Hire Templates based on Location, Legal Entity, and other fields that are present in Employment Information and Job Information.
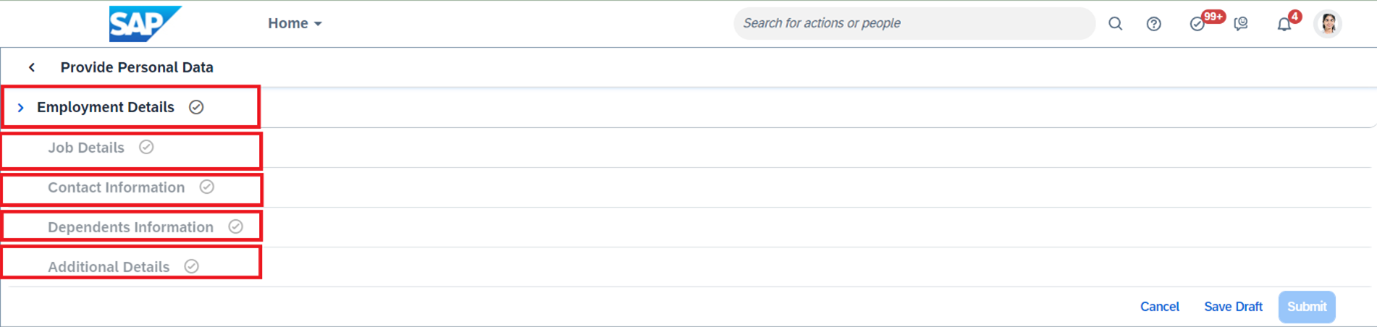
You can configure different templates for different steps such as New Hire Data Review, Personal Data Collection, and Access New Hire Data.
You also get the ability to use this feature in hybrid mode, for example, for country A, a template can be used while for country B, we could continue using the standard process where fixed entities are used.
A Hire template is a collection of sections and portlets, where each section is a collection of HRIS elements and/or user-defined configuration UIs which are referred to as Portlets. The creation of configuration UIs is done by customers based on specific needs. These UIs are defined as we do today where we have custom MDF objects after which a UI is created for the previously defined custom MDF objects.
You can redefine the order of the objects and retain only required portlets after removing entities that aren't required for a template. Please note that the template can hold only a maximum of 30 standard and custom MDF objects and Employee Central HRIS elements which are contained between 2 and 10 pages. Additionally, single page templates aren’t accepted by the system. Single Page Templates are the ones which has only one section defined, so with customers needs to have at least 2 sections (pages) in the templates.
Once a template is created, you can set the status to Active or Inactive, as needed. You can also delete templates if they’re no longer necessary. However, a template can’t be deleted if the hiring process, saved drafts, or workflow associated to it isn’t complete.
When Configurable New Hire is configured, it will be applicable for all the candidates who satisfy the Rule conditions. This means it will also be applicable for candidates whose onboarding process is currently in progress. In case you would like to apply this feature only for fresh New Hires whose Onboarding Process has been started after the SAP SuccessFactors 1H 2023 release, you can look at the solution provided in following sections.
Setting up Configurable New Hire in Onboarding is a 3-step process, as below:
These steps are elaborated in the following sections.
Note: You can't collect data for custom MDF objects as part of Configurable New Hire for Rehire with old employment and Rehire on New Employment. You must follow the Custom Data Collection process to capture such data.
Following are some important benefits of using the Configurable New Hire feature:
Using the Configurable New Hire feature, data that was previously collected as part of Personal Data Collection and Additional Data Collection can now be collected in a single step as part of Personal Data Collection thereby providing new hires a better user experience.
Previously, the only way to view data/attachments entered by a candidate was through SAC or custom extract/import into the Profile. With Configurable New Hire, Responsible Users/HR Admins can now view and correct the data entered by new hires in manage pending hires. This helps Responsible Users/HR Admins to correct the data entered by new hires in manage pending hires without restarting the Tasks.
Previously, the only way to see data/attachments entered by a candidate was through SAC or custom extract/import into the Profile. With Configurable New Hire, Responsible Users/HR Admins can now view and correct the data entered by New Hires in the Employee Profile itself, thereby providing a better experience for the users.
Below are the configurations for various setups related to Configurable New Hire.
Hire Template is an object that holds the configuration of Sections and Portlets and their order in which the Sections and Portlets are displayed.
We have added two new types of Hire Templates, “Onboarding Manager” and “Onboarding New Hire”. “Onboarding Manager” type templates are used during the New Hire Data Review and Access New Hire Data step, while “Onboarding New Hire” templates are used for new hires in the Personal Data Collection step.
To create a Hire Template, we need to perform the following steps:
Under Section Configuration, you can define a block based on your requirement. For example, Identity Information
Now click on the Details link present next to Identity Information Section and add the portlets.
You can add any HRIS Element such as Name Information, Biographical Information, Person Information or MDF Block as Configuration UI such as Payment Information or any other UI created from custom MDF Objects.
There are some mandatory Portlets which needs to be added while creating Hire Template.
For Onboarding Manager, we need to add at least Name Information, Employment ID Information, Personal Information, Employment Information and Job Information to successfully create Hire Template. Also, Employee Cost Assignment Portlet when Industry Features are enabled for Onboarding.
For Onboarding New Hire, we need to add at least Name Information Portlet to successfully create Hire Template.
To select the appropriate Hire Template in the Onboarding data review steps such as New Hire Data Review, Personal Data Collection and Access New Hire Data, you must set up business rules. These business rules shall be of type Set Hire Template for New Hire for the Personal Data Collection Step and Set Hire Template for Onboarding Participant or Responsible User type for the New Hire Data Review and Access New Hire Data Review steps. These rule scenarios are present under the Onboarding Module. Below are the steps to set up the business rule:
Following are examples of the flow and the corresponding behavior that can be expected while performing Onboarding:
This can be achieved by adjusting the Rule Conditions to pick candidates whose Onboarding has been initiated after certain date. Sample rule provided below with changes highlighted. This is not a mandatory step and can be done when use-case demands.
Configurable New Hire enables customers in collecting specific data in a single step. It also gives the ability for the hiring managers and responsible users to view and modify the data before and after hiring. This also enables users to see specific data in Employee Profile which was collected during Onboarding. When Configurable New Hire is configured, it will be applicable for all the candidates who satisfies the Rule conditions. This means it will also be applicable for candidates whose onboarding process is currently in progress. In case you would like to apply this feature only for fresh New Hires whose Onboarding Process has been started after the SAP SuccessFactors 1H 2023 release, you can look at the solution provided above.
Configurable New Hire provides the ability to configure the hiring process which caters for the various needs of your workforce, that is hired through the Onboarding application. Using this feature, you can create effective-dated templates for specific hiring scenarios, for example, for seasonal workers, interns, or full-time employees. You can also configure Hire Templates based on Location, Legal Entity, and other fields that are present in Employment Information and Job Information.
You can configure different templates for different steps such as New Hire Data Review, Personal Data Collection, and Access New Hire Data.
You also get the ability to use this feature in hybrid mode, for example, for country A, a template can be used while for country B, we could continue using the standard process where fixed entities are used.
A Hire template is a collection of sections and portlets, where each section is a collection of HRIS elements and/or user-defined configuration UIs which are referred to as Portlets. The creation of configuration UIs is done by customers based on specific needs. These UIs are defined as we do today where we have custom MDF objects after which a UI is created for the previously defined custom MDF objects.
You can redefine the order of the objects and retain only required portlets after removing entities that aren't required for a template. Please note that the template can hold only a maximum of 30 standard and custom MDF objects and Employee Central HRIS elements which are contained between 2 and 10 pages. Additionally, single page templates aren’t accepted by the system. Single Page Templates are the ones which has only one section defined, so with customers needs to have at least 2 sections (pages) in the templates.
Once a template is created, you can set the status to Active or Inactive, as needed. You can also delete templates if they’re no longer necessary. However, a template can’t be deleted if the hiring process, saved drafts, or workflow associated to it isn’t complete.
When Configurable New Hire is configured, it will be applicable for all the candidates who satisfy the Rule conditions. This means it will also be applicable for candidates whose onboarding process is currently in progress. In case you would like to apply this feature only for fresh New Hires whose Onboarding Process has been started after the SAP SuccessFactors 1H 2023 release, you can look at the solution provided in following sections.
Setting up Configurable New Hire in Onboarding is a 3-step process, as below:
- Create a Hire Template.
- Create a Business Rule and define the conditions to select the Hire Template.
- Assign the Business Rule to Onboarding Configurations.
These steps are elaborated in the following sections.
Note: You can't collect data for custom MDF objects as part of Configurable New Hire for Rehire with old employment and Rehire on New Employment. You must follow the Custom Data Collection process to capture such data.
Benefits
Following are some important benefits of using the Configurable New Hire feature:
Enhanced Experience: Merger of Personal Data Collection and Additional Data Collection Step
Using the Configurable New Hire feature, data that was previously collected as part of Personal Data Collection and Additional Data Collection can now be collected in a single step as part of Personal Data Collection thereby providing new hires a better user experience.
Data Collected in Additional Data Collection Step can be Viewed/Corrected in the Manage Pending Hire Step
Previously, the only way to view data/attachments entered by a candidate was through SAC or custom extract/import into the Profile. With Configurable New Hire, Responsible Users/HR Admins can now view and correct the data entered by new hires in manage pending hires. This helps Responsible Users/HR Admins to correct the data entered by new hires in manage pending hires without restarting the Tasks.
Data can be Viewed/Corrected after Hiring
Previously, the only way to see data/attachments entered by a candidate was through SAC or custom extract/import into the Profile. With Configurable New Hire, Responsible Users/HR Admins can now view and correct the data entered by New Hires in the Employee Profile itself, thereby providing a better experience for the users.
Configuration
Below are the configurations for various setups related to Configurable New Hire.
Hire Template Setup
Hire Template is an object that holds the configuration of Sections and Portlets and their order in which the Sections and Portlets are displayed.
We have added two new types of Hire Templates, “Onboarding Manager” and “Onboarding New Hire”. “Onboarding Manager” type templates are used during the New Hire Data Review and Access New Hire Data step, while “Onboarding New Hire” templates are used for new hires in the Personal Data Collection step.
To create a Hire Template, we need to perform the following steps:
- Go to Admin Center > Manage Data.
- Select Create New> Hire Template.
- Add a unique Template ID. You can’t use the term "Standard" since that is taken by the system.
- Select Effective Start Date to make the template effective from a desired date.
- Select Effective status as Active if you want to use it, marking it as Inactive will not apply this template even when rule returns this template.
- Add a Name for the template to identify it easily.
- Template Type: Select Onboarding Manager or Onboarding New Hire.
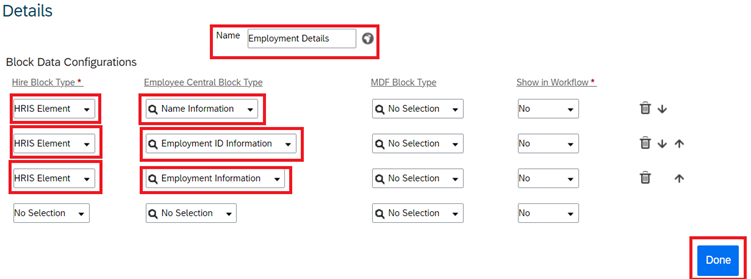
Under Section Configuration, you can define a block based on your requirement. For example, Identity Information
Now click on the Details link present next to Identity Information Section and add the portlets.
You can add any HRIS Element such as Name Information, Biographical Information, Person Information or MDF Block as Configuration UI such as Payment Information or any other UI created from custom MDF Objects.
There are some mandatory Portlets which needs to be added while creating Hire Template.
For Onboarding Manager, we need to add at least Name Information, Employment ID Information, Personal Information, Employment Information and Job Information to successfully create Hire Template. Also, Employee Cost Assignment Portlet when Industry Features are enabled for Onboarding.
For Onboarding New Hire, we need to add at least Name Information Portlet to successfully create Hire Template.

This image displays the Hire Template creation view
Business Rules Setup
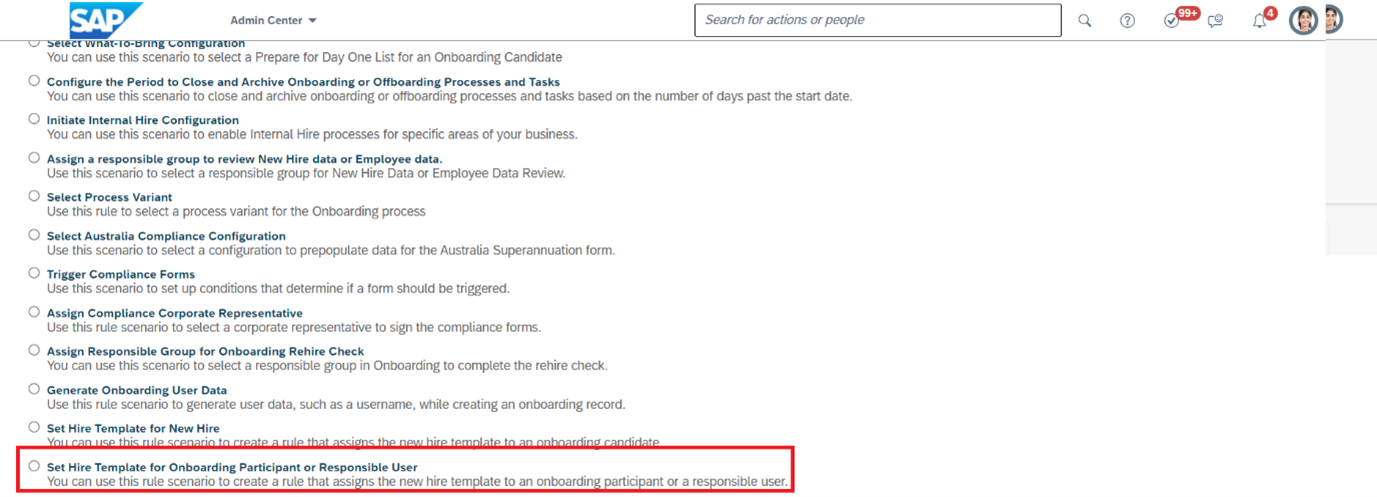
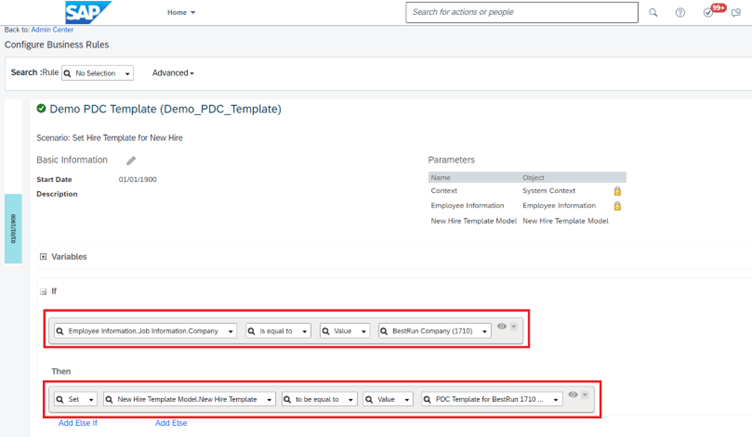
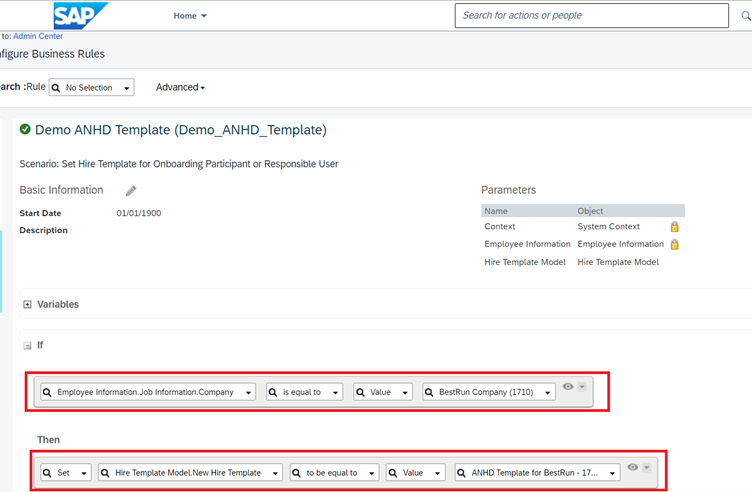
To select the appropriate Hire Template in the Onboarding data review steps such as New Hire Data Review, Personal Data Collection and Access New Hire Data, you must set up business rules. These business rules shall be of type Set Hire Template for New Hire for the Personal Data Collection Step and Set Hire Template for Onboarding Participant or Responsible User type for the New Hire Data Review and Access New Hire Data Review steps. These rule scenarios are present under the Onboarding Module. Below are the steps to set up the business rule:

This image displays rule scenarios for the Hire Template selection
- Go to Admin Center and search Configure Business Rules.
- Choose + to add a new Business Rule.
- Under Onboarding, select the Rule Scenario Set Hire Template for Onboarding Participant or Responsible User to create a rule for New Hire Data Review or Access New Hire Data Review or select Set Hire Template for New Hire for the Personal Data Collection step.
- Provide a unique Rule Name and Rule ID.
- Select the Effective Start Date of the Rule.
- We can add a Description for informational purpose.
- Click Continue.
- Set the Hire Template Value as part of the Then
- Click Save to save the Rule.
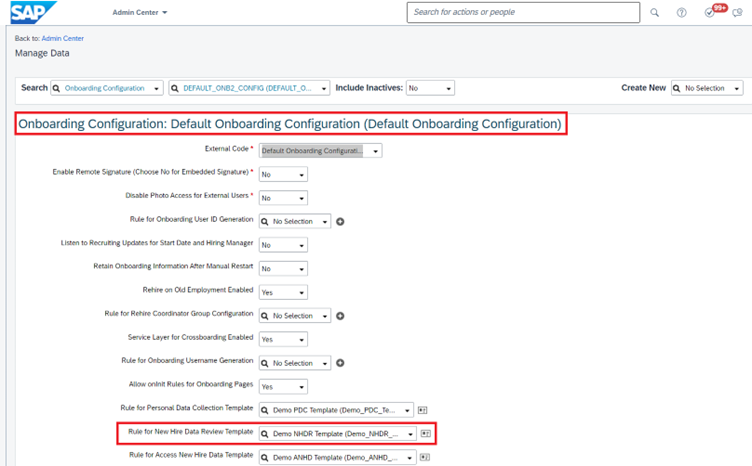
Assignment of the Rules to an Onboarding Configuration Object
- To assign the rule created above to select the Hire Template, go to Manage Data and then search for Onboarding Configuration Object Type.
- In the next search, look for “DEFAULT_ONB2_CONFIG” and then select it to view the corresponding details.
- Click on Take Action link and then Select Make Correction.
- To set the rule for the New Hire Data Review step, locate the field “Rule for New Hire Data Review Template” and click on the dropdown to see if the rule created above is listed, it shall be listed. Select the Rule.
- To set the Rule for Access New Hire Data Review step, locate the field “Rule for Access New Hire Data Review Template” and click on the dropdown to see if the rule created above of type “Set Hire Template for Onboarding Participant or Responsible User” is listed, it shall be listed. Select the Rule.
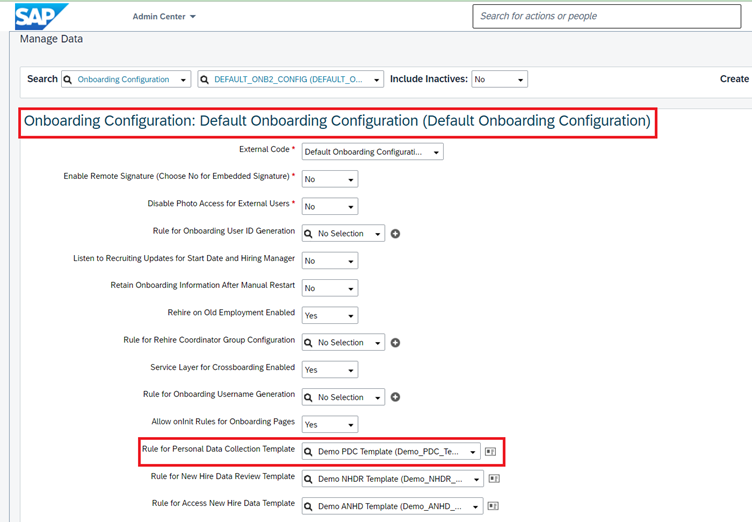
- To set the Rule for Personal Data Collection step, locate the field “Rule for Personal Data Collection Template” and click on the dropdown to see if the rule created above of type “Set Hire Template for New Hire” is listed, it shall be listed.
- Select the Rule.
- Click Save to save changes.

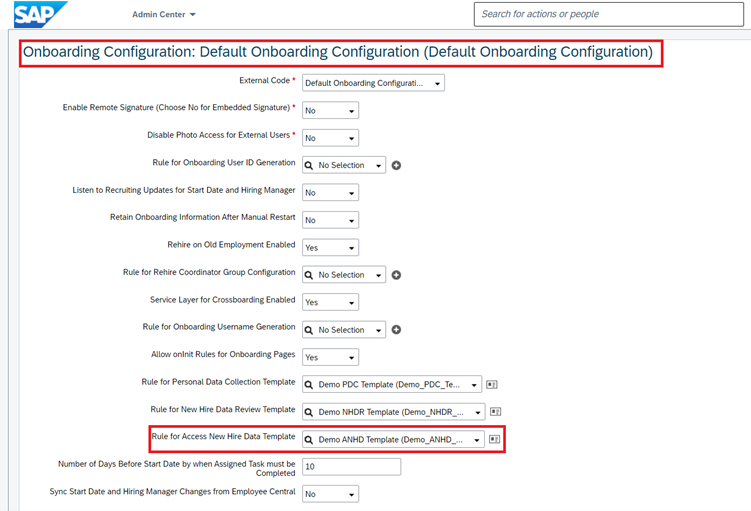
The above image displays rule assignment in the onboarding Configuration Object.
Example of the flow and behavior in Onboarding Steps
Following are examples of the flow and the corresponding behavior that can be expected while performing Onboarding:
New Hire Data Review
Hire Template Setup
- Go to Manage Data and Select Hire Template from the dropdown next to Create New.
- Enter Basic Details of the Hire Template such as template Id, effective start date, status, name, and type, for New Hire Data Review, select the Template Type as Onboarding Manager.

- Click on Details link after providing the basic information, the section name, and then add portlet details such as Name Information, Employment ID Information and so on, and then click on Done.

- To add more Sections, click on next Details link, provide the section name, and then add portlet details such as Job Information or any portlet of your choice. Click on Done upon adding Portlets.

- Click Save to persist Hire Template.
Business Rules Setup
- Open Configure Business Rule and click on + to add a new rule

- Move to the Onboarding module and click on Set Hire Template for Onboarding Participant or Responsible User.
- Add all the mandatory details required to create rule and click Continue..

- Add required rule conditions and the desired Hire Template and then click Save.

- Open Configure Business Rule and click on + to add a new rule
Assigning the Rule to Onboarding Configuration
- Go to Manage Data page, search for the required Onboarding Configuration Object, and then select Defatult_ONB2_Config. Populate the highlighted field with the rule created in step 2 and then click Save
- Go to Manage Data page, search for the required Onboarding Configuration Object, and then select Defatult_ONB2_Config. Populate the highlighted field with the rule created in step 2 and then click Save
Validate the changes are visible on New Hire Data Review
- Initiate Onboarding for a New Hire and then login as Hiring Manager to complete New Hire Data Review.
Validate to see if template is applied and template name is visible.

Validate to see if sections are in same order as Desired Hire Template.

Personal Data Collection
Hire Template Setup
- Go to Manage Data and Select Hire Template from the dropdown next to Create New.
- Enter Basic Details of the Hire Template such as template Id, effective start date, status, name, and type, for New Hire Data Review, select the Template Type as Onboarding New Hire.

- Click on Details link after providing the basic information, the section name, and then add portlet details such as Name Information, Biographical Information and so on, and then click Done.

- To add more Sections, click on next Details link, provide the section name, and then add portlet details such as Email Information, Phone Information, or any portlet of your choice. Click on Done upon adding Portlets.

- To add more Sections, click on next Details link, provide the section name, and then add portlet details such as Dependent Information, Emergency Contact Information, or any portlet of your choice. Click on Done upon adding Portlets.

- To add more Sections, click on next Details link, provide the section name, then add portlet details such as gym_membership, cust_vehicleDetails , or any portlet of your choice. Click on Done upon adding Portlets.

- Click Save to persist Hire Template.
Business Rules Setup
- Open Configure Business Rule and click on + to add a new rule.

- Move to the Onboarding module and click on Set Hire Template for New Hire.

- Add all the mandatory details required to create rule and click Continue

- Add required rule conditions and the desired Hire Template and then click Save.
- Open Configure Business Rule and click on + to add a new rule.
Assigning the Rule to Onboarding Configuration
- Go to Manage Data page, search for the required Onboarding Configuration Object, and then select Defatult_ONB2_Config. Populate the highlighted field with the rule created in step 2 and then click Save.
- Go to Manage Data page, search for the required Onboarding Configuration Object, and then select Defatult_ONB2_Config. Populate the highlighted field with the rule created in step 2 and then click Save.
- Validate to see then changes visible on Access New Hire Data
- Login as New Hire and then click on “Help us Learn about you” card. Click Start on Personal Data Collection step.
- Validate to see if template is applied and template name is visible.
- Validate to see if sections are in same order as Desired Hire Template.

Access New Hire Data
Hire Template Setup
- Go to Manage Data and Select Hire Template from the dropdown next to Create New.
- Enter Basic Details of the Hire Template such as template Id, effective start date, status, name, and type, for New Hire Data Review, select the Template Type as Onboarding Manager.

- Click on Details link after providing the basic information, the section name, and then add portlet details such as Name Information, Employment ID Information and so on, and then click on Done.
- To add more Sections, click on next Details link, provide the section name, and then add portlet details such as Job Information or any portlet of your choice. Click on Done upon adding Portlets.

- To add more Sections, click on next Details link, provide the section name, and then add portlet details such as Email Information, Phone Information, or any portlet of your choice. Click on Done upon adding Portlets.

- To add more Sections, click on next Details link, provide the section name, and then add portlet details such as Dependents Information, Emergency Contact Information, or any portlet of your choice. Click on Done upon adding Portlets.

- To add more Sections, click on next Details link, provide the section name, and then add portlet details such as gym_membership, cust_vehicleDetails, or any portlet of your choice. Click on Done upon adding Portlets.

- Click Save to persist Hire Template.
Business Rules Setup
- Open Configure Business Rule and click on + to add a new rule.

- Move to the Onboarding module and click on Set Hire Template for Onboarding Participant or Responsible User.

- Add all the mandatory details required to create rule and click Continue.

- Add required rule conditions and the desired Hire Template and then click Save.
- Open Configure Business Rule and click on + to add a new rule.
Assigning the Rule to Onboarding Configuration
- Go to Manage Data page, search for the required Onboarding Configuration Object, and then select Defatult_ONB2_Config. Populate the highlighted field with the rule created in step 2 and then click Save.
- Go to Manage Data page, search for the required Onboarding Configuration Object, and then select Defatult_ONB2_Config. Populate the highlighted field with the rule created in step 2 and then click Save.
Validate to see then changes visible on Access New Hire Data
- Go to Onboarding Dashboard and then click on New Hire Data from Actions Link.
- Validate to see if template is applied and template name is visible.

- Validate to see if sections are in same order as Desired Hire Template.
Employee Profile
- Configuring an MDF Block on the People Profile
- Go to Admin Center and then Configure People Profile.
- Highlight the relevant Live Profile MDF Information block to open the Edit Block: Live Profile MDF Information panel.
- From the MDF Screen ID menu, select the screen ID of the MDF object you want to display in the block.
- The screen ID is the ID that was provided when creating the configurable UI for the object.
- Save your changes.
- Providing Permissions for viewing the section in Employee Profile
- Go to Admin Center and Role Based Permissions
- Open the desired permission role.
- Move to User Permissions Section and click on Employee Views.
- Add permission for the section where MDF block was added
- Click Save
- Login with the desired User and search for the profile and you can view the data collected as part of Configurable New Hire.

Enabling Configurable New Hire only for New Candidates Onboarded after the Release.
This can be achieved by adjusting the Rule Conditions to pick candidates whose Onboarding has been initiated after certain date. Sample rule provided below with changes highlighted. This is not a mandatory step and can be done when use-case demands.
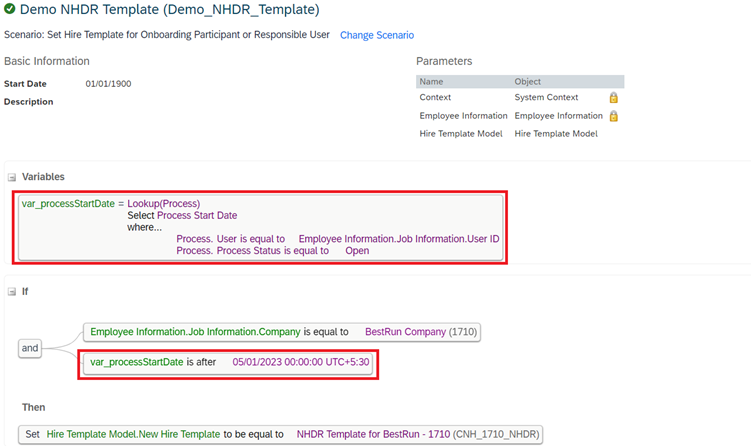
This pic shows a sample rule for enabling Configurable New Hire for New Hires after specific Date
Summary
Configurable New Hire enables customers in collecting specific data in a single step. It also gives the ability for the hiring managers and responsible users to view and modify the data before and after hiring. This also enables users to see specific data in Employee Profile which was collected during Onboarding. When Configurable New Hire is configured, it will be applicable for all the candidates who satisfies the Rule conditions. This means it will also be applicable for candidates whose onboarding process is currently in progress. In case you would like to apply this feature only for fresh New Hires whose Onboarding Process has been started after the SAP SuccessFactors 1H 2023 release, you can look at the solution provided above.
- SAP Managed Tags:
- SAP SuccessFactors Onboarding
Labels:
9 Comments
You must be a registered user to add a comment. If you've already registered, sign in. Otherwise, register and sign in.
Labels in this area
-
1H 2023 Product Release
3 -
2H 2023 Product Release
3 -
Business Trends
104 -
Business Trends
5 -
Cross-Products
13 -
Event Information
75 -
Event Information
9 -
Events
5 -
Expert Insights
26 -
Expert Insights
22 -
Feature Highlights
16 -
Hot Topics
20 -
Innovation Alert
8 -
Leadership Insights
4 -
Life at SAP
67 -
Life at SAP
1 -
Product Advisory
5 -
Product Updates
499 -
Product Updates
45 -
Release
6 -
Technology Updates
408 -
Technology Updates
12
Related Content
- Onboarding 1.0 data migration to another tool in Human Capital Management Q&A
- Document transfer from RCM to Onboarding 2.0 in Human Capital Management Q&A
- Onboarding 2.0 New Hire directed to SSO screen in Human Capital Management Q&A
- 1H 2024 Release Highlights: New Innovations in SAP SuccessFactors Onboarding in Human Capital Management Blogs by SAP
- 1H 2024 Release Highlights: Leveraging AI within SAP SuccessFactors Recruiting to Accelerate Hiring in Human Capital Management Blogs by SAP
Top kudoed authors
| User | Count |
|---|---|
| 5 | |
| 3 | |
| 2 | |
| 2 | |
| 2 | |
| 2 | |
| 2 | |
| 2 | |
| 1 | |
| 1 |