
- SAP Community
- Products and Technology
- Human Capital Management
- HCM Blogs by SAP
- Configuring the SAP SuccessFactors Employee Master...
Human Capital Management Blogs by SAP
Get insider info on HCM solutions for core HR and payroll, time and attendance, talent management, employee experience management, and more in this SAP blog.
Turn on suggestions
Auto-suggest helps you quickly narrow down your search results by suggesting possible matches as you type.
Showing results for
Product and Topic Expert
Options
- Subscribe to RSS Feed
- Mark as New
- Mark as Read
- Bookmark
- Subscribe
- Printer Friendly Page
- Report Inappropriate Content
03-18-2020
7:54 PM
Hello SAP community,
We would like to share one working sample of the SAP SuccessFactors Employee Central connecting with the SAP HCM ERP using the SAP Cloud Platform Integration (CPI) + SAP Cloud Connector (SCC).
The ERP used was one S/4HANA OnPremise (running PA_SE_IN SP 26 and EA_HR 608 SP 65).
Objective:
Help our customers and partners completing the configuration in your local environments/projects.
The handbook used during this set up is:
All the images and data used here was taken from SuccessFactors SalesDemo instance, local CPI tenant, local ERP OnPremise installation, so we are using dummy data.
Let's start with one picture of the landscape.

We are assuming that you already have the PA_SE_IN SP installed in your ERP. This blog post will not cover all these steps, for more info you can refer the implementation guide mentioned earlier.
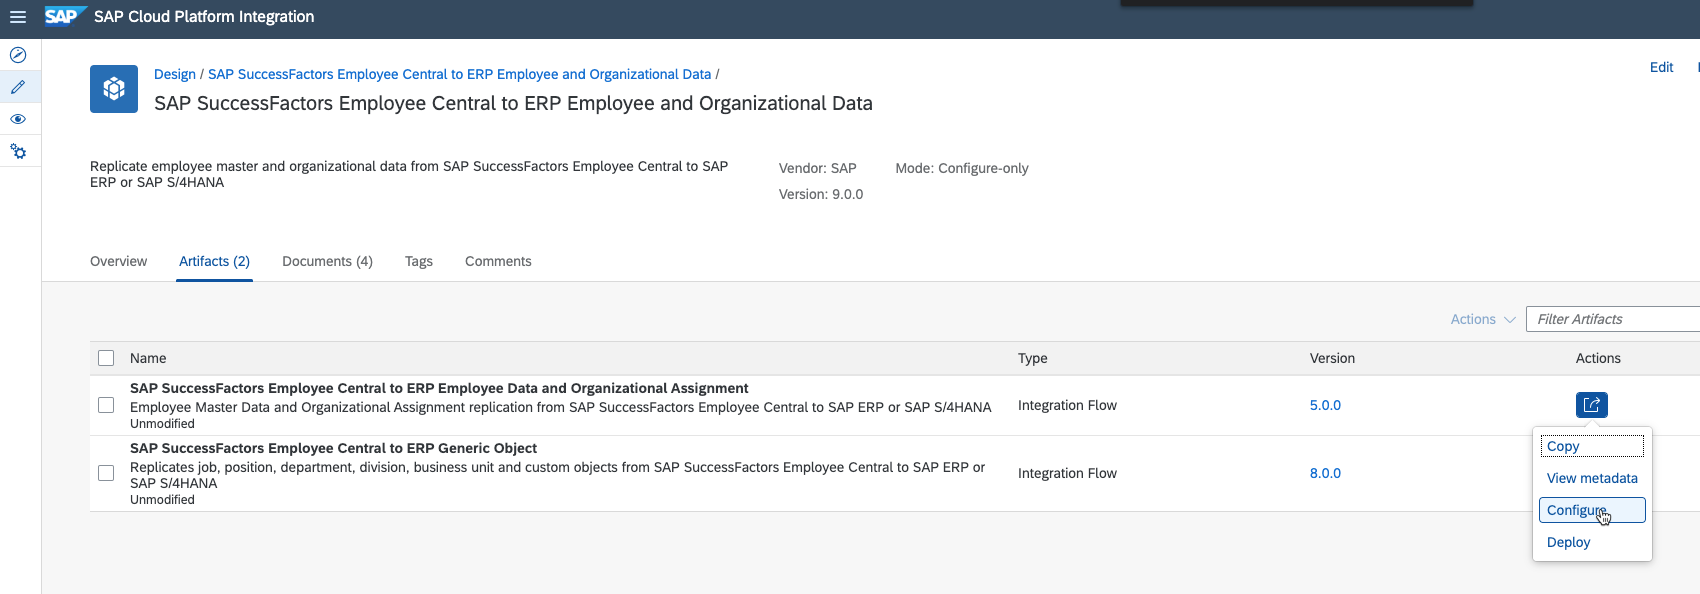
1. Download the CPI package named SAP SuccessFactors Employee Central to ERP Employee and Organizational Data from the Discover menu.
The configuration will start in the artifact SAP SuccessFactors Employee Central to ERP Employee Data and Organizational Assignment
Actions > Configure:
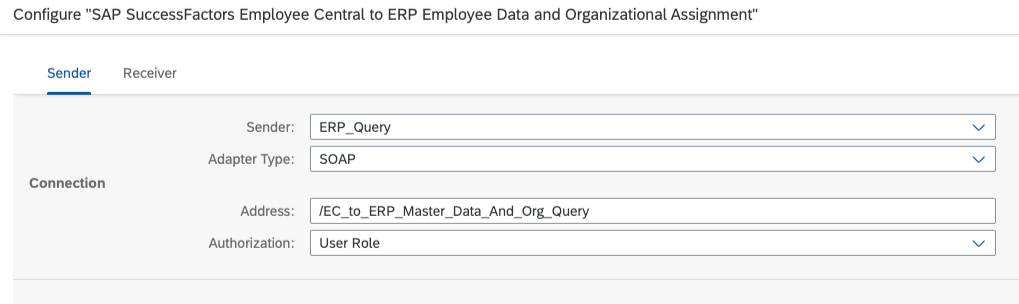
In the Sender tab, you can maintain the default configuration with the address:
This address will be used later in your SOAMANAGER consumer proxy configuration.
In the Receiver tab, change in the dropdown for Employee_Central.

The Address field should be selected according your SF instance datacenter, you can find all the URLs here 2215682 – SAP Successfactors API URLs for different Data Centers.
The Credential Name field you can type any text, but this needs to be created prior in the monitor view > Security Material, with your SF company ID, your username and your password (we call this one as API user).
The permissions that this API user will need in the SF side are described in the handbook chapter 3.3.1 Granting Permissions to API User.

If you are not familiar creating SAP SuccessFactors API username, you can follow also the instructions of this guided answers here.
In the Receiver tab, change in the dropdown for ERP_Response
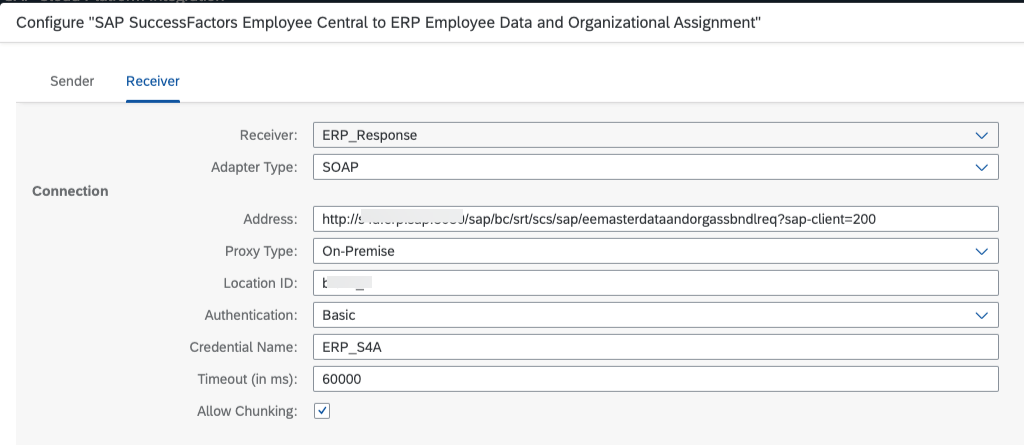
The "ERP_Response", "ERP_Notification..." and "ERP_Exceptions..." share the same config. You can apply the same values for all these.
In the Address, your URL will end with:
The initial part of the URL at this point is still unknown, because we need to set up the SAP Cloud Connector first. We will go back here later. Just type some valid HTTP web address like the sample above.
The Credential Name needs to be created prior in the monitor view > Security Material, with your ERP admin technical username. The permissions that this user will need in the ERP side can be seen in the handbook chapters 3.3.2 and 3.3.3.
The Proxy Type here was used On-Premise because later we will configure the SAP Cloud Connector.
After doing similar configs according above, please Save/Deploy your artifact.
Now go to Monitor > Manage Integration Content > search for the SAP SuccessFactors Employee Central to ERP Employee Data and Organizational Assignment and find your endpoint URL ready to be consumed.

In my scenario, the URL is:
https://MASKED-iflmap.hcisbt.br1.hana.ondemand.com/cxf/EC_to_ERP_Master_Data_And_Org_Query
2. Now let's start with SOAMANAGER config in your ERP.
Access the Web Service Configuration in browser.
Type in the Search bar the object name CO_ECPAOX_EE_MD_ORGAS_BNDL_QRY.
Create one Manual configuration for this consumer proxy.

In this sample we will use User ID / Password.
The User Name is your CPI S-USER. You can configure with Client Certificate too in your side if you prefer.
The Messaging tab must have these exact set up.
In the Transport Settings tab, we are going to use the URL that we got from the CPI > Overview > manage integration content (the same we have in the step 1).
Sample = https://MASKED-iflmap.hcisbt.br1.hana.ondemand.com/cxf/EC_to_ERP_Master_Data_And_Org_Query
The next tabs leave the default values (no changes are needed) and save 🙂
The last step (very important) is marking the Logical Port is Default = true. This is needed otherwise the messages can be in the Wait for Scheduler status in the SRTUTIL transaction later.

You now can run one Ping Web Service. The expected message is:
Web service ping successful for LP 'REPLICATION_S4A', proxy 'CO_ECPAOX_EE_MD_ORGAS_BNDL_QRY'.
If your ping did not worked, don't be sad. It can be due the certificates (step 3) or due another reason.
Sometimes the ping fails and this is the expected result. As per KBAs 1947516 and 1711486, it is always recommended to test Web Services in SE80, because pinging it in SOAMANAGER, testing it in a browser or using transaction SICF do not send POST method, which is mandatory for the SOAP service. This could result in empty pages or various HTTP error codes depending on the release. Another alternative to test the service is using one of the methods mentioned on the following Wiki: https://wiki.scn.sap.com/wiki/x/GAIhF
My suggestion if your ping failed = ignore this for now because later we will run the program to sync data and the real "testing" will be done.
3. We need to set up the certificates.
Why? Because we just configured HTTPS connection between 2 systems and certificates are part of the handshake process.
Type the CPI endpoint URL generated in the step 1 in your browser, sample below:
https://MASKED-iflmap.hcisbt.br1.hana.ondemand.com/cxf/EC_to_ERP_Master_Data_And_Org_Query
I am using Mac OS and the things are little different from Microsoft Windows in the browsers Google Chrome and Firefox.
After typing the URL in the browser, click in the lock icon and navigate until you see the certificates.
We need to download the TOP certificate (the one that expires in very future, like year 2038), not the middle/intermediate certificate and not the leaf certificate (expires usually in 1 year).
In Mac OS and Google Chrome, we just need to drag and drop the gold box to some folder in Finder.
This action generate the file like "DigiCert Global Root G2.cer".
Now we need to install this file inside the ERP STRUST transaction.
Please install under the nodes:
Please be aware that importing the leaf and intermediate certificate is not required for CPI, you can import only the root certificate, and this will avoid to renewal the certs every year. That's why I just recommended you to export 1 certificate (not the complete chain of 3 certificates of the URL).
After installing, Save, restart ICM (for older versions, this is done in the SMICM transaction). For recent versions, we do not need the ICM restart.
4. Let's configure another web service / package.
Download from CPI discover menu the package = ERP to SAP SuccessFactors Employee Central Confirmation v2

After installed, Go to Design > Actions > Configure.
In the Sender tab, leave the default config with the Address /ERP_to_EC_EmployeeMasterDataReplicationConfirmation
In the Receiver tab,
Select the Address of the datacenter of your SF company ID (same URL as the step 1 of this blog post).
Select the Credential Name created in the step 1 of this blog post.
In the More tab (no changes needed).
After doing similar configs according above, please Save/Deploy your artifact.
Now go to Monitor > Manage Integration Content > search for the ERP to SAP SuccessFactors Employee Central Confirmation v2 and find your endpoint URL ready to be consumed.
In my scenario, the URL is:
https://MASKED-iflmap.hcisbt.br1.hana.ondemand.com/cxf/ERP_to_EC_EmployeeMasterDataReplicationConfir...
5. Let's configure again the SOAMANAGER in your ERP. This time for the confirmation webservice of the step 4.
Access the Web Service Configuration in browser.
Type in the Search bar the object name CO_PAOCF_EC_EMPLOYEE_MASTER_DA.
Create one Manual configuration for this consumer proxy.

In this sample we will use User ID / Password. The User Name is your CPI S-USER.
You can configure with Client Certificate too in your side if you prefer.
The Messaging tab must have these exact set up.

In the Transport Settings tab, we are going to use the URL that we got from the CPI > Overview > manage integration content (the same we have in the step 4).
Sample = https://MASKED-iflmap.hcisbt.br1.hana.ondemand.com:443/cxf/ERP_to_EC_EmployeeMasterDataReplicationCo...
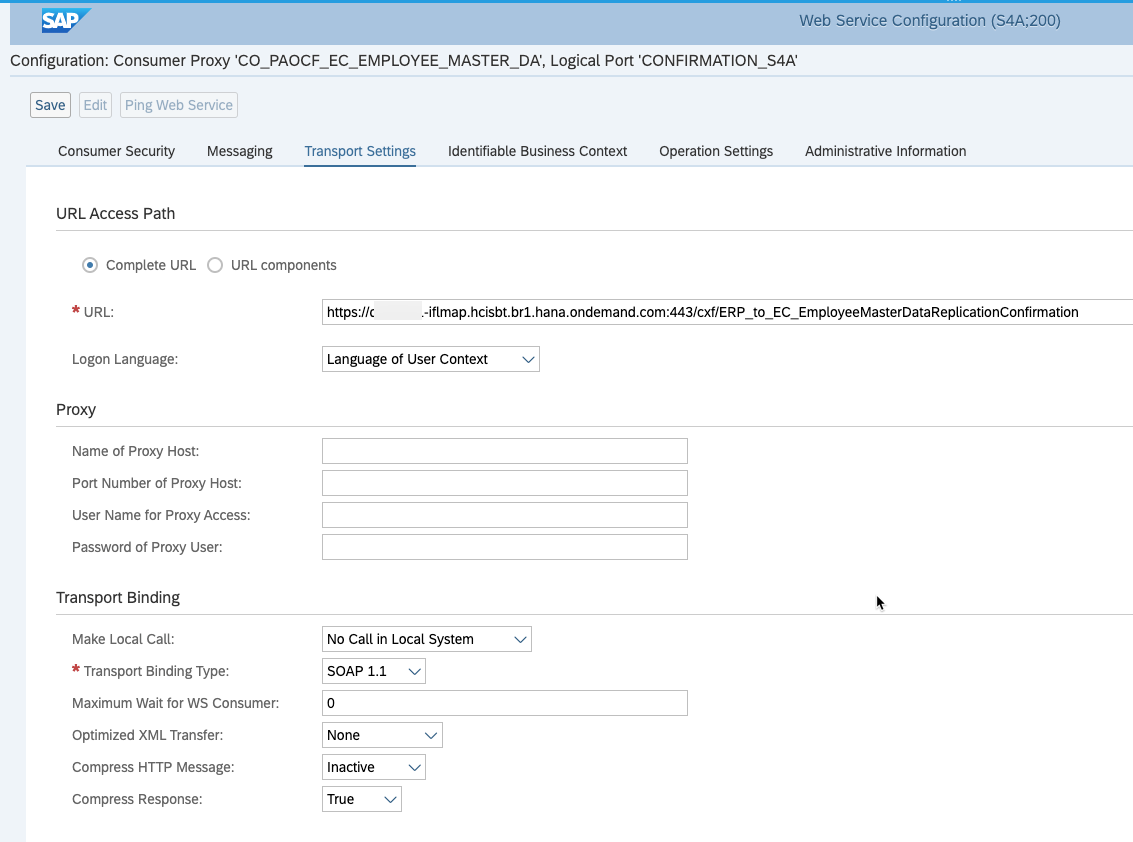
The next tabs leave the default values (no changes are needed) and save 🙂
The last step is marking the Logical Port is Default = true.

You can run now run one Ping Web Service. The expected message is:
Web service ping successful for LP 'CONFIRMATION_S4A', proxy 'CO_PAOCF_EC_EMPLOYEE_MASTER_DA'.
If your ping did not worked, find the reasons/same explanation done earlier in the step 2.
6. Let's configure another webservice required for this process.
Access the SOAMANAGER and go to Simplified Web Service Configuration.
Type the Search Pattern = EEMASTERDATAANDORGASSBNDLREQ
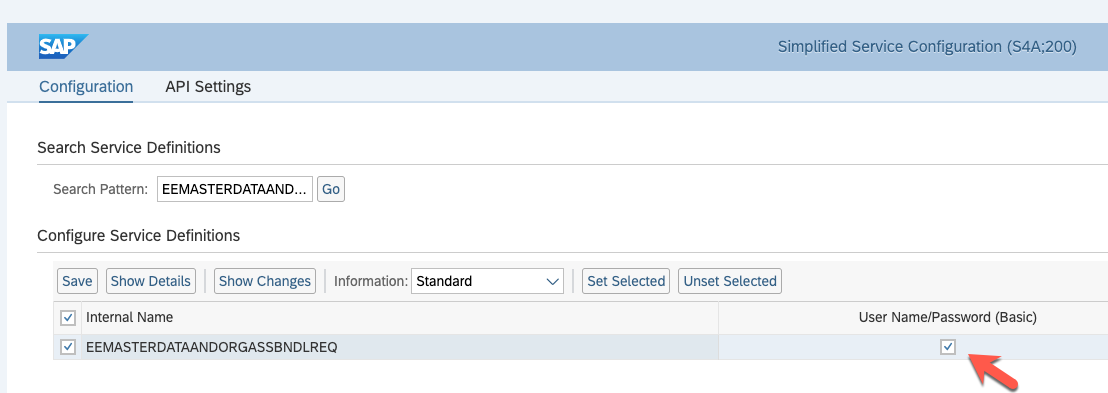
Select the checkbox of User Name/Password (Basic) and Save.
Click in the Show Details button.
You will see the technical details according sample below:
The URL above is masked, but you will need to copy and paste your URL and type in browser.
After loading the WSDL page in browser, scroll down until the end.

and copy the last URL.
Sample:
http://brMASKED.sap/sap/bc/srt/scs/sap/eemasterdataandorgassbndlreq?sap-client=200
This URL is your ERP webservice inbound URL that needs to be configured in SCC, because probably this URL is exposed only in the local network.
The SCC will convert the internal URL to the cloud exposed URL to be configured in CPI.
I will explain more in the next step.
7. At this point, the ERP SOAMANAGER work is 100% done and the CPI work is 95% done.
Now, starting with the SAP Cloud Connector installation/configuration to allow your CPI connecting with your SAP HCM ERP On Premise.
Download and install the SCC in your local environment / local server.
Link to download the software.
Link of the SAP Cloud Connector (SCC) handbook/help.
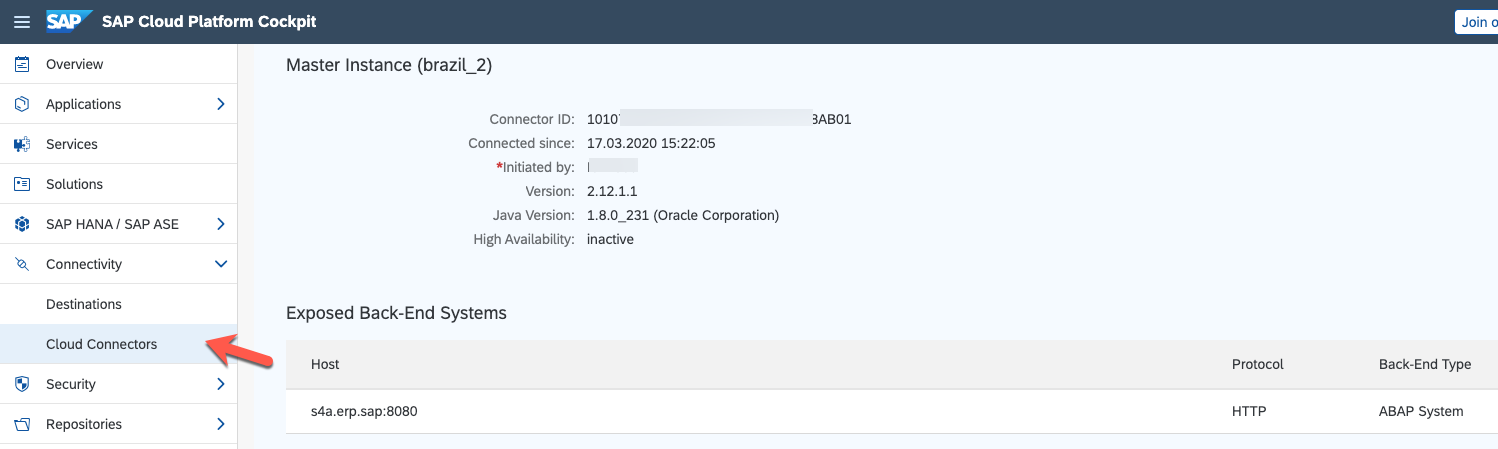
Access your SAP Cloud Platform (SCP) account and find the Technical Name of your subaccount.

Configure your SCC to connect with your SAP Cloud Platform (SCP) subaccount (using the Technical Name).

In this sample, the Location ID used was brazil_2.
After that, create your Cloud To On-Premise configuration

In my sample, we are using:
This configuration above allows your Virtual host that will be used in CPI to connect in your destination Internal Host (the webservice URL that we configured in the step 6).
We used the SCC in this landscape, because the URL of the step 6 is not exposed directly in the internet (most common scenario of SAP HCM ERP On Premise in customers).
When the setup above is ready, you will be able see the connected environments in the SAP Cloud Platform (SCP) > Connectivity > Cloud Connectors:
You can also run one test in the SAP Cloud Platform Integration (CPI) in the Overview > Test Connectivity > Cloud connector > type your Location ID and hit Send button:
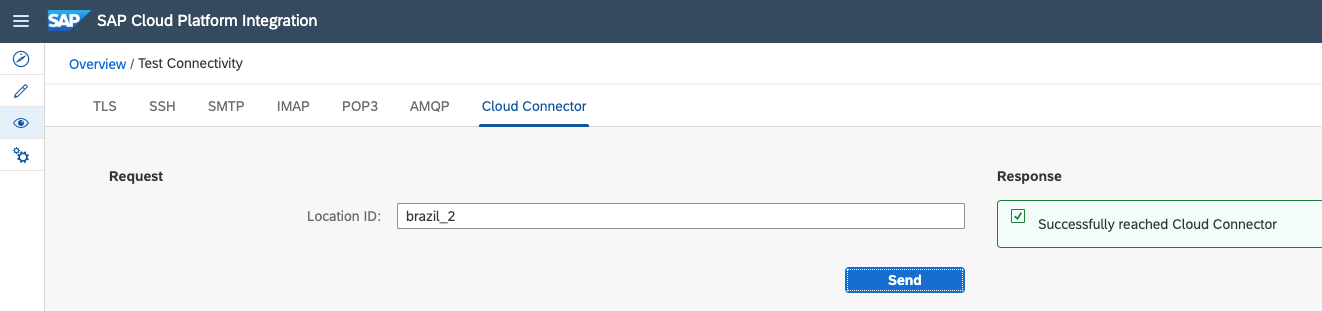
If the connectivity is good, you will receive the message = Successfully reached Cloud Connector.
8. Completing the CPI work, I wrote one comment in red in the step 1 and we need to revisit that point of the configuration.
We need to go back to CPI configuration and type again the URL just generated in the Cloud connector in the Receiver tab.
Find below the config ready.
The field Address have now the SCC URL (Virtual host + combined with the path, webservice and client ID).

Your configuration of SCC, CPI and ERP webservices are 100% done.
After your SAP HCM functional team completes the SPRO customizing (path Personnel Management > Integration with SuccessFactors Employee Central > Business Integration Builder ) in the ERP side described in the handbook, you will be able to run the following program:
SE38 > ECPAO_EE_ORG_REPL_QUERY with your transformation template.
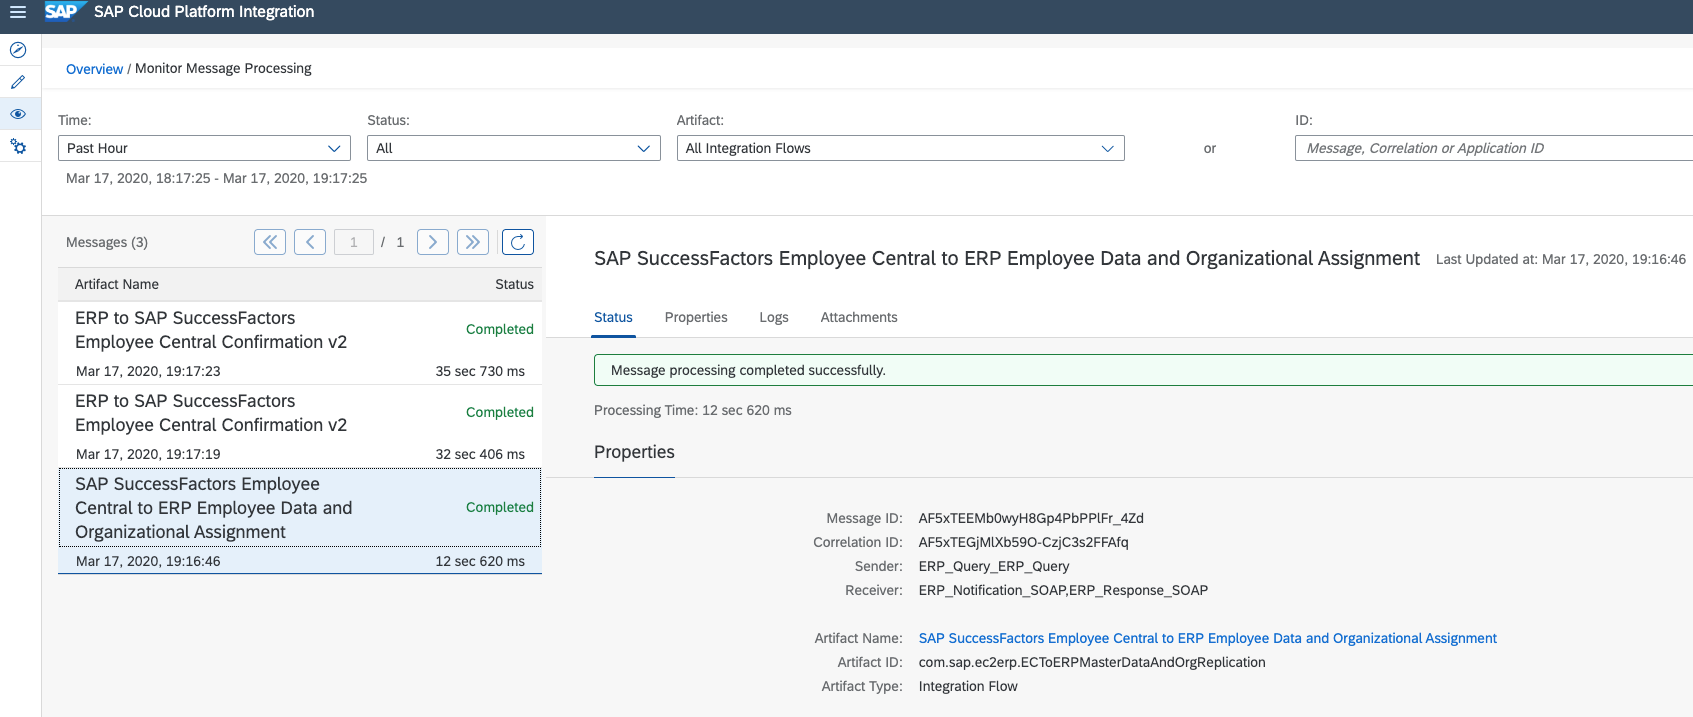
Then, you will be able to see the payloads and webservices working in CPI Overview > Monitor Message Processing:
Similar logs will be visible in the Data Replication Monitor in the SuccessFactors side or the SRTUTIL (Message Monitor) and SLG1 transactions in ERP side.
The webservices involved are:

In the SLG1, you can filter by the Object text = ECPAO_IN
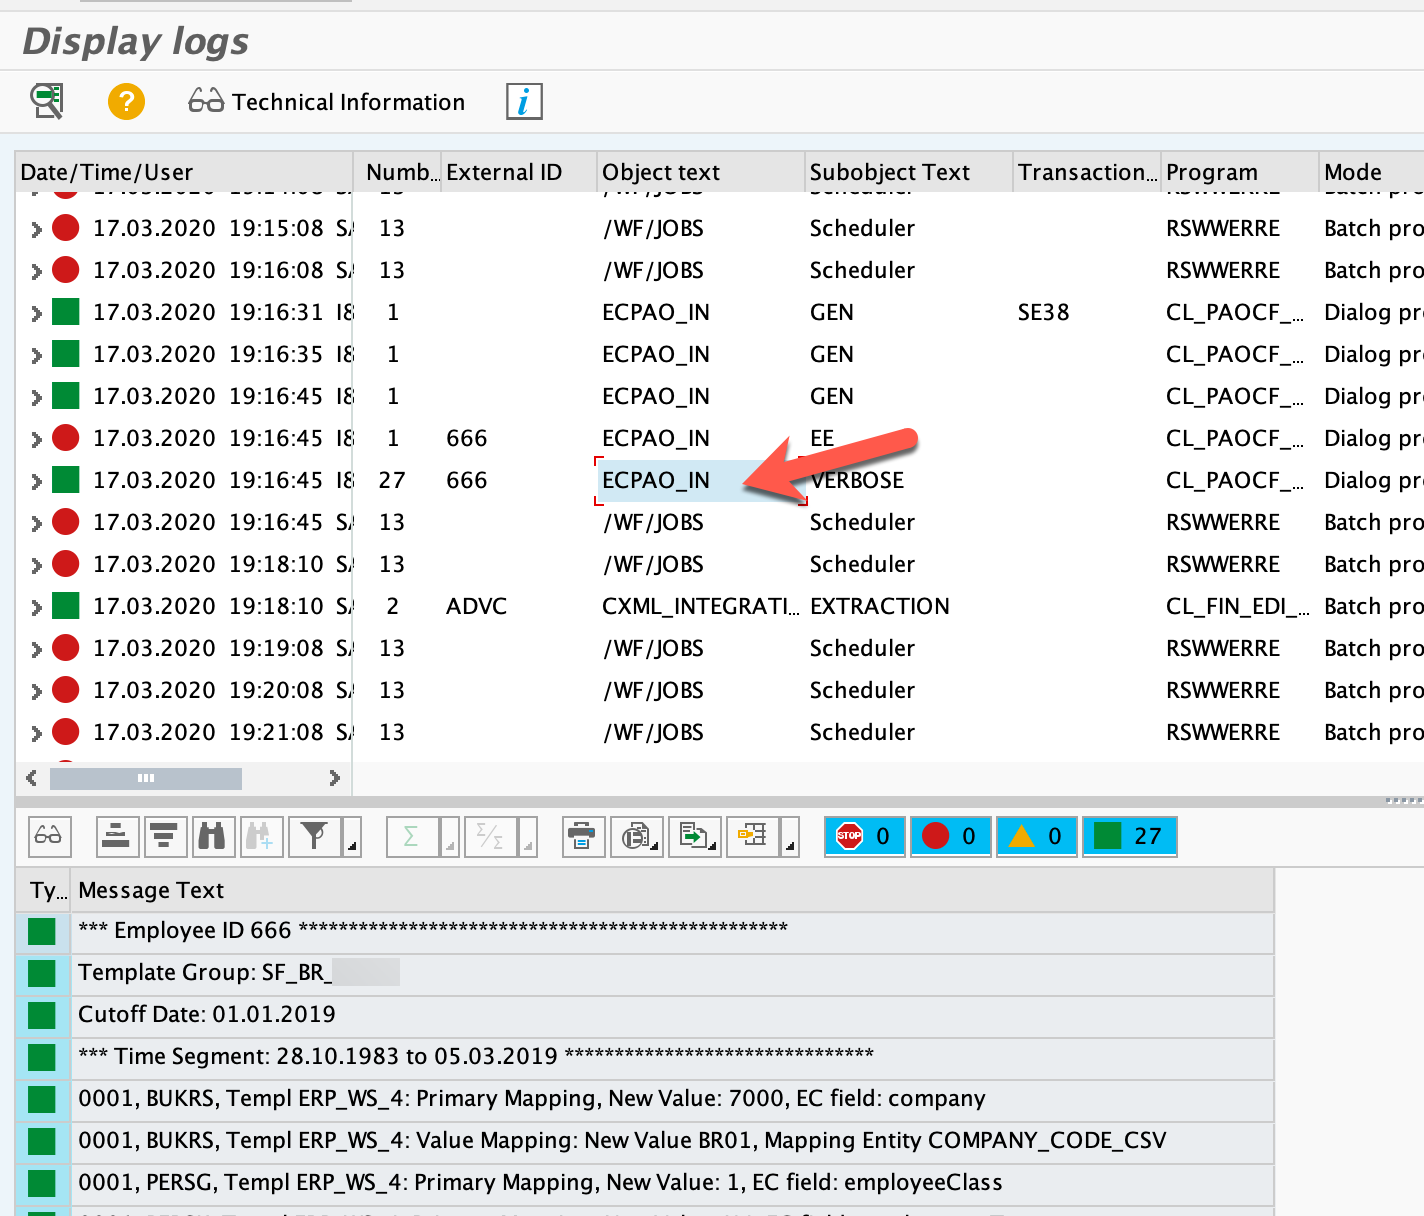
Just FYI, after one execution, the last successful run date/parameter is stored in the table ECPAO_QRY_ADM (fields QRY_LSTMOD_DT_TM or NXT_LSTMOD_DT_DM). These timestamps stored there will be used to control de Delta executions.
If you have errors like Wait for Scheduler under the SRTUTIL or SRT_MONI, please check this master KBA:
All set 🙂
Happy implementation.
Conclusion:
Using the instructions of this blog post, you will be able to set up the SAP Cloud Platform Integration (CPI) packages, the ERP webservices required in the SAP SuccessFactors Employee central Master Data and Organizational assignment to SAP ERP HCM with the latest version Builder integration Builder (BIB). This knowledge also can be used when your team apply system refresh in ERP side or instance refresh in SF side, because similar work needs to be done reconnecting all the systems. The SAP Cloud Connector (SCC) instructions part was summarized, but you can get the complete installation procedures in the handbook shared.
I hope this blog post can help your team doing the same implementation faster.
If you find this blog post helpful – please press like button 🙂
Best Regards from Brazil,
Soliman
We would like to share one working sample of the SAP SuccessFactors Employee Central connecting with the SAP HCM ERP using the SAP Cloud Platform Integration (CPI) + SAP Cloud Connector (SCC).
The ERP used was one S/4HANA OnPremise (running PA_SE_IN SP 26 and EA_HR 608 SP 65).
Objective:
Help our customers and partners completing the configuration in your local environments/projects.
The handbook used during this set up is:
- Replicating Employee Master Data and Organizational Assignments from Employee Central to SAP ERP HCM - (Q4 2019 – 2020-02-04)
- the handbook link includes the "/latest" in the URL, so in future, this handbook might have some different procedures or minor changes not documented in this blog post.
All the images and data used here was taken from SuccessFactors SalesDemo instance, local CPI tenant, local ERP OnPremise installation, so we are using dummy data.
Let's start with one picture of the landscape.
We are assuming that you already have the PA_SE_IN SP installed in your ERP. This blog post will not cover all these steps, for more info you can refer the implementation guide mentioned earlier.
1. Download the CPI package named SAP SuccessFactors Employee Central to ERP Employee and Organizational Data from the Discover menu.
The configuration will start in the artifact SAP SuccessFactors Employee Central to ERP Employee Data and Organizational Assignment
Actions > Configure:
In the Sender tab, you can maintain the default configuration with the address:
/EC_to_ERP_Master_Data_And_Org_Query
This address will be used later in your SOAMANAGER consumer proxy configuration.
In the Receiver tab, change in the dropdown for Employee_Central.
The Address field should be selected according your SF instance datacenter, you can find all the URLs here 2215682 – SAP Successfactors API URLs for different Data Centers.
The Credential Name field you can type any text, but this needs to be created prior in the monitor view > Security Material, with your SF company ID, your username and your password (we call this one as API user).
The permissions that this API user will need in the SF side are described in the handbook chapter 3.3.1 Granting Permissions to API User.
If you are not familiar creating SAP SuccessFactors API username, you can follow also the instructions of this guided answers here.
In the Receiver tab, change in the dropdown for ERP_Response
The "ERP_Response", "ERP_Notification..." and "ERP_Exceptions..." share the same config. You can apply the same values for all these.
In the Address, your URL will end with:
http://MASKED.com/sap/bc/srt/scs/sap/eemasterdataandorgassbndlreq?sap-client=200
(the value 200 in the end of the URL is your ERP client number)
The initial part of the URL at this point is still unknown, because we need to set up the SAP Cloud Connector first. We will go back here later. Just type some valid HTTP web address like the sample above.
The Credential Name needs to be created prior in the monitor view > Security Material, with your ERP admin technical username. The permissions that this user will need in the ERP side can be seen in the handbook chapters 3.3.2 and 3.3.3.
The Proxy Type here was used On-Premise because later we will configure the SAP Cloud Connector.
After doing similar configs according above, please Save/Deploy your artifact.
Now go to Monitor > Manage Integration Content > search for the SAP SuccessFactors Employee Central to ERP Employee Data and Organizational Assignment and find your endpoint URL ready to be consumed.
In my scenario, the URL is:
https://MASKED-iflmap.hcisbt.br1.hana.ondemand.com/cxf/EC_to_ERP_Master_Data_And_Org_Query
2. Now let's start with SOAMANAGER config in your ERP.
Access the Web Service Configuration in browser.
Type in the Search bar the object name CO_ECPAOX_EE_MD_ORGAS_BNDL_QRY.
Create one Manual configuration for this consumer proxy.
In this sample we will use User ID / Password.
The User Name is your CPI S-USER. You can configure with Client Certificate too in your side if you prefer.
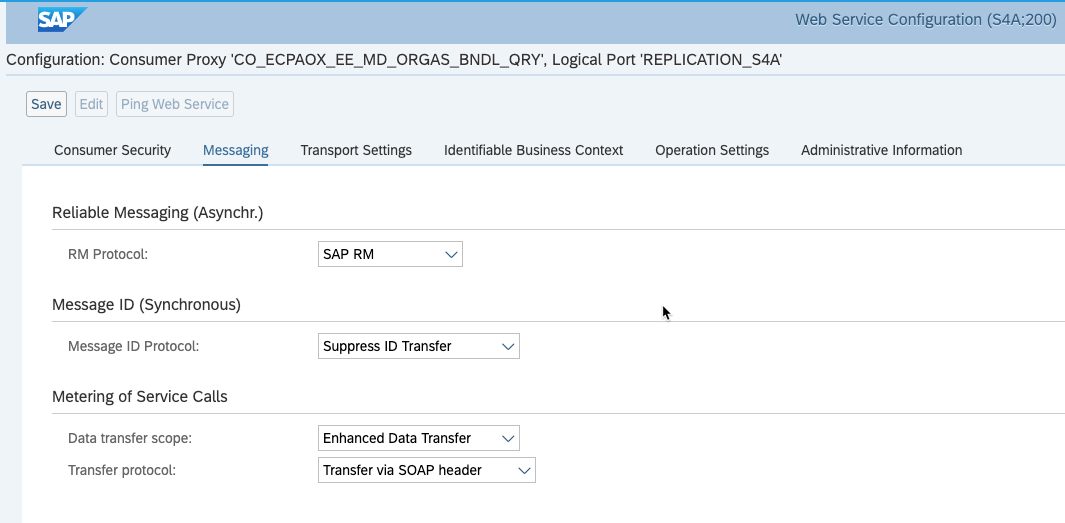
The Messaging tab must have these exact set up.
- RM Protocol = SAP RM
- Message ID Protocol = Suppress ID Transfer
- Data transfer scope = Enhanced Data Transfer
- Transfer protocol = Transfer via SOAP header
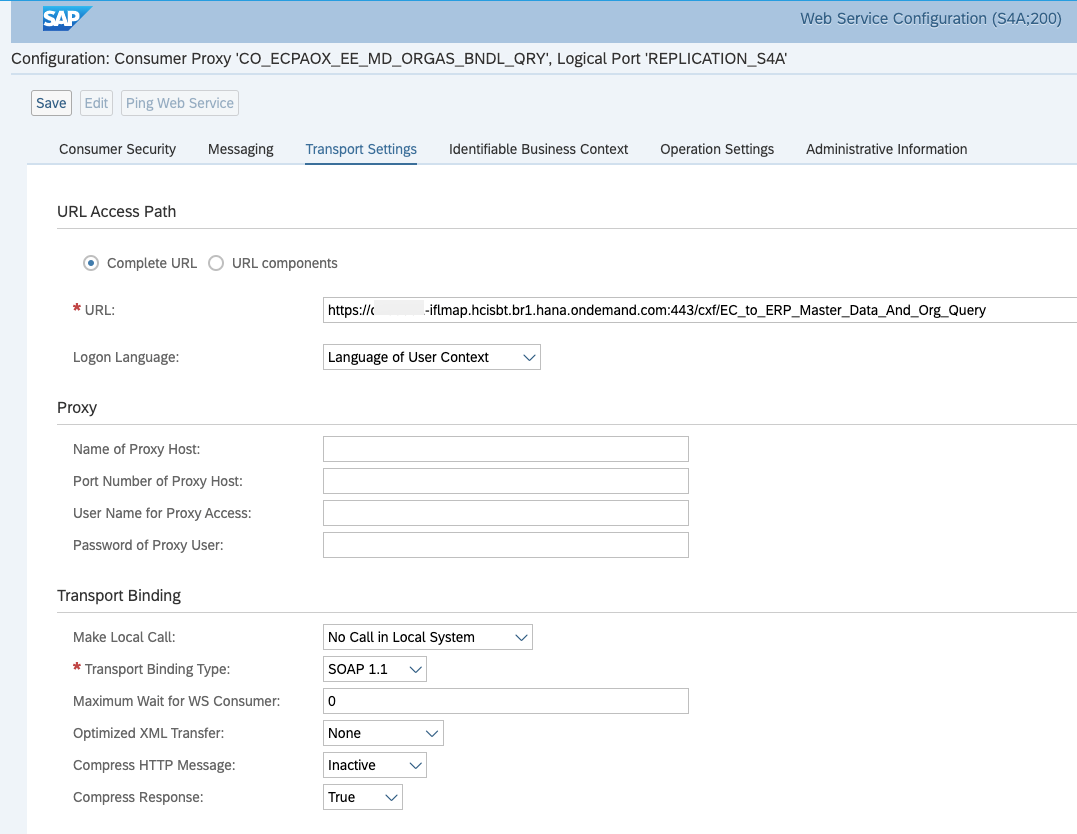
In the Transport Settings tab, we are going to use the URL that we got from the CPI > Overview > manage integration content (the same we have in the step 1).
Sample = https://MASKED-iflmap.hcisbt.br1.hana.ondemand.com/cxf/EC_to_ERP_Master_Data_And_Org_Query
The next tabs leave the default values (no changes are needed) and save 🙂
The last step (very important) is marking the Logical Port is Default = true. This is needed otherwise the messages can be in the Wait for Scheduler status in the SRTUTIL transaction later.
You now can run one Ping Web Service. The expected message is:
Web service ping successful for LP 'REPLICATION_S4A', proxy 'CO_ECPAOX_EE_MD_ORGAS_BNDL_QRY'.
If your ping did not worked, don't be sad. It can be due the certificates (step 3) or due another reason.
Sometimes the ping fails and this is the expected result. As per KBAs 1947516 and 1711486, it is always recommended to test Web Services in SE80, because pinging it in SOAMANAGER, testing it in a browser or using transaction SICF do not send POST method, which is mandatory for the SOAP service. This could result in empty pages or various HTTP error codes depending on the release. Another alternative to test the service is using one of the methods mentioned on the following Wiki: https://wiki.scn.sap.com/wiki/x/GAIhF
My suggestion if your ping failed = ignore this for now because later we will run the program to sync data and the real "testing" will be done.
3. We need to set up the certificates.
Why? Because we just configured HTTPS connection between 2 systems and certificates are part of the handshake process.
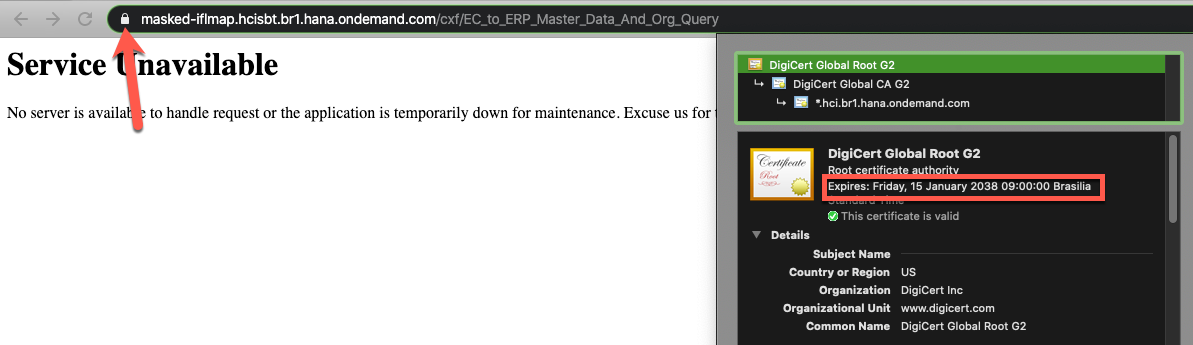
Type the CPI endpoint URL generated in the step 1 in your browser, sample below:
https://MASKED-iflmap.hcisbt.br1.hana.ondemand.com/cxf/EC_to_ERP_Master_Data_And_Org_Query
I am using Mac OS and the things are little different from Microsoft Windows in the browsers Google Chrome and Firefox.
After typing the URL in the browser, click in the lock icon and navigate until you see the certificates.
We need to download the TOP certificate (the one that expires in very future, like year 2038), not the middle/intermediate certificate and not the leaf certificate (expires usually in 1 year).
In Mac OS and Google Chrome, we just need to drag and drop the gold box to some folder in Finder.
This action generate the file like "DigiCert Global Root G2.cer".
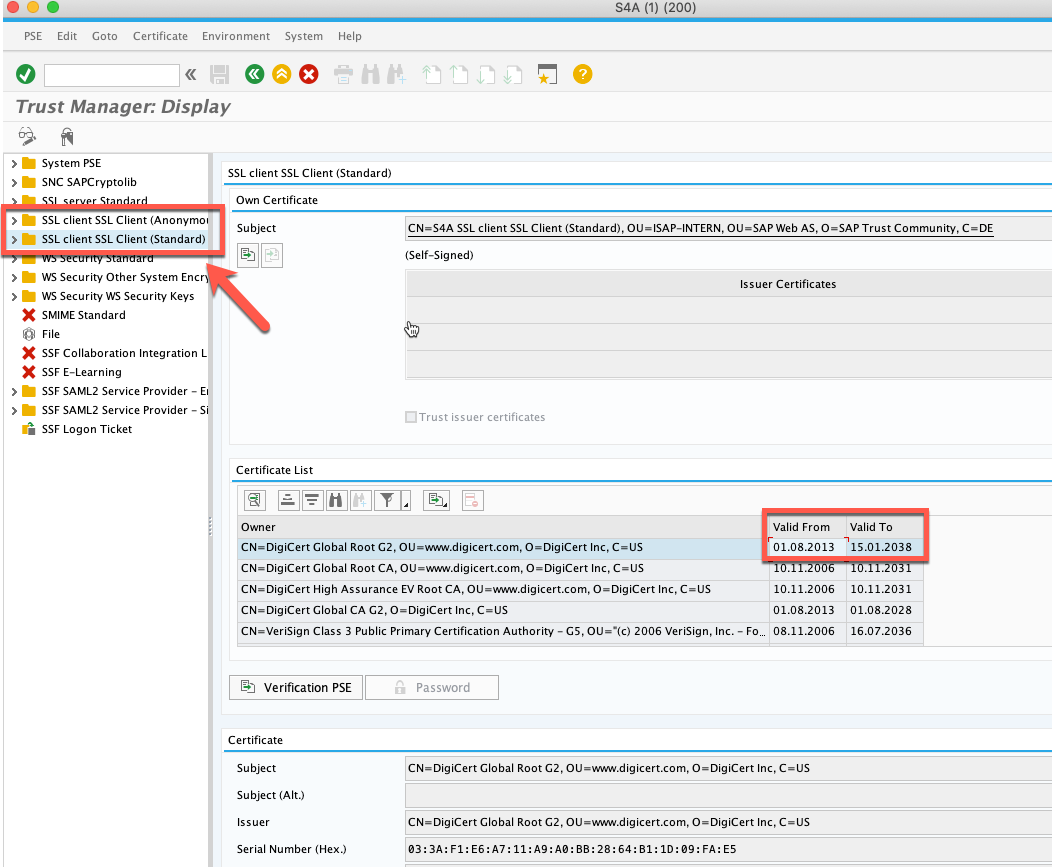
Now we need to install this file inside the ERP STRUST transaction.
Please install under the nodes:
- SSL client SSL Client (Standard)
- SSL client SSL Client (Anonymous)
Please be aware that importing the leaf and intermediate certificate is not required for CPI, you can import only the root certificate, and this will avoid to renewal the certs every year. That's why I just recommended you to export 1 certificate (not the complete chain of 3 certificates of the URL).
After installing, Save, restart ICM (for older versions, this is done in the SMICM transaction). For recent versions, we do not need the ICM restart.
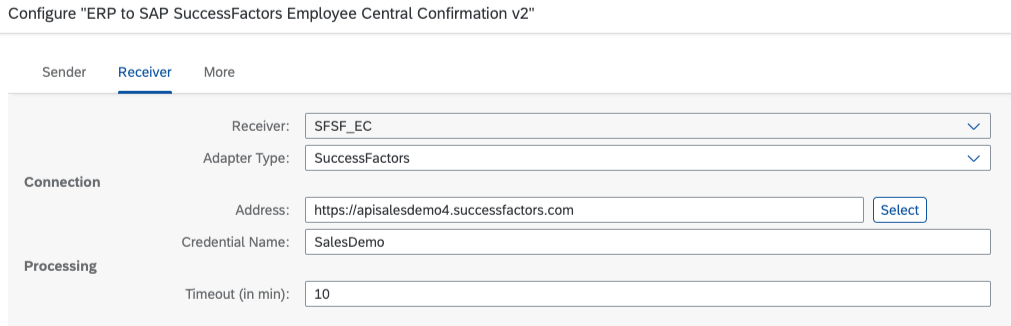
4. Let's configure another web service / package.
Download from CPI discover menu the package = ERP to SAP SuccessFactors Employee Central Confirmation v2
After installed, Go to Design > Actions > Configure.
In the Sender tab, leave the default config with the Address /ERP_to_EC_EmployeeMasterDataReplicationConfirmation
In the Receiver tab,
Select the Address of the datacenter of your SF company ID (same URL as the step 1 of this blog post).
Select the Credential Name created in the step 1 of this blog post.
In the More tab (no changes needed).
After doing similar configs according above, please Save/Deploy your artifact.
Now go to Monitor > Manage Integration Content > search for the ERP to SAP SuccessFactors Employee Central Confirmation v2 and find your endpoint URL ready to be consumed.
In my scenario, the URL is:
https://MASKED-iflmap.hcisbt.br1.hana.ondemand.com/cxf/ERP_to_EC_EmployeeMasterDataReplicationConfir...
5. Let's configure again the SOAMANAGER in your ERP. This time for the confirmation webservice of the step 4.
Access the Web Service Configuration in browser.
Type in the Search bar the object name CO_PAOCF_EC_EMPLOYEE_MASTER_DA.
Create one Manual configuration for this consumer proxy.
In this sample we will use User ID / Password. The User Name is your CPI S-USER.
You can configure with Client Certificate too in your side if you prefer.
The Messaging tab must have these exact set up.
- RM Protocol = SAP RM
- Message ID Protocol = Suppress ID Transfer
- Data transfer scope = Enhanced Data Transfer
- Transfer protocol = Transfer via SOAP header
In the Transport Settings tab, we are going to use the URL that we got from the CPI > Overview > manage integration content (the same we have in the step 4).
Sample = https://MASKED-iflmap.hcisbt.br1.hana.ondemand.com:443/cxf/ERP_to_EC_EmployeeMasterDataReplicationCo...
The next tabs leave the default values (no changes are needed) and save 🙂
The last step is marking the Logical Port is Default = true.
You can run now run one Ping Web Service. The expected message is:
Web service ping successful for LP 'CONFIRMATION_S4A', proxy 'CO_PAOCF_EC_EMPLOYEE_MASTER_DA'.
If your ping did not worked, find the reasons/same explanation done earlier in the step 2.
6. Let's configure another webservice required for this process.
Access the SOAMANAGER and go to Simplified Web Service Configuration.
Type the Search Pattern = EEMASTERDATAANDORGASSBNDLREQ
Select the checkbox of User Name/Password (Basic) and Save.
Click in the Show Details button.
You will see the technical details according sample below:
| |||||||||
|
The URL above is masked, but you will need to copy and paste your URL and type in browser.
After loading the WSDL page in browser, scroll down until the end.
and copy the last URL.
Sample:
http://brMASKED.sap/sap/bc/srt/scs/sap/eemasterdataandorgassbndlreq?sap-client=200
This URL is your ERP webservice inbound URL that needs to be configured in SCC, because probably this URL is exposed only in the local network.
The SCC will convert the internal URL to the cloud exposed URL to be configured in CPI.
I will explain more in the next step.
7. At this point, the ERP SOAMANAGER work is 100% done and the CPI work is 95% done.
Now, starting with the SAP Cloud Connector installation/configuration to allow your CPI connecting with your SAP HCM ERP On Premise.
Download and install the SCC in your local environment / local server.
Link to download the software.
Link of the SAP Cloud Connector (SCC) handbook/help.
Access your SAP Cloud Platform (SCP) account and find the Technical Name of your subaccount.
Configure your SCC to connect with your SAP Cloud Platform (SCP) subaccount (using the Technical Name).
In this sample, the Location ID used was brazil_2.
After that, create your Cloud To On-Premise configuration
In my sample, we are using:
- Virtual Host = s4a.erp.sap:8080 (HTTP port)
- Internal Host = brMASKED.sap:4430 (HTTPS port) > depends of your SMICM config in your ERP.
- URL Path = /sap/bc/srt/
- Access Policy = Path and all sub-paths (otherwise you may receive HTTP 403 error).
This configuration above allows your Virtual host that will be used in CPI to connect in your destination Internal Host (the webservice URL that we configured in the step 6).
We used the SCC in this landscape, because the URL of the step 6 is not exposed directly in the internet (most common scenario of SAP HCM ERP On Premise in customers).
When the setup above is ready, you will be able see the connected environments in the SAP Cloud Platform (SCP) > Connectivity > Cloud Connectors:
You can also run one test in the SAP Cloud Platform Integration (CPI) in the Overview > Test Connectivity > Cloud connector > type your Location ID and hit Send button:
If the connectivity is good, you will receive the message = Successfully reached Cloud Connector.
8. Completing the CPI work, I wrote one comment in red in the step 1 and we need to revisit that point of the configuration.
We need to go back to CPI configuration and type again the URL just generated in the Cloud connector in the Receiver tab.
Find below the config ready.
The field Address have now the SCC URL (Virtual host + combined with the path, webservice and client ID).
Your configuration of SCC, CPI and ERP webservices are 100% done.
After your SAP HCM functional team completes the SPRO customizing (path Personnel Management > Integration with SuccessFactors Employee Central > Business Integration Builder ) in the ERP side described in the handbook, you will be able to run the following program:
SE38 > ECPAO_EE_ORG_REPL_QUERY with your transformation template.
Then, you will be able to see the payloads and webservices working in CPI Overview > Monitor Message Processing:
- SAP SuccessFactors Employee Central to ERP Employee Data and Organizational Assignment
- ERP to SAP SuccessFactors Employee Central Confirmation v2
Similar logs will be visible in the Data Replication Monitor in the SuccessFactors side or the SRTUTIL (Message Monitor) and SLG1 transactions in ERP side.
The webservices involved are:
- getEmployeeMasterDataAndOrgAssignmentBundleReplicationQuery_Out (Consumer)
- EmployeeMasterDataAndOrgAssignmentBundleReplicationRequest_In (provider)
- EmployeeMasterDataReplicationConfirmation_Out (Consumer)
In the SLG1, you can filter by the Object text = ECPAO_IN
Just FYI, after one execution, the last successful run date/parameter is stored in the table ECPAO_QRY_ADM (fields QRY_LSTMOD_DT_TM or NXT_LSTMOD_DT_DM). These timestamps stored there will be used to control de Delta executions.
If you have errors like Wait for Scheduler under the SRTUTIL or SRT_MONI, please check this master KBA:
All set 🙂
Happy implementation.
Conclusion:
Using the instructions of this blog post, you will be able to set up the SAP Cloud Platform Integration (CPI) packages, the ERP webservices required in the SAP SuccessFactors Employee central Master Data and Organizational assignment to SAP ERP HCM with the latest version Builder integration Builder (BIB). This knowledge also can be used when your team apply system refresh in ERP side or instance refresh in SF side, because similar work needs to be done reconnecting all the systems. The SAP Cloud Connector (SCC) instructions part was summarized, but you can get the complete installation procedures in the handbook shared.
I hope this blog post can help your team doing the same implementation faster.
If you find this blog post helpful – please press like button 🙂
Best Regards from Brazil,
Soliman
Labels:
62 Comments
- « Previous
-
- 1
- 2
- Next »
You must be a registered user to add a comment. If you've already registered, sign in. Otherwise, register and sign in.
Labels in this area
-
1H 2023 Product Release
3 -
2H 2023 Product Release
3 -
Business Trends
104 -
Business Trends
4 -
Cross-Products
13 -
Event Information
75 -
Event Information
9 -
Events
5 -
Expert Insights
26 -
Expert Insights
19 -
Feature Highlights
16 -
Hot Topics
20 -
Innovation Alert
8 -
Leadership Insights
4 -
Life at SAP
67 -
Life at SAP
1 -
Product Advisory
5 -
Product Updates
499 -
Product Updates
40 -
Release
6 -
Technology Updates
408 -
Technology Updates
10
Related Content
- Explore the Enhanced New Hire Experience in SAP SuccessFactors Onboarding in Human Capital Management Blogs by SAP
- First Half 2024 Release: What’s New in SAP SuccessFactors HCM in Human Capital Management Blogs by SAP
- SAP SuccessFactors Employee Central: 1H 2024 Release Highlights in Human Capital Management Blogs by Members
- Country Compliance - Configure overrides for US WTPA Form fields in Human Capital Management Blogs by SAP
- The 1H 2024 Release of SAP SuccessFactors Learning – Release Highlights in Human Capital Management Blogs by Members
Top kudoed authors
| User | Count |
|---|---|
| 13 | |
| 3 | |
| 3 | |
| 2 | |
| 2 | |
| 2 | |
| 2 | |
| 2 | |
| 2 | |
| 1 |