
- SAP Community
- Products and Technology
- Human Capital Management
- HCM Blogs by SAP
- SAP Success Factors Employee Central and its integ...
Human Capital Management Blogs by SAP
Get insider info on SAP SuccessFactors HCM suite for core HR and payroll, time and attendance, talent management, employee experience management, and more in this SAP blog.
Turn on suggestions
Auto-suggest helps you quickly narrow down your search results by suggesting possible matches as you type.
Showing results for
former_member66
Explorer
Options
- Subscribe to RSS Feed
- Mark as New
- Mark as Read
- Bookmark
- Subscribe
- Printer Friendly Page
- Report Inappropriate Content
05-12-2020
9:56 AM
Hello Everyone,
In this blog post you will learn about -
1.Success Factors Employee System.
2.GRC(Governance ,Risk and Compliance).
3.How to configure and enable the integration between Access Control and Success Factors for Access Request and Access Risk Analysis.
4.GRC Access Risk Analysis for Success Factors in GRC System.
5.GRC Access Request for Success Factors in GRC System.
Success Factors Employee Central and its Integration with SAP GRC Risk Analysis
1.What is SAP Success Factors Employee Central
“SAP Success Factors Employee Central is a cloud-based Core HR solution that pulls all employee data into a single platform to give small and medium-size businesses greater visibility into their workforce, basically through this we can manage our Workforce.”
SAP Success Factors is a cloud based HCM solution and developed on Software as a Service (SaaS) model.
Success Factors Employee Central provides an option to manage key HR operations and contains HR master data like employee name, identification, user name, etc.
The most important features of Employee Central are listed below –
3.GRC
Governance, risk and compliance (GRC) refers to a strategy for managing an organization's overall governance, risk management and compliance with regulations.
GRC is the integrated collection of capabilities that enable an organization to maintain the cyber security and protects organizational data.
GRC provides Confidentiality, Integrity and Availability of information, where as
"Confidentiality is a set of rules that limits access to information, integrity is the assurance that the information is trustworthy and accurate, and availability is a guarantee of reliable access to the information by authorized people."
For Example-
4.Need of Success Factors Employee Central Integration with GRC Access Control-
“Customers were not able to manage access requests, provision users for SuccessFactors, building systems which allow them to identify and mitigate risk while ensuring compliance which means looking at how you govern, how you do things, also not able to analyze SOD and critical access risks for the users in SAP Success Factors Employee Central HCM.”
“With this Integration Customers can start using Access Control to manage access requests, analyze SOD, Critical Action, Critical Permissions access risks, Critical Roles, provision users for SuccessFactors.
This helps Customer to better manage risk and compliance, strengthen cybersecurity, detect and prevent fraud, and optimize controls.”
“Connecting SAP GRC to SAP HCM makes a great deal of sense from a risk management perspective. There are a number of Segregation of Duties (SOD) and sensitive access risks within the HR process itself and these need to be managed carefully - in the same way as any other access risks.”
5.High Level Workflow of how SuccessFactors integrates with Access Control

6.Steps to configure and enable the integration between Access Control and Success Factors for Access Request & Access Risk Analysis
Below configuration showcases the process from setting up the system connectors to completing the synchronization between the two systems.
Users will be able to enable the management of access requests, risk analysis, provisioning for Success Factors in Access Control after the below configurations.
User have to do the integration of the following Access Control capabilities with SuccessFactors-
User have to do the following Integration Scenarios to enable the integration between Access Control and Success Factors for Access Request and Access Risk Analysis-
6.1 Setup connectors between SAP Access Control and SuccessFactors
User have to create an HTTP connector Type G between SAP Access Control and SuccessFactors.
5.Fill the Target Host, Service No and Path Prefix.
6.Go to next tab>>Logon & Security>>set user and password for the Success Factors Employee Central.
7.Goto>>Special Options and Select the Http Version.
8.Click on Save.
9.For checking the connection test, you can click on “Connection Test”.
6.2 Create the connection type definition: SFEC Success Factor Employee Central.
1.In the IMG Choose go to>> Governance, Risk, and Compliance>> Common Components>> Integration Framework>>Maintain Connectors and Connection Types.
2.Click on Define Connectors >>Click on New Entries and then enter the “Target Connector” (e.g. SFEC_RITIKA) which is just created above and Connection Type as “SFEC”.
3.Click on “Save”.
4.Next Step is to assign the Connector to the Connector Group, in “Define Connector Groups” click on “Assign Connectors to Connectors Group”.
5.Enter the Connector Group as shown below.
7.Then click on New Entries >>under the Connector Group add “Target Connector” (e.g. SFEC_RITIKA) and Connection Type as “SFEC”.
8.Click on Save.
9.Target Connector (SFEC_Ritika) added in Connector Group.
Maintain the connection scenarios.
Go to >> IMG >>Governance, Risk, and Compliance >> common components >> Integration Framework>> Maintain Connection Settings.
3.User have to Link Target Connector (e.g. SFEC_RITIKA) to all these integration Scenarios.
4.Select Scenario-Connector Link. Link the Target Connector (e.g. SFEC_RITIKA) to the respective Work Area and the Connection Type is SFEC.
5.Save it.
6.Follow the same steps to link connector with another Integration Scenarios - PROV for Provisioning and ROLMG for Role Management.
Link your connector to SAP Access Control
1.Go to >> IMG >> Governance, Risk, and Compliance >> Access Control >> Maintain Connector Settings.
2.Add a new entry for your connector.
3.Set Application Type 19 (SuccessFactors Employee Central)
4.Save it.
Map your actions and connector groups in SAP Access Control
In this Customizing activity, user can assign the actions to a connector group, and then select the connector for each group.
1.Go to SPR0>>IMG>> Governance, Risk, and Compliance>> Access Control>> Maintain Mapping for Actions and Connector Groups.
2.Click on Assign Default Connector to Connector Groups.
3.Add New Entries, fill the Connector Group (e.g. SFEC), and assign the actions to the connector group-
Actions are-
4.Assign the Target Connector for all the actions assigned to the Connector Group.
So, the mapping of Actions and Connector Groups in Access Control is done.
Now the Connector Configuration part in SAP Access Control is done. Next step is to “Create Employees”, “Roles”, “Static Groups” in Success Factors. Below are the detailed steps user must follow in Success Factors.
7.Steps to do in Success Factor Employee Central
7.1 Login into Success Factors Employee Central
7.2 Creation of Employees
Note- There are many fields regarding Employee Data, user can fill the employee data according to the organization need.
7.3 Creation of Static Groups
7.4 Creation of Permission Roles and assignment of Static Group to the Role
7.5 Assignment of Employee to the Static Group
After creating the Employee, Static Groups and Permission Roles, now we have to assign the Static Groups to the Employee.
Assignment of Employee to the Static Group has been done.
Now user have created Employees, Static Groups and Permission Roles. Also, user has done with assignment of roles to Static Groups and assignment of Static Groups to the Employees.
Now user have to Sync Employees, Static Groups, Permission Roles and all the assignment in GRC.
8.Steps to sync Employees, Static Groups, Permission Roles and all the assignment in GRC.
8.1 Run Repository Sync
8.2 Run Authorization Sync
8.1 Run Repository Sync
User have to run the Repository Sync so that all the Employees, Static Groups, Permission Roles will get synced in GRC system.
8.2 Run Authorization Sync
It Synchronizes the PFCG authorization objects into the repository.
9.Risk Analysis for Success Factors in GRC System
CREATE FUNCTIONS FOR SUCCESS FACTORS
Functions for SOD Risk-
Go to >>NWBC>>Rule Setup>>Access Rule Maintenance>>Functions.
For SOD- Select any two conflicting actions and make two conflicting functions for Success Factors.
e.g. Conflicting Actions-Employee Data and Recruiting Permissions & SOD Functions are-TSF1 and TSF2.
Function for Critical Action-
For Critical Action-Select any action that you want to make it as a critical action and create function for Success Factors.
e.g. Critical Action- Recruiting Permission & Function-R_TSF3.
Create Rulesets for Success Factors
e.g. Ruleset ID- R_RU.
CREATE ACCESS RISK FOR SUCCESS FACTORS
User will define the risks it helps organizations to prevent unauthorized access by defining segregation of duties (SOD) and Critical Access.
e.g. SOD Risk- R_TR1 having functions R_TSF1 & R_TSF2 and Critical Action – R_TR2 having function R_TSF3.
SOD Risk
Critical Action Risk
Generate Rules
User should generate the rules after the creation of access risks.
Run Risk Analysis for Success Factors
“We have defined the risks, now it’s time to run the risk analysis so that user will be able to know that what are the risks which are there in the organization and by the risk analysis we can resolve the risk by either removing it or by assigning the mitigation control.”
Analysis Criteria
Action Level
Critical Action
There are violations for the Employees in Success Factors, it can be resolved either by remediating the risk or by mitigating it.
10.Approach for handelling the Risks
The violations or risks can be resolved either by remediating the risks or mitigate it by assignment of control.
Risk Remediation-Best Approach
User should always attempt to remediate a risk before mitigation. Risk remediation phase determines the method to eliminate risks in roles. The purpose of the remediation phase is to determine alternatives for eliminating issues. Remediation removes the risks from the system and does not rely on mitigation controls.
User should always find a way to remediate a risk instead of defining mitigation controls as mitigation can lead to fraudulent actions.
Risk Mitigation
If user is unable to remediate the risk, then user should go for the mitigation. We assign the mitigation to reduce the impact of the risk.
User should create mitigation control having risks. Approver and Monitor should also get associated with the mitigation control.
11.Access Request for Success Factors in GRC System
11.1 Run Role Import
When we create the roles in backend system then that roles need to be imported in GRC system, for this user needs to run the role import. After running the role import user will be able to raise the request for roles through GRC.
Definition Criteria
Role Selection Criteria:
11.2 Request for Self, Other User, Assignment of Static Groups/Roles to Users for Success Factors through GRC
User can create access requests for himself, for another user, or for multiple users on the Access Request Screen.
Fill all the necessary criteria and select the roles which you want to assign to your Employee.
12.Risk Analysis in Access Request for Success Factors- at the time of requesting the roles
In Access Request, user can also perform the risk analysis to check if the roles he is requesting have any violations.
e.g. Analysis Type-Risk Analysis, System- SFEC, Ruleset- R_RU and check all the necessary parameters.
In Access Request, reviewer can also perform the risk analysis to check if the request is having any violations or not before taking any action.
As shown in above screenshot the request is having violation, red dot in Risk Violation and Mitigation shows that there is risk in the request and risk is also not mitigated yet.
Conclusion
So by following all the above steps we can run the risk analysis and create access request for Success Factors in GRC and also will be able to configure and enable the integration between GRC and Success Factors.
All the pre-requisites of Success Factors and GRC is briefed in detail above.
In this blog post you will learn about -
1.Success Factors Employee System.
2.GRC(Governance ,Risk and Compliance).
3.How to configure and enable the integration between Access Control and Success Factors for Access Request and Access Risk Analysis.
4.GRC Access Risk Analysis for Success Factors in GRC System.
5.GRC Access Request for Success Factors in GRC System.
Success Factors Employee Central and its Integration with SAP GRC Risk Analysis
1.What is SAP Success Factors Employee Central
“SAP Success Factors Employee Central is a cloud-based Core HR solution that pulls all employee data into a single platform to give small and medium-size businesses greater visibility into their workforce, basically through this we can manage our Workforce.”

SAP Success Factors is a cloud based HCM solution and developed on Software as a Service (SaaS) model.
Success Factors Employee Central provides an option to manage key HR operations and contains HR master data like employee name, identification, user name, etc.
The most important features of Employee Central are listed below –
- As SuccessFactors is a cloud solution and manages quarterly, user can easily accommodate an organization’s changing work force structure.
- SuccessFactors Employee central manages different events occurred in the life cycle of an employee. User can track basic events like new hire, promotion, transfer and new assignment, and other activities in Employee Central.
- Integration of SuccessFactors Employee Central to ERP is more robust and provides better quality HR solution.
- 2.Key Features Of SAP Success FactorsThe key features that are covered in SAP SuccessFactors cloud-based HCM solution are as
- Recruitment
- HR Transactions
- Changes and Transfers
- Position Management
- Time Off
- Performance Overview
- Payroll Time Sheets
- Reporting, Compliance and Auditing
- Integration & Extensibility
- Learning and development

3.GRC
Governance, risk and compliance (GRC) refers to a strategy for managing an organization's overall governance, risk management and compliance with regulations.
GRC is the integrated collection of capabilities that enable an organization to maintain the cyber security and protects organizational data.
GRC provides Confidentiality, Integrity and Availability of information, where as
"Confidentiality is a set of rules that limits access to information, integrity is the assurance that the information is trustworthy and accurate, and availability is a guarantee of reliable access to the information by authorized people."
For Example-
“In your Organization there are two roles one is Hiring of Employee and other is giving salary to the same employee and suppose the hiring and giving salary to the same employee is a risk ,and any employee in an organization is having these roles then this can result to Fraud, but through GRC we can find the risks, mitigate and manage risks so that it does not harm the Organization and mitigate it from any type of Fraud.”

4.Need of Success Factors Employee Central Integration with GRC Access Control-
“Customers were not able to manage access requests, provision users for SuccessFactors, building systems which allow them to identify and mitigate risk while ensuring compliance which means looking at how you govern, how you do things, also not able to analyze SOD and critical access risks for the users in SAP Success Factors Employee Central HCM.”
“With this Integration Customers can start using Access Control to manage access requests, analyze SOD, Critical Action, Critical Permissions access risks, Critical Roles, provision users for SuccessFactors.
This helps Customer to better manage risk and compliance, strengthen cybersecurity, detect and prevent fraud, and optimize controls.”
“Connecting SAP GRC to SAP HCM makes a great deal of sense from a risk management perspective. There are a number of Segregation of Duties (SOD) and sensitive access risks within the HR process itself and these need to be managed carefully - in the same way as any other access risks.”

5.High Level Workflow of how SuccessFactors integrates with Access Control

6.Steps to configure and enable the integration between Access Control and Success Factors for Access Request & Access Risk Analysis
Below configuration showcases the process from setting up the system connectors to completing the synchronization between the two systems.
Users will be able to enable the management of access requests, risk analysis, provisioning for Success Factors in Access Control after the below configurations.
User have to do the integration of the following Access Control capabilities with SuccessFactors-
- Access Request Management
- Access Risk Analysis
- Role Management
User have to do the following Integration Scenarios to enable the integration between Access Control and Success Factors for Access Request and Access Risk Analysis-
- 0001 Role Generation
- 0002 Role Risk Analysis
- 0004 Provisioning
6.1 Setup connectors between SAP Access Control and SuccessFactors
User have to create an HTTP connector Type G between SAP Access Control and SuccessFactors.
- In Customizing (go to transaction SPRO), follow the path SAP Reference IMG>> Governance, Risk, and Compliance>> Common Components>>Integration Framework>> Create Connectors.
- Click on Create Connectors.
- Select the folder HTTP Connections to External Server and click on create icon.
- Fill in the data as shown in the screenshot below.

5.Fill the Target Host, Service No and Path Prefix.
6.Go to next tab>>Logon & Security>>set user and password for the Success Factors Employee Central.
7.Goto>>Special Options and Select the Http Version.
8.Click on Save.
9.For checking the connection test, you can click on “Connection Test”.

6.2 Create the connection type definition: SFEC Success Factor Employee Central.
1.In the IMG Choose go to>> Governance, Risk, and Compliance>> Common Components>> Integration Framework>>Maintain Connectors and Connection Types.
2.Click on Define Connectors >>Click on New Entries and then enter the “Target Connector” (e.g. SFEC_RITIKA) which is just created above and Connection Type as “SFEC”.
3.Click on “Save”.
4.Next Step is to assign the Connector to the Connector Group, in “Define Connector Groups” click on “Assign Connectors to Connectors Group”.
5.Enter the Connector Group as shown below.

7.Then click on New Entries >>under the Connector Group add “Target Connector” (e.g. SFEC_RITIKA) and Connection Type as “SFEC”.
8.Click on Save.
9.Target Connector (SFEC_Ritika) added in Connector Group.

Maintain the connection scenarios.
Go to >> IMG >>Governance, Risk, and Compliance >> common components >> Integration Framework>> Maintain Connection Settings.
- Select the Integration Scenario in Work Area.
- Enter values for the respective integration scenarios:
- PROV for Provisioning
- AUTH for Authorization Management
- ROLMG for Role Management

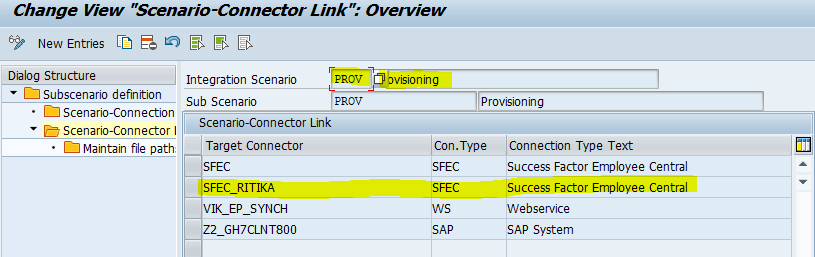
3.User have to Link Target Connector (e.g. SFEC_RITIKA) to all these integration Scenarios.
4.Select Scenario-Connector Link. Link the Target Connector (e.g. SFEC_RITIKA) to the respective Work Area and the Connection Type is SFEC.
5.Save it.


6.Follow the same steps to link connector with another Integration Scenarios - PROV for Provisioning and ROLMG for Role Management.

Link your connector to SAP Access Control
1.Go to >> IMG >> Governance, Risk, and Compliance >> Access Control >> Maintain Connector Settings.
2.Add a new entry for your connector.
3.Set Application Type 19 (SuccessFactors Employee Central)
4.Save it.

Map your actions and connector groups in SAP Access Control
In this Customizing activity, user can assign the actions to a connector group, and then select the connector for each group.
1.Go to SPR0>>IMG>> Governance, Risk, and Compliance>> Access Control>> Maintain Mapping for Actions and Connector Groups.
2.Click on Assign Default Connector to Connector Groups.
3.Add New Entries, fill the Connector Group (e.g. SFEC), and assign the actions to the connector group-
Actions are-
- 0001 Role Generation
- 0002 Role Risk Analysis
- 0004 Provisioning

4.Assign the Target Connector for all the actions assigned to the Connector Group.

- Click on Save.
- Go to Maintain Connector Group Status and set the status as Active.
So, the mapping of Actions and Connector Groups in Access Control is done.
Now the Connector Configuration part in SAP Access Control is done. Next step is to “Create Employees”, “Roles”, “Static Groups” in Success Factors. Below are the detailed steps user must follow in Success Factors.
7.Steps to do in Success Factor Employee Central

7.1 Login into Success Factors Employee Central
- Open the Link.
- Enter the Company Name, User ID, Password and Login.
7.2 Creation of Employees
- After login, in “Action Type Selector” on top right enter “ADD NEW EMPLOYEE” and press enter.

- In the displayed form, enter Recruit Date= Today’s date, Select the Company and Event Reason from the dropdown.

- Enter Name Information

- Add Person ID and click on Continue (You can fill the details of the Employee according to your Organization’s need)
- User can fill the Employee Personal Information field if required.
- Enter email address and gender information and click on Continue (You can fill Phone Information and Home Address also)

- Fill Job Classification field in Job Information section and click on Continue and then Submit.
- After Submit, user will get the Confirmation message.

Note- There are many fields regarding Employee Data, user can fill the employee data according to the organization need.
7.3 Creation of Static Groups
- In “Action Search” on top right enter “MANAGE STATIC GROUPS” and press enter.

- Click on “IMPORT STATIC GROUPS”.

- Select Full Replace and click on Download a blank CSV template.

- Enter the name of Groups that you want to create in the Excel sheet and save the Excel.

- Choose the csv file and click on Upload.

- On getting the success message, Click on Cancel button.
- Refresh the page and search for the Static Group you created, (e.g. SFSSTATIC_GRP1).

7.4 Creation of Permission Roles and assignment of Static Group to the Role
- In “Action Search” on top right enter “Manage Permission Roles” and press enter.

- “Permission Role List” page will get open.
- Click on “Create New”.

- Fill the Role Name and Description.
- In Permission Settings, click on the permission button and specify the permission you want to give in a role.

- Select the permissions and click on “Finished”.

- Now in “Grant This Role To” click on “Add” button and Select a group to which you wish to grant this role.

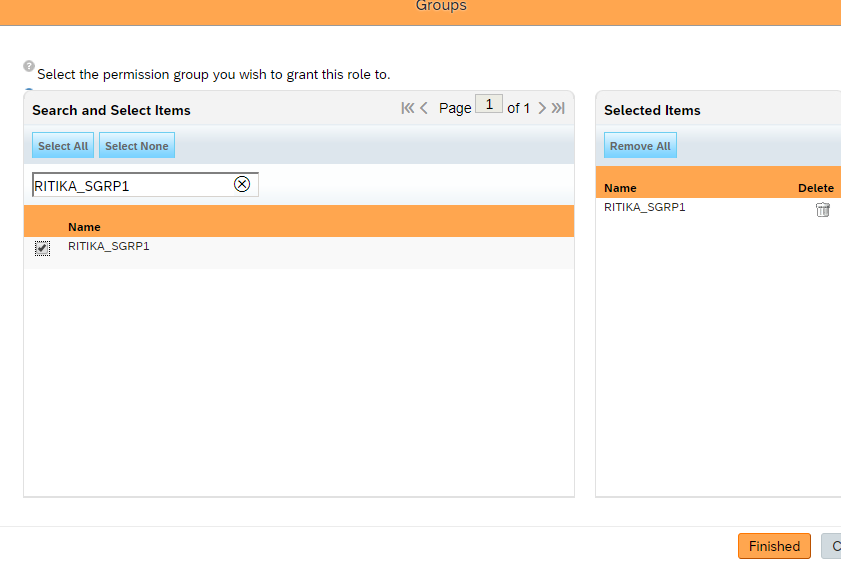
- Select the group and click on “Finished”.

- Again, select the Static Group and click on “Save Changes”.
7.5 Assignment of Employee to the Static Group
After creating the Employee, Static Groups and Permission Roles, now we have to assign the Static Groups to the Employee.
- Go to “Manage Permission Groups”.
- Click on the static group which you want to assign to your employee.
- After clicking, permission group window will appear then click on “Add User”.

- Search for your Employee, select it and click on finished.

- Click on Close.
Assignment of Employee to the Static Group has been done.
Now user have created Employees, Static Groups and Permission Roles. Also, user has done with assignment of roles to Static Groups and assignment of Static Groups to the Employees.
Now user have to Sync Employees, Static Groups, Permission Roles and all the assignment in GRC.
8.Steps to sync Employees, Static Groups, Permission Roles and all the assignment in GRC.
8.1 Run Repository Sync
8.2 Run Authorization Sync
8.1 Run Repository Sync
User have to run the Repository Sync so that all the Employees, Static Groups, Permission Roles will get synced in GRC system.
- Go to>>SPRO>>SAP Reference IMG>>GRC>>Access Control>>Synchronization Jobs>>Repository Object Sync.

8.2 Run Authorization Sync
It Synchronizes the PFCG authorization objects into the repository.
- Go to>>SPRO>>SAP Reference IMG>>GRC>>Access Control>>Synchronization Jobs>>Authorization Sync.
- Run Authorization Sync.

9.Risk Analysis for Success Factors in GRC System

CREATE FUNCTIONS FOR SUCCESS FACTORS
Functions for SOD Risk-
Go to >>NWBC>>Rule Setup>>Access Rule Maintenance>>Functions.
For SOD- Select any two conflicting actions and make two conflicting functions for Success Factors.
e.g. Conflicting Actions-Employee Data and Recruiting Permissions & SOD Functions are-TSF1 and TSF2.


Function for Critical Action-
For Critical Action-Select any action that you want to make it as a critical action and create function for Success Factors.
e.g. Critical Action- Recruiting Permission & Function-R_TSF3.

Create Rulesets for Success Factors
- GO TO >>Rule Setup>>Access Rule Maintenance>>Rulesets.
- Create Ruleset.
e.g. Ruleset ID- R_RU.

CREATE ACCESS RISK FOR SUCCESS FACTORS
User will define the risks it helps organizations to prevent unauthorized access by defining segregation of duties (SOD) and Critical Access.
- Go to>>Rule Setup>>Access Rule Maintenance>>Access Risks.
- Create SOD Risk and Critical Action Risk.
e.g. SOD Risk- R_TR1 having functions R_TSF1 & R_TSF2 and Critical Action – R_TR2 having function R_TSF3.
SOD Risk

Critical Action Risk

Generate Rules
User should generate the rules after the creation of access risks.
- Go to >>Ruleset up>>Access Rule Maintenance >>Access Risks.
- Select the risks and click on Generate Rules.
- Generate the rules in foreground.
Run Risk Analysis for Success Factors
“We have defined the risks, now it’s time to run the risk analysis so that user will be able to know that what are the risks which are there in the organization and by the risk analysis we can resolve the risk by either removing it or by assigning the mitigation control.”
- Go to >>Access Management>>Access Risk Analysis>>User Level.
- Fill all the necessary criteria like System, User, Ruleset etc.
- Check all the necessary parameters like Action level, Permission Level, Critical Action.
Analysis Criteria

- Run the report in Foreground.
Action Level

Critical Action

There are violations for the Employees in Success Factors, it can be resolved either by remediating the risk or by mitigating it.
10.Approach for handelling the Risks
The violations or risks can be resolved either by remediating the risks or mitigate it by assignment of control.
Risk Remediation-Best Approach
User should always attempt to remediate a risk before mitigation. Risk remediation phase determines the method to eliminate risks in roles. The purpose of the remediation phase is to determine alternatives for eliminating issues. Remediation removes the risks from the system and does not rely on mitigation controls.
User should always find a way to remediate a risk instead of defining mitigation controls as mitigation can lead to fraudulent actions.
Risk Mitigation
If user is unable to remediate the risk, then user should go for the mitigation. We assign the mitigation to reduce the impact of the risk.
User should create mitigation control having risks. Approver and Monitor should also get associated with the mitigation control.
11.Access Request for Success Factors in GRC System
11.1 Run Role Import
When we create the roles in backend system then that roles need to be imported in GRC system, for this user needs to run the role import. After running the role import user will be able to raise the request for roles through GRC.

- Logon to GRC frontend application (NWBC).
- Goto>>Access Management>>Role Mass Maintenance>>Role Import.
Definition Criteria
- Application Type: It should be selected as Success Factor Employee Central.
- Landscape: This should be selected as the connector group name.
- Overwriting Existing Roles: This option overwrites the roles already existing in the system if this selected as ‘Yes’. If you do not want to overwrite the Roles, select it as No.
Role Selection Criteria:
- Source System: Connector name from where the Role will be fetched.
- Role Updated After: Specify a date after which the Role get updated.
- All Roles except SAP Predefined Roles: Tick the check box if you want to import all the Roles into BRM except SAP Predefined Roles.
- Role from and Role To: Specify a range in between the Roles should be fetched.
- Methodology Status: This is important because this will decide whether the Role will be imported as ‘Complete’ or ‘Initial’.
- Click on Next, Select Role Data Window will get open. Set the necessary criteria like Project Release, Business Process, Subprocess.
- Click on Next, review all the roles by clicking on Preview All Roles “Show Preview”.
- Click on Next, Click on Submit. After that you will get the success message.

11.2 Request for Self, Other User, Assignment of Static Groups/Roles to Users for Success Factors through GRC
User can create access requests for himself, for another user, or for multiple users on the Access Request Screen.
- Go to>>NWBC>>Access Management>>Access Request.
- Select the Request Type (e.g.-Change Account), Request for(e.g.-Self)
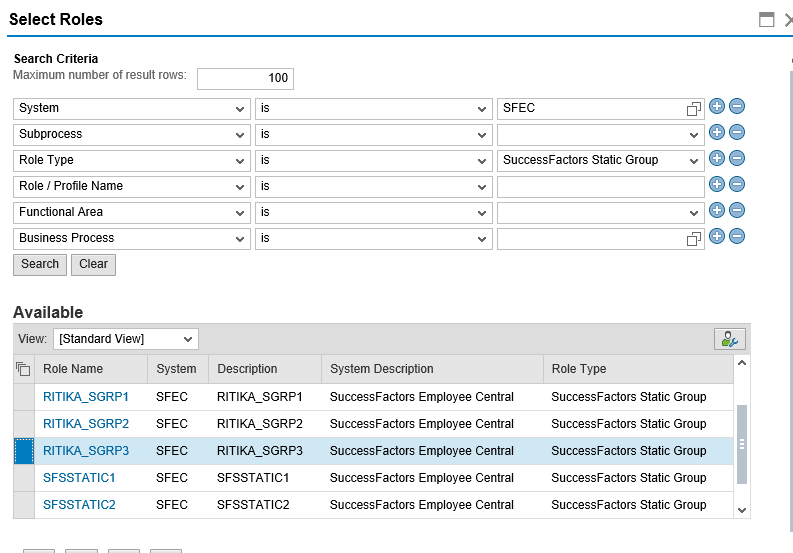
- If you want to assign roles to the Employee then click on “Add” from the below table and select role, select roles window will get open.
- Fill all the necessary criteria like-System, Role Type, Role Name and click on Search.
- According to your search criteria roles will come in the below table, select the role which you want to request for your Employee.

Fill all the necessary criteria and select the roles which you want to assign to your Employee.
- Click on Submit.
- After that you will get the success message that your request is submitted, and you will get the request number as shown below in screenshot.

- In the Search Request you can search your request by request number and check the status, from the audit log you can also the check the log of your request that which path it is going for the approve/reject action.
- Request will go to the Approver (the person who is responsible for taking the action).
- Request will go to the approver inbox, If the approver approves the request then the requested role will get assign to the user via GRC.
12.Risk Analysis in Access Request for Success Factors- at the time of requesting the roles
In Access Request, user can also perform the risk analysis to check if the roles he is requesting have any violations.
- Go to >>nwbc>>access management>>access request.
- Request for the roles which you want (discussed above).

- Go to >>Risk Violation tab and define the analysis criteria
e.g. Analysis Type-Risk Analysis, System- SFEC, Ruleset- R_RU and check all the necessary parameters.
- Run the risk analysis.


13.Risk Analysis in Access Request for Success Factors- at the time of reviewing the request
In Access Request, reviewer can also perform the risk analysis to check if the request is having any violations or not before taking any action.
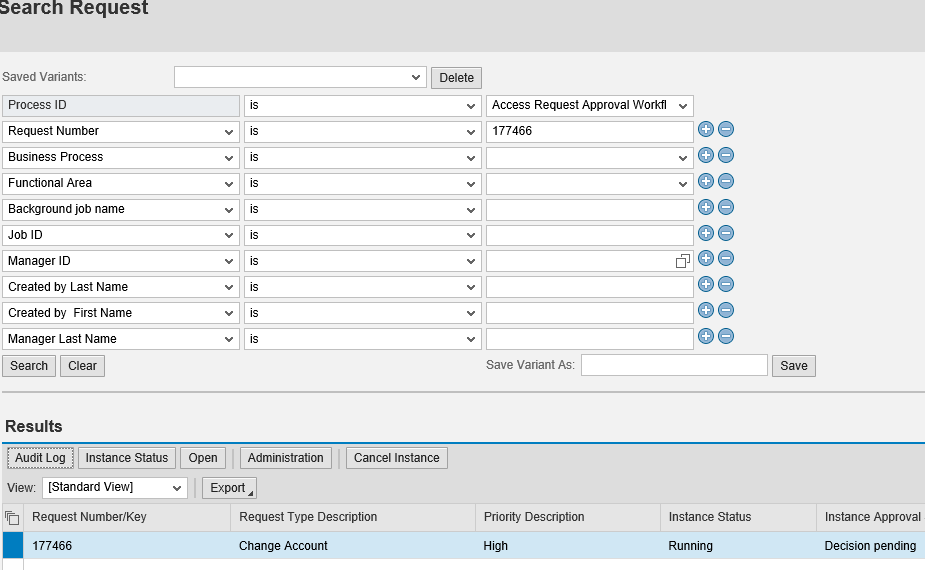
- Go to >>nwbc>>access management>>search request.
- Select process id as Access Request Approval Workflow.
- Enter the request number and click on search.
- Request will come.

- click on open to run the risk analysis and check if the request is having any violation.

As shown in above screenshot the request is having violation, red dot in Risk Violation and Mitigation shows that there is risk in the request and risk is also not mitigated yet.
Conclusion
So by following all the above steps we can run the risk analysis and create access request for Success Factors in GRC and also will be able to configure and enable the integration between GRC and Success Factors.
All the pre-requisites of Success Factors and GRC is briefed in detail above.
Labels:
23 Comments
You must be a registered user to add a comment. If you've already registered, sign in. Otherwise, register and sign in.
Labels in this area
-
1H 2023 Product Release
3 -
2H 2023 Product Release
3 -
Business Trends
104 -
Business Trends
5 -
Cross-Products
13 -
Event Information
75 -
Event Information
9 -
Events
5 -
Expert Insights
26 -
Expert Insights
22 -
Feature Highlights
16 -
Hot Topics
20 -
Innovation Alert
8 -
Leadership Insights
4 -
Life at SAP
67 -
Life at SAP
1 -
Product Advisory
5 -
Product Updates
499 -
Product Updates
47 -
Release
6 -
Technology Updates
408 -
Technology Updates
14
Related Content
- Sicherstellung der Datensicherheit in SAP SuccessFactors in Human Capital Management Blogs by SAP
- Integration Framework for Onboarding Compliance Forms From Employee Central in Human Capital Management Q&A
- Talent Intelligence Hub - Myths and Misconceptions - Part 3 (Functionality) in Human Capital Management Blogs by SAP
- Enable username in Employee Central (Active Directory/SuccessFactors) in Human Capital Management Q&A
- API Integration from EC to ADP WFN in Human Capital Management Q&A
Top kudoed authors
| User | Count |
|---|---|
| 5 | |
| 4 | |
| 3 | |
| 2 | |
| 2 | |
| 2 | |
| 2 | |
| 2 | |
| 2 | |
| 1 |