
- SAP Community
- Products and Technology
- Human Capital Management
- HCM Blogs by Members
- Recruitment Marketing: Data Capture Form - How to ...
Human Capital Management Blogs by Members
Gain valuable knowledge and tips on SAP SuccessFactors HCM suite and human capital management market from member blog posts. Share your insights with a post of your own.
Turn on suggestions
Auto-suggest helps you quickly narrow down your search results by suggesting possible matches as you type.
Showing results for
former_member19
Explorer
Options
- Subscribe to RSS Feed
- Mark as New
- Mark as Read
- Bookmark
- Subscribe
- Printer Friendly Page
- Report Inappropriate Content
10-24-2022
11:37 AM
Data capture form is an excellent tool which enables recruiting users to request additional information from leads, candidates, and employees, and use them for lead generation.
Currently data capture forms do not support cascading picklists, as stated in the SAP Note https://userapps.support.sap.com/sap/support/knowledge/en/3157993, however, this can be achieved by inserting JavaScript code in the Global Settings of the Career Site Builder
Before we proceed any further, I would like to let you know that basic HTML and JavaScript knowledge is required to perform the subsequent steps
STEP 0: Create Data Capture Form and Landing Page
I write this blog assuming you have created the data capture form and the associated landing page, hence naming this step as step 0.
If you need assistance in creating data capture form, I would recommend this step by step guide on how to create data capture form
STEP 1: Find the HTML Element ID for Parent and Child Picklist
You can find the element ID of the parent and child picklist by inspect option available in Google Chrome. In my example, the parent picklist is "Focus Group" and child picklist is "Focus Subgroup"
When you hover on the parent picklist field, you will find the select tag highlighted. Note down the id value of the select tag. This value will be used in the JavaScript code later
Use the above steps to find the Element ID for child picklist
STEP 2: JavaScript
The code below can be used to enable cascading picklists.
Update the values of zParentPicklistId, zChildPicklistId with the ID obtained from the previous step
For the zPicklistMappingArray, update the values of parent and child picklist external code maintained in Picklist Center. The format to be used is:
The values maintained in Picklist Center for my example are shown below:
STEP 3: Update JavaScript in Career Site Builder
Once the code is updated add the code in the Career Site Builder under Appearance - Global - JavaScript - Footer JavaScript
Save the changes and the cascading picklist should work now on the Landing Page
Before: The child drop down shows all values irrespective of Parent value selected
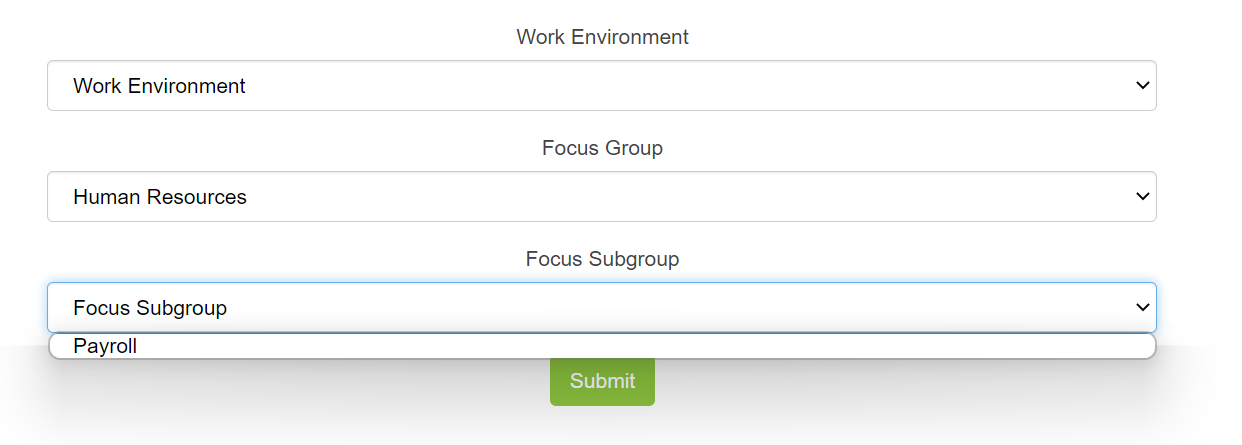
After: The child drop down shows only the values associated with the parent picklist
Things to Consider Before Implementing
By following the steps above, you should be able to enable cascading picklists. The JavaScript code written can be used as is, however, feel free to optimize the code and share it in the comments for reference.
This is my first blog, please let me know if you would like me to provide more customizations in RMK.
Currently data capture forms do not support cascading picklists, as stated in the SAP Note https://userapps.support.sap.com/sap/support/knowledge/en/3157993, however, this can be achieved by inserting JavaScript code in the Global Settings of the Career Site Builder
Before we proceed any further, I would like to let you know that basic HTML and JavaScript knowledge is required to perform the subsequent steps
STEP 0: Create Data Capture Form and Landing Page
I write this blog assuming you have created the data capture form and the associated landing page, hence naming this step as step 0.
If you need assistance in creating data capture form, I would recommend this step by step guide on how to create data capture form
STEP 1: Find the HTML Element ID for Parent and Child Picklist
You can find the element ID of the parent and child picklist by inspect option available in Google Chrome. In my example, the parent picklist is "Focus Group" and child picklist is "Focus Subgroup"
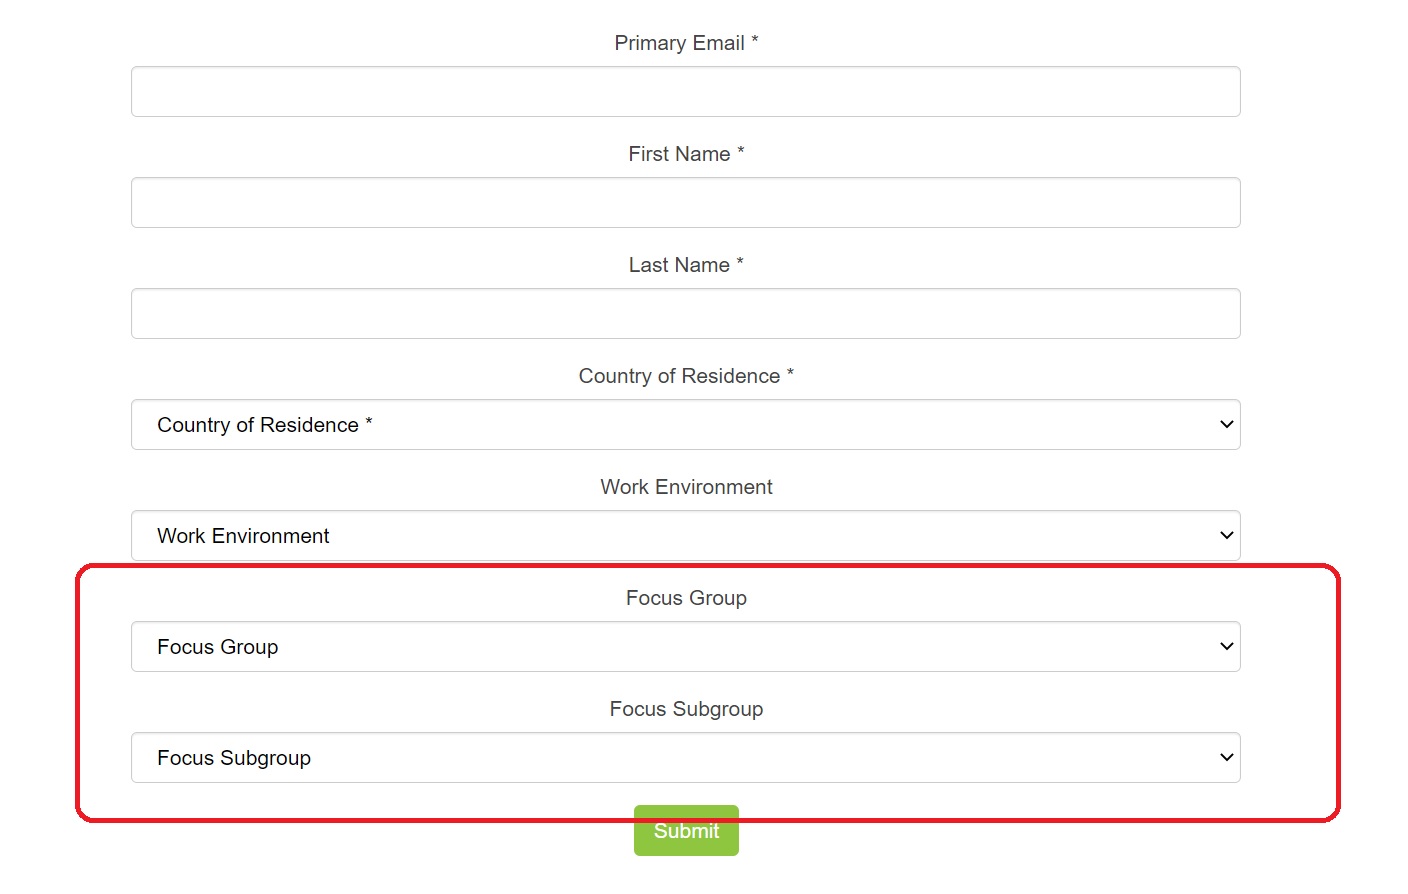
Reference Image for Parent and Child Picklist
To find the element id, right click on the landing page, in the Google Chrome browser, and then click on Inspect. 
Inspect Element
When you hover on the parent picklist field, you will find the select tag highlighted. Note down the id value of the select tag. This value will be used in the JavaScript code later

Fetching the Element ID for Picklist
Use the above steps to find the Element ID for child picklist
STEP 2: JavaScript
The code below can be used to enable cascading picklists.
<script type="text/javascript">


var zArrLen,  zParentSelectedVal, zChildPicklistValue, zArrChildVal, zArrParentVal

var zPicklistMappingArray = new Array ()

// Update the below values with the Picklist ID obtained from previous step

var zParentPicklistId = "property.cust_FocusArea.value";

var zChildPicklistId = "property.cust_FocusSubarea.value";

// Update the Parent Child Picklist codes here, use the format ["parent picklist code", "Child Picklist code"]

zPicklistMappingArray = [

                            ["FI","Compliance"],

                            ["HR","PY"]

                        ]

var zChildPicklistValues = document.getElementById(zChildPicklistId);

var  zchildPicklistIdLen   = zChildPicklistValues.length;

var zArrLen = zPicklistMappingArray.length;


function hideChildPicklists() {

   for(i = 0; i <zchildPicklistIdLen ; i++) {

      zChildPicklistValue = zChildPicklistValues[i];

      zChildPicklistValue.hidden = true;

      zChildPicklistValue.selected = false

      if (zChildPicklistValue.value == ""){

           zChildPicklistValue.selected = true

      }

   }

}

// Hide all childpicklist values on page load

hideChildPicklists();


document.getElementById(zParentPicklistId).onchange = function() {

    hideChildPicklists();

    zParentSelectedVal= document.getElementById(zParentPicklistId).value;

     for(zArrCount = 0; zArrCount < zArrLen; zArrCount++){

            zArrParentVal =  zPicklistMappingArray[zArrCount][0]

            zArrChildVal = zPicklistMappingArray[zArrCount][1]

            if(zArrParentVal == zParentSelectedVal) {

                   for(i = 0; i <zchildPicklistIdLen ; i++) {

                           zChildPicklistValue = zChildPicklistValues[i];

                           if (zChildPicklistValue.value == zArrChildVal) {

                                    zChildPicklistValue.hidden = false;

                           }

                    }

              }

        }

} ;


</script>
Update the values of zParentPicklistId, zChildPicklistId with the ID obtained from the previous step
For the zPicklistMappingArray, update the values of parent and child picklist external code maintained in Picklist Center. The format to be used is:
[

   ["<parent picklist code 1>"],["<child picklist code 1>"],

   ["<parent picklist code 1>"],["<child picklist code 2>"],

   ["<parent picklist code 2>"],["<child picklist code 1>"],

   ["<parent picklist code 3>"],["<child picklist code 1>"],

   .

   .

   .

   ["<parent picklist code n>"],["<child picklist code n>"]

]
The values maintained in Picklist Center for my example are shown below:

Parent Picklist Value in Picklist Center

Child Picklist Value in Picklist Center
STEP 3: Update JavaScript in Career Site Builder
Once the code is updated add the code in the Career Site Builder under Appearance - Global - JavaScript - Footer JavaScript

Save the changes and the cascading picklist should work now on the Landing Page
Before: The child drop down shows all values irrespective of Parent value selected


After: The child drop down shows only the values associated with the parent picklist

Things to Consider Before Implementing
- This technique involves use of the "ID" field in HTML page, if the ID changes due to SAP code updates then the JavaScript above would fail
- Any updates to values of the Picklist in SuccessFactors would have to be copied in the custom code written above
- Read the SAP note on inserting Custom code, before implementing this change

By following the steps above, you should be able to enable cascading picklists. The JavaScript code written can be used as is, however, feel free to optimize the code and share it in the comments for reference.
This is my first blog, please let me know if you would like me to provide more customizations in RMK.
- SAP Managed Tags:
- SAP SuccessFactors Recruiting
You must be a registered user to add a comment. If you've already registered, sign in. Otherwise, register and sign in.
Labels in this area
-
1H 2024 Product Release
5 -
2H 2023 Product Release
1 -
ACCRUAL TRANSFER
1 -
Advanced Workflow
1 -
AI
1 -
AI & Skills Ontology
1 -
Anonymization
1 -
BTP
1 -
Business Rules
1 -
Canvas Report
1 -
Career Development
1 -
Certificate-Based Authentication
1 -
Cloud Platform Integration
1 -
Compensation
1 -
Compensation Information Management
1 -
Compensation Management
1 -
Compliance
2 -
Content
1 -
Conversational AI
2 -
Custom Data Collection
1 -
custom portlet
1 -
Data & Analytics
1 -
Data Integration
1 -
Dayforce
1 -
deep link
1 -
deeplink
1 -
Delimiting Pay Components
1 -
Deprecation
1 -
Employee Central
1 -
Employee Central Global Benefits
1 -
Employee Central Payroll
1 -
employee profile
1 -
Employee Rehires
1 -
external terminal
1 -
external time events
1 -
Generative AI
2 -
Getting Started
1 -
Global Benefits
1 -
Guidelines
1 -
h12024
1 -
H2 2023
1 -
HR
2 -
HR Data Management
1 -
HR Transformation
1 -
ilx
1 -
Incentive Management Setup (Configuration)
1 -
Integration Center
2 -
Integration Suite
1 -
internal mobility
1 -
Introduction
1 -
learning
3 -
LMS
2 -
LXP
1 -
Massively MDF attachments download
1 -
Mentoring
1 -
Metadata Framework
1 -
Middleware Solutions
1 -
OCN
1 -
OData APIs
1 -
ONB USA Compliance
1 -
Onboarding
2 -
Opportunity Marketplace
1 -
Pay Component Management
1 -
Platform
1 -
portlet
1 -
POSTMAN
1 -
Predictive AI
2 -
Recruiting
1 -
recurring payments
1 -
Role Based Permissions (RBP)
2 -
SAP Build CodeJam
1 -
SAP Build Marketplace
1 -
SAP CPI (Cloud Platform Integration)
1 -
SAP HCM (Human Capital Management)
2 -
SAP HR Solutions
2 -
SAP Integrations
1 -
SAP release
1 -
SAP successfactors
5 -
SAP SuccessFactors Customer Community
1 -
SAP SuccessFactors OData API
1 -
SAP Workzone
1 -
SAP-PAYROLL
1 -
skills
1 -
Skills Management
1 -
sso deeplink
1 -
Stories in People Analytics
3 -
Story Report
1 -
SuccessFactors
3 -
SuccessFactors Employee central home page customization.
1 -
SuccessFactors Onboarding
1 -
successfactors onboarding i9
1 -
Table Report
1 -
talent
1 -
Talent Intelligence Hub
2 -
talentintelligencehub
1 -
talents
1 -
Tax
1 -
Tax Integration
1 -
TIH
1 -
Time Accounts
1 -
Workflows
1 -
XML Rules
1
- « Previous
- Next »
Related Content
- Picklist value repeating in Manage pending recruits in Human Capital Management Q&A
- Elevating Internal Transfers Transitions through SAP SuccessFactors Onboarding for Internal Hires in Human Capital Management Blogs by SAP
- FLSA Picklist in Recruiting in Human Capital Management Q&A
- Cascading picklist for Region of Birth in Human Capital Management Q&A
- Must Know New Features for EC in 1H 2023 in Human Capital Management Blogs by SAP
Top kudoed authors
| User | Count |
|---|---|
| 6 | |
| 6 | |
| 5 | |
| 3 | |
| 2 | |
| 2 | |
| 1 | |
| 1 | |
| 1 | |
| 1 |