My blogs to date have focused on using email and imagery to improve user communication and engagement. There is one persona that I don't want to forget; the LMS Administrator. While there are lots of areas in the LMS where we can improve our LMS Administrators experience, the one that really stands out to me, is the Admin home page.
In this blog, I'll review the steps you need to take to configure the Admin Intro Panel, and suggest a few ideas on how you can improve this page, and make it more useful.
First .. what is the Admin Home page (or Intro Panel)? Since the arrival of the new Admin UI (removal of the old Flash UI), we have had, by default, an image of a carousel, and some text welcoming the currently logged in admin. While the image of a carousel can certainly reflect the average day in the life of an LMS Admin, I would propose there is better use of this space!
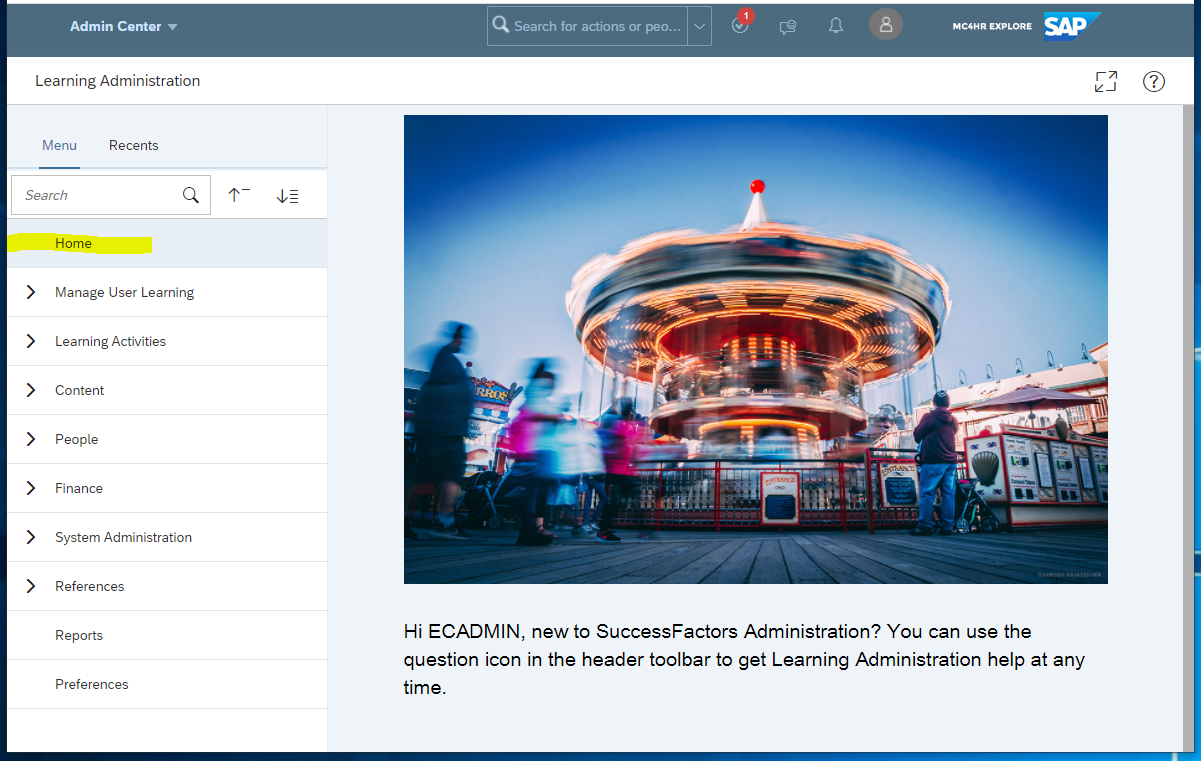
Default LMS Admin Home Page
Lets think about what it is you want to show here. What is most relevant to an LMS administrator that they would need in the course of their daily routine? Jobs Aides? Documentation? Video guides? Governance Policies? Once you'd decided what it is you want to show here, you'll start to get an idea how HOW you want to show it.
Like many areas in the LMS, you'll need to know a little HTML to get the best value out of this feature. For the purposes of this blog, I'll create a simple, HTML table (with some less-simple formatting) that contains links to materials that might be of interest to an LMS admin.
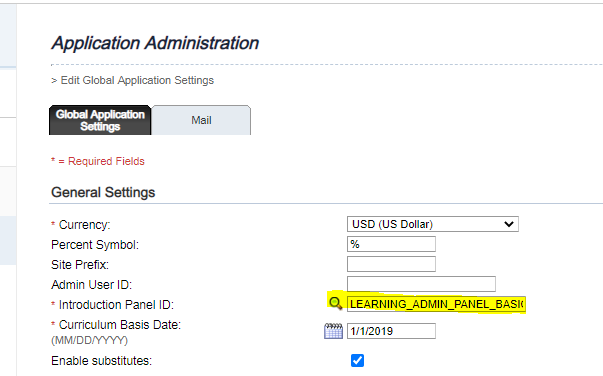
First, lets start by creating a new introduction panel. You'll find the default panels under:
System Administration >> Application Administration >> User Introductions
If you do a Search (with no filters/criteria), you'll see the complete list of Introduction panels (or "User Introductions") available. The one with the carousel is the "DEFAULT_LEARNING_ADMINISTRATION_INTRO".
This is more of an fyi, as the LMS does not allow you to edit the system default. That's ok - we're going to create a new one anyways - so go ahead and click "Add New".
The pop out window will prompt your (as many new LMS entities do) for an ID, Description, & Domain. The
Data textarea is where we'll put our HTML code. To get you started, you may use the code below.
<style>

.styled-table {

    border-collapse: collapse;

    margin: 25px 0;

    font-size: 0.9em;

    font-family: sans-serif;

    min-width: 400px;

	width:50%;

    box-shadow: 0 0 20px rgba(0, 0, 0, 0.15);

}

.styled-table thead tr {

    background-color: #009879;

    color: #ffffff;

    text-align: left;

}

.styled-table th,

.styled-table td {

    padding: 12px 15px;

}

.styled-table tbody tr {

    border-bottom: 1px solid #dddddd;

}


.styled-table tbody tr:nth-of-type(even) {

    background-color: #f3f3f3;

}

.styled-table tbody tr:nth-of-type(odd) {

    background-color: #ffffff;

}

.styled-table tbody tr:last-of-type {

    border-bottom: 2px solid #009879;

}


</style>


<table  class="styled-table" >

<thead>

<tr><th>Great Blog Resources</th><th>Link</th></tr>

<thead>

<tbody>

<tr>

<td>Dressing up your VCAL</td><td><a href="https://blogs.sap.com/2021/12/09/dressing-up-your-vcal-in-lms/" target="_blank">Click Here</a></td>

</tr>

<tr>

<td>Branding Emails Quickly and Easily</td><td><a href="https://blogs.sap.com/2022/01/18/branding-your-lms-email-notifications-quickly-easily/" target="_blank">Click Here</a></td>

</tr>

<tr>

<td>Using Images in LMS</td><td><a href="https://blogs.sap.com/2022/01/28/images-in-lms-emails/" target="_blank">Click Here</a></td>

</tr>

</tbody>

</table>
The top section contains all the code formatting (everything between <style> and </style>). The actual content a links is below in the <table> element. When you've pasted in your code, click Submit. (remember what you used for the ID value, as we'll need it in the next step).
Now that we've create a new Introduction Panel, lets go ahead and tell the LMS to use the new one, instead of the default. You'll find this configuration under:
System Administration >> Configuration >> Global Application Settings
Set New Default Panel
User the magnifying glass icon to search for, and select the Intro Panel we created in the last step. Then scroll to the bottom of the page, and click "Apply Changes"
Now that we've created a new panel, and told the LMS to use it, lets see what the new LMS Admin home page looks like. Click "Home" on the left hand menu system.

New LMS Admin Home Page
The next thing is that message at the bottom of the page. "
Hi [username], new to SuccessFactors Administration ... ". Technically speaking, we can't get rid of it. Like all other labels in the LMS, its placement is fixed. If you have a good use case for putting text under the intro panel, then the label ID you can edit is:
label.ADMIN_HOME.WelcomeMessage
I didn't want it at all, so I "removed" it by adding in white space in place of any text. You can do this put setting the labels value to
in each of the locales you have configured in your instance.
Multi-Language Support
If you want to add labels elsewhere, you can do so by creating custom labels, and using the following syntax:
<I18nLabel key="instruction.u.AdminIntro"/>
(where "instruction.u.AdminIntro" is the ID of the custom label you've created).
Getting Some Inspiration
This blog covers the basic of how-to change the content, but there really so so much else you can do. As I mentioned early on, this feature in the LMS relies on know HTML (and possibly even some CSS). The more advanced your skills in those areas, the more options your have in how you display your content.
If you have a lots of content for example, you may want to consider using "Tabs" to section off varying topics.

Inspiration Piece #1

Inspiration Piece #2
In this blog, we reviewed the steps required to create a new Admin Intro Panel, provided sample code to get you started, and showed you where to set it as the default. Finally, I provided a couple inspiration pieces that use very advanced HTML & CSS that I hope motivate you to improve your administrators experience.
Comment below and share what you are doing on your LMS Admin home page!
