Decommissioning of Basic Authentication by Microsoft called for a need to transition to Modern Authentication for Outlook integration with interview scheduling.
Interview scheduling is enhanced to support OAuth for Outlook 365 or Exchange Online. Online Exchange Customers not migrating to OAuth after June 2021 may result in Interview Scheduling and Outlook integration to break and result in loss of connection with the Outlook. For the integration to continue to work, SuccessFactors Administrator should be able to configure OAuth configuration details in Admin Center >> Setup Interview Scheduling Outlook Integration. The Admin User should have RBP permission for the accessing the Setup Interview Scheduling Outlook Integration page who provides all configuration details pertaining to Exchange Online.
Let’s go through the technical details for Interview Scheduling Outlook Integration Using Modern Authentication.
Overview of Registering an Application on the Azure Portal
Registering an application for your Service Account in Microsoft Azure portal and noting down the Application (client) ID, Client Secret, and Directory (tenant) ID. For more information, refer to the
Microsoft Documentation.
Azure Active Directory (Azure AD) manages the connectivity of Office 365 with Interview Scheduling and Exchange Online. To set up this integration, you must register an application with Azure AD and use the information generated in Azure AD to configure ISOI. While you register your application, make sure you note down the following information generated in Azure AD:
- Application (client) ID
- Directory (tenant) ID
- Client secret value
- Email Id of the service Account
As a pre-requisite, you must have created a tenant account on the Azure portal. A tenant is a dedicated instance of Azure AD representing your organization.
Let’s go through the tasks to register an application on the Azure portal. For detailed information about the steps to register an application on the Azure portal, you can refer to
Microsoft documentation.
- Sign-In to the Azure portal using your tenant account and go to Azure Active Directory.
- Complete the steps to register an application associated with your account in the Overview
- Provide a name for your application. [Here, sample reference is given as – InterviewSchedulingIntegration]
- Specify the account (tenant) type as single tenant. [Currently, ISOI doesn’t support Multitenant type]
- Register the application.
Azure AD assigns a unique Application (client) ID to your application. The Service Principal is created after your application is registered.

App Registration - Azure Portal
- Copy the Application (client) ID and Directory (tenant) ID for future use.
The Application (client) ID and the Directory (tenant) ID are required when you perform the steps in
Admin Center to integrate Interview Scheduling with Outlook 365.
- Generate a client secret that is valid for an expiry duration of your choice and copy the client secret value for future use.
Outlook 365 uses the client secret to prove its identity when requesting a token from the Microsoft identity platform.
- You can't retrieve the client secret after you leave the client secrets page on the Azure portal.
This value is required when you perform the steps in
Admin Center to integrate Interview Scheduling with Outlook 365.
- New Client secrets can be created from can be created from ‘Certificates & Secrets’ section.
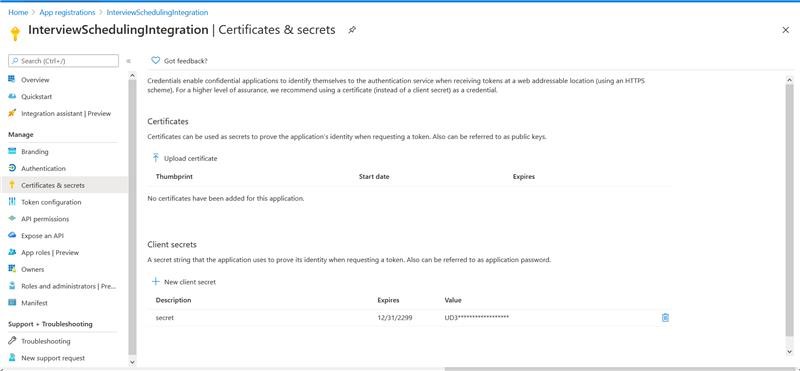
Certificates - Secrets
- Configure API permissions by navigating to ‘API permissions’ section to allow ISOI to access the required Graph APIs.
Ensure that you choose
Application permissions as the permission type, and then choose the following API permissions:
Delegated permissions
Calendars: Calendars.Read.Shared and Calendars.ReadWrite.Shared
Application permissions
Calendars: Calendars.Read and Calendars.ReadWrite
Mail: Mail.Send
With these permissions, you can attach files up to 3 MB to the meeting invites.
Grant admin consent for the Service Principal to access calendars and mails.

Grant Permissions

API Permissions
Once you have all the required details from the Azure Portal: You can login to the SF system and provide these details in the Admin Center >> Setup Interview Scheduling Outlook Integration.
Clicking on Verify button in the settings page will verify these details and integration will be set-up. Enable this integration to start using Modern Authentication with Interview Scheduling.
Conclusion:
This is the way that you provide appropriate permissions for the Outlook APIs in the Azure portal by creating your application and in-turn using those credentials for the setup page in the Interview Scheduling Outlook Integration to enable this integration.
More details n the topic can be referenced here . You can also ask questions and look for related answers in this section.
Disclaimer: (All images used in this blog are taken from Microsoft Azure portal and the information used in the images are just for representation purpose )
